Notes to self, 2015
2015-12-09 - thai hot pot / recipe
For hot pot, you don't need a recipe. You just chuck interesting vegetables and meat into a pot of hot stock, and grab them when ready with your chopsticks.
But, at OSSO B.V. it's become somewhat of a Christmas dinner tradition. And each year we forget what we put in it. Here the quick rundown, so we don't have to dig in our brains as much.
Consumers

Alex+1, Harm, Herman+1.1, Jelle, Jordi+1, Ronald+1, Ruben+1, Walter+1, Yorian (=15)
Hardware
- Electric hot plates (3 or 4, @osso, @walter)
- Rice cooker (@herman)
- Hot pot pans (with divider, again 3 or 4, @herman)
- Chopsticks, small strainers (@osso)
- Knives, cutting boards (@everyone)
- Plates and bowls (@everyone)
- Strainers (@everyone)
Input
- Meats
slice into small pieces, cover with egg- Rump steak (1.5kg, "kogelbiefstuk", @butcher)
- Pork Tenderloin (1.5kg, "varkenshaas", @butcher)
- Lamb rib chops (?)
- Tiger prawns (1kg, peeled, @toko)
- Lamb rolls (400g, @toko)
- Veggies
slice into smaller pieces; ordered by quantity, descending; 3kg should suffice; a medium sized cauliflower head weighs about 600g- Broccoli or romanescu (or cauliflower)
- Sugar snaps or snow pea and/or similar ("peultjes")
- Enoki (or similar thin mushrooms, @toko)
- Bok choy or baby bok choy
- Mini mais (@toko)
- Spring onions
- Bean sprout (not too much, "taugé")
- Essentials
- Rice (500g, @toko)
- Tofu (500+g, @toko)
- Noodles (500g, medium-sized (Udon?), @toko)
- Light soy sauce (quarter bottle, @toko)
- Fish sauce (a few tablespoons, @toko)
- Egg, to cover the land-meat
- Chicken broth (spoon or so per pan)
- Green chili sauce (@homemade, see below)
- Herbs/roots
- Chili peppers (@toko)
- Lemon grass (10 or more stalks, @toko)
- Cilantro/Coriander (plenty!, @toko)
- Thai basil (@toko)
- Ginger (@toko)
- Garlic
- Kafir lime leaves (@freezer, since previous hot pot)
- Green chili sauce

 mix the following ingredients to create 600ml green sauce;
all quantities are after peeling/removing stalks
mix the following ingredients to create 600ml green sauce;
all quantities are after peeling/removing stalks
- 300g Thai papaya or boiled potato or a combination of both
- 75g green rawit (hot birds eye chili)
- 50g garlic
- 150ml vinegar
- 50ml light soy sauce
- 40ml sugar
- 3ml salt
- 50g red lombok (less hot, put in last and mix shortly, to get small red pieces instead of a brown sauce)
2015-11-21 - asterisk / editline / key bindings
Getting the Asterisk PBX CLI to work more like you're used to from the (readline) bash shell can, be a time-saver.
For example, you may want reverse-i-search (^R),
backward word deletion (^W) and
word skipping (^<arrow-left> and ^<arrow-right>).
It can be done, but you must configure the editline library
in a similar manner as you would configure .inputrc.
Support for the .editrc configuration file was added in May 2011
(git commit d508a921).
The commit message mentions it: you need to explicitly set the EDITRC
environment variable to the full path of your
editrc file.
Thus, place the following in /etc/editrc:
#REM:# Resist the urge to put blanks in this file!
#REM:# Double-quotes do matter for baskslash escapes.
#REM:#
#REM:# Backward-i-search: vi-search-prev behaves better than
#REM:# ed-search-prev-history and em-inc-search-prev. At least for
#REM:# someone who is used to the readline/bash ^R.
asterisk:bind "^R" vi-search-prev
#REM:#
#REM:# ^W, same as ALT-BS.
asterisk:bind "^W" ed-delete-prev-word
#REM:#
#REM:# ^left/^right to skip words.
asterisk:bind "\e[1;5D" vi-prev-word
asterisk:bind "\e[1;5C" vi-next-word
And add export EDITRC=/etc/editrc to /etc/bash.bashrc
or to your personal .bashrc.
Update 2015-12-03
If you remove the asterisk: prefixes from the above file,
it works perfectly for the standard MySQL client as well. That one
doesn't need you to set the EDITRC envvar, but reads
~/.editrc by default.
2015-11-12 - encfs / recursion into itself
We wanted to use EncFS to be able to store encrypted backups.
The requirements for that are:
- The backup server initiates the backup. That's where we configure which hours are safe (resource wise) and which files need backing up (etc, home, root, srv, ...). And it means the backup server can safely be placed behind a gateway disallowing all incoming connections.
- The backup server cannot know the passwords of files. This means that the file providing server will have to do the encrypting.
As I wrote earlier EncFS
is willing to encrypt files on the fly. So, with a bit of sshd_config
chroot hackery, and a --reverse encrypted mount of / onto
/.encbackup/data we have an rsync entrypoint to get daily backups. The
backup server only ever has access to encrypted files, so privacy is guaranteed.
Just one problem!
/.encbackup/data now contains encrypted versions of /etc,
/home and so on...
... but also of /.encbackup and it's subdirectories!
And you guessed what's in there; that's right, an infinitely
recursing loop of /.encbackup/data/.encbackup/data/.encbackup/data...
which will cause any find /, ncdu / or locate updatedb
to break. (Actually, it's worse, because file accesses would hang, crippling the
mount point completely.)
EncFS could be patched rather quickly and for our Debian/Wheezy machines (and others who use 1.7.4), we got upstream_pull125-inf_recursion_check.patch (view) with this changelog:
encfs (1.7.4-2.4.osso0) unstable; urgency=low

  * Added upstream_pull125-inf_recursion_check.patch to fix infinite recursion.

 -- Walter Doekes <wjdoekes[AT]osso.nl>  Thu, 12 Nov 2015 14:11:23 +0100
The lazy can get the deb-archive here: encfs_1.7.4-2.4.osso0_amd64.deb
md5sum of encfs_1.7.4-2.4.osso0_amd64.deb:
  e02f423f3611b22f132b1b9a450d7042943d1a06
sha256sum of encfs_1.7.4-2.4.osso0_amd64.deb:
  c5923498f69d5cd6520ec81df29d46cea754edd2f10fea049af7588cb3ce7916
tthsum of encfs_1.7.4-2.4.osso0_amd64.deb:
  TGTKIRSQAW6Q2PYX2GE2HCBCKYROF6CXB6OZGXI
2015-11-10 - encfs / configure / libboost
I ran into an obscure Could not link against !
error when configuring EncFS:
~/src$ apt-get source encfs
...
~/src$ cd encfs-1.7.4/
~/src/encfs-1.7.4$ ./configure
...
configure: WARNING: BOOST_CPPFLAGS -I/usr/include
checking whether the Boost::Serialization library is available... yes
configure: error: Could not link against  !
That's odd. And not immediately obvious how to fix.
For starters we need all the dependencies that Debian defines:
~/src/encfs-1.7.4$ sed -e '/^Build-Depends: /!d;s/^[^:]*: //;s/([^)]*)//g;s/,//g' \
    debian/control
debhelper  librlog-dev librlog5 libfuse-dev  libssl-dev  pkg-config
libboost-serialization-dev libboost-filesystem-dev quilt dh-autoreconf

~/src/encfs-1.7.4$ sudo apt-get install `sed -e
    '/^Build-Depends: /!d;s/^[^:]*: //;s/([^)]*)//g;s/,//g' debian/control`
...
And then we need to supply the libboost directory explicitly:
~/src/encfs-1.7.4$ ./configure --with-boost-libdir=/usr/lib/x86_64-linux-gnu
...
configure: WARNING: BOOST_CPPFLAGS -I/usr/include
checking whether the Boost::Serialization library is available... yes
checking for exit in -lboost_serialization... yes
checking whether the Boost::Filesystem library is available... yes
...
Profit!
2015-10-05 - scapy / dns server / snippet
A few days ago, the Scapy project was brought to my attention.
Scapy is an internet packet manipulation library for Python2. It can be used to sniff and decode packets, or to generate your own custom packets.
In the most basic form, it runs on raw sockets, sniffing and decoding traffic
like tcpdump. See the sniff() examples and the
send(IP(dst="1.2.3.4") / ICMP()) example for sending a simple
packet.
But just as easily, it works on regular datagram sockets — those that you
don't need CAP_NET_RAW powers for. Like in the following example.
This example snippet demonstrates how Scapy takes the hassle out of parsing
and creating DNS requests and responses. It accepts DNS requests on port 1053,
in the form <NAME>.<IPV4>.example.com., returning
<IPV4> as an A record.
This example provides a similar feature as the nip.io (or xip.io) service: a wildcard DNS for any IPv4 address. Useful when serving development sites on internal IP addresses.
# Use scapy2.3.1+ from pip (secdev original) or for Python3 use the
# https://github.com/phaethon/scapy Scapy3K version.
#
# Example DNS server that resolves NAME.IPV4.example.com A record
# requests to an A:IPV4 response.
#
# $ dig test.12.34.56.78.example.com -p 1053 @127.0.0.1 +short
# 12.34.56.78

from scapy.all import DNS, DNSQR, DNSRR, dnsqtypes
from socket import AF_INET, SOCK_DGRAM, socket
from traceback import print_exc

sock = socket(AF_INET, SOCK_DGRAM)
sock.bind(('0.0.0.0', 1053))

while True:
    request, addr = sock.recvfrom(4096)

    try:
        dns = DNS(request)
        assert dns.opcode == 0, dns.opcode  # QUERY
        assert dnsqtypes[dns[DNSQR].qtype] == 'A', dns[DNSQR].qtype
        query = dns[DNSQR].qname.decode('ascii')  # test.1.2.3.4.example.com.
        head, domain, tld, tail = query.rsplit('.', 3)
        assert domain == 'example' and tld == 'com' and tail == ''
        head = head.split('.', 1)[-1]  # drop leading "prefix." part

        response = DNS(
            id=dns.id, ancount=1, qr=1,
            an=DNSRR(rrname=str(query), type='A', rdata=str(head), ttl=1234))
        print(repr(response))
        sock.sendto(bytes(response), addr)

    except Exception as e:
        print('')
        print_exc()
        print('garbage from {!r}? data {!r}'.format(addr, request))
As you can see, all the protocol stuff is nicely tucked away in pre-existing structures, so you get nice and readable Python. Thanks, Scapy!
2015-09-15 - flake8 / vim / python2 / python3
To syntax check Python code before executing, I use flake8. And when coding in the Vim editor, I use the vim-flake8 plugin that allows me to hit <F7> to quickly check for errors in the file I'm currently working in.
But, there are currently two common flavors of Python: python2
and python3.
And therefore flake8 comes in two flavors as well —
you guessed it — a python2 and a python3 flavor.
Unfortunately they are named the same on install: flake8
To fix this, I installed them twice, and then patched vim-flake8 to select the right one, based on the Function key (either F7 or F8).
$ sudo pip install flake8
$ sudo mv /usr/local/bin/flake8{,.2}
$ sudo pip3 install flake8
$ sudo mv /usr/local/bin/flake8{,.3}
I now have two flake8 executables, appropriately named flake8.2
and flake8.3.
Patching the flake8 Vim plugin is then easy as py (hehe):
--- .vim/ftplugin/python/flake8.vim.orig  2015-09-15 10:04:34.680245861 +0200
+++ .vim/ftplugin/python/flake8.vim 2015-09-15 10:10:48.395762116 +0200
@@ -12,11 +12,11 @@ endif
 let b:loaded_flake8_ftplugin=1

 if !exists("*Flake8()")
-    function Flake8()
+    function Flake8(flake8_cmd)
         if exists("g:flake8_cmd")
             let s:flake8_cmd=g:flake8_cmd
         else
-            let s:flake8_cmd="flake8"
+            let s:flake8_cmd=a:flake8_cmd
         endif

         if !executable(s:flake8_cmd)
@@ -97,6 +97,7 @@ endif
 " remapped it already (or a mapping exists already for <F7>)
 if !exists("no_plugin_maps") && !exists("no_flake8_maps")
     if !hasmapto('Flake8(')
-        noremap <buffer> <F7> :call Flake8()<CR>
+        noremap <buffer> <F7> :call Flake8("flake8.2")<CR>
+        noremap <buffer> <F8> :call Flake8("flake8.3")<CR>
     endif
 endif
If you're in Python2 code, hit <F7>. Are you coding Python3? Hit <F8>.
2015-09-01 - python / subprocess / winch
While I was writing a Python tool to wrap C Gdb so I could fetch some info out of it automatically, I ran into the issue that it reads the terminal size (lines x columns) to adjust its output.
I wanted consistent machine readable output, so I enlarged the terminal size programmatically: now row based output would not get wrapped by Gdb.
Later I noticed that it would cease to use the terminal size —
in fact, use the default 80 columns — if I also redirected stderr
to a non-tty. That left me with the terminal resize code which could
be dropped again.
Here, for my own reference, Python terminal resize code. This simple python snippet starts an application of your choice from a 80x25 window.
import array, fcntl, termios, subprocess, sys

class WinchPopen(subprocess.Popen):
    def __init__(self, lines, columns, *args, **kwargs):
        self._winch_push(lines, columns)
        super(WinchPopen, self).__init__(*args, **kwargs)

    def wait(self):
        super(WinchPopen, self).wait()
        self._winch_pop()

    def _winch_push(self, lines, columns):
        fileno = sys.stdout.fileno()
        # Store window size.
        self.__stored_winsize = array.array('h', [0, 0, 0, 0])
        fcntl.ioctl(fileno, termios.TIOCGWINSZ, self.__stored_winsize, True)
        # Mangle window size.
        buf = array.array('h', [lines, columns, 0, 0])  # struct winsize
        for fileno in (sys.stdin.fileno(), sys.stdout.fileno(),
                       sys.stderr.fileno()):
            fcntl.ioctl(fileno, termios.TIOCSWINSZ, buf)

    def _winch_pop(self):
        for fileno in (sys.stdin.fileno(), sys.stdout.fileno(),
                       sys.stderr.fileno()):
            fcntl.ioctl(fileno, termios.TIOCSWINSZ,
                        self.__stored_winsize)

if __name__ == '__main__':
    proc = WinchPopen(columns=80, lines=25, args=sys.argv[1:])
    proc.wait()  # don't forget to call this!
Example calls:
$ ls /dev
autofs           cuse      hidraw0  loop3         network_latency     ram1   ram6    sda5      sr0     tty14  tty24  tty34  tty44  tty54  tty7       ttyS15  ttyS25  ttyS7      vcs4   vcsa7
block            disk      hidraw1  loop4         network_throughput  ram10  ram7    sdb       stderr  tty15  tty25  tty35  tty45  tty55  tty8       ttyS16  ttyS26  ttyS8      vcs5   vga_arbiter
bsg              dm-0      hidraw2  loop5         null                ram11  ram8    sdb1      stdin   tty16  tty26  tty36  tty46  tty56  tty9       ttyS17  ttyS27  ttyS9      vcs6   vhci
...
$ python smallwindow.py ls /dev
autofs     loop6             rtc       tty22  tty55  ttyS29
block      loop7             rtc0      tty23  tty56  ttyS3
bsg        loop-control      sda       tty24  tty57  ttyS30
...
$ python smallwindow.py vim 80x25.txt
...
2015-08-18 - debian / packaging asterisk 13
As of this writing, Debian testing (stretch) contains Asterisk version 13.1.0.
The Debian source as GIT repository is here:
https://anonscm.debian.org/git/pkg-voip/asterisk.git
(browse)
Packaging a newer version is not that hard, if we start out with the debian/
directory kindly supplied by the Debian maintainers.
Hints to get things running:
Use a local git repository
By using a local git repository in your unpacked Asterisk dir, you can quickly restart from scratch any time you mess anything up.
$ tar zxf asterisk-13.5.0.tar.gz
$ cd asterisk-13.5.0
$ git init; git add -A; git commit -m 'clean version'
Instead of manually cleaning up the build dir with make clean
and quilt pop -a, you use git to reset everything
efficiently.
$ git reset; git checkout .; git clean -xf
$ rm -rf addons/mp3/ autom4te.cache/ .pc
$ touch configure  # fix timestamp
Update changelog and rename orig tar
Move the (separately versioned) debian directory into the unpacked source directory. Then edit the changelog, using your own versioning scheme.
--- a/debian/changelog
+++ b/debian/changelog
@@ -1,3 +1,9 @@
+asterisk (1:13.5.0-test1) wheezy; urgency=medium
+
+  * Test.
+
+ -- Walter Doekes <wjdoekes@example.com>  Tue, 18 Aug 2015 12:32:52 +0200
+
 asterisk (1:13.1.1~dfsg-1) UNRELEASED; urgency=medium

   * New upstream bugfix release: fixes AST-2015-001 and AST-2015-002.
Rename the original tarball, like this:
$ mv asterisk-13.5.0.tar.gz asterisk_13.5.0.orig.tar.gz
Now the package should build
$ cd asterisk-13.5.0
$ dpkg-buildpackage -us -uc -sa
Restart when convenient
But we can do better, for starters by altering the prerm
and postinst scripts so Asterisk doesn't forcefully restart
after an upgrade. It's kinder to have it restart when convenient.
Add --noscript to dh_installinit so it doesn't
auto-generate the service asterisk stop code:
--- a/debian/rules
+++ b/debian/rules
@@ -173,6 +173,9 @@ override_dh_fixperms:
 override_dh_strip:
        dh_strip -a --dbg-package=asterisk-dbg

+override_dh_installinit:
+       dh_installinit --noscripts
+
 print-version:
        @@echo "Debian version:          $(DEBVERSION)"
        @@echo "Upstream version:        $(UPVERSION)"
Manually put the altered "restart" code into the supplied scripts:
--- a/debian/asterisk.prerm
+++ b/debian/asterisk.prerm
@@ -5,4 +5,15 @@ set -e
 rmdir /usr/local/share/asterisk/sounds 2>/dev/null || true
 rmdir /usr/local/share/asterisk        2>/dev/null || true

+# The following bit is placed here manually instead of through the
+# <hash>DEBHELPER<hash> replacement.
+# # if [ -x "/etc/init.d/asterisk" ]; then
+# #     invoke-rc.d asterisk stop || exit $?
+# # fi
+# Only for "prerm remove" do we stop asterisk. In all other cases we
+# wait for the postinst of the new version to "restart when convenient".
+if [ "$1" = "remove" -a -z "$2" ]; then
+    invoke-rc.d asterisk stop || exit $?
+fi
+
 #DEBHELPER#
diff --git a/debian/asterisk.postinst b/debian/asterisk.postinst
index a2a6dc0..06fd4a0 100644
--- a/debian/asterisk.postinst
+++ b/debian/asterisk.postinst
@@ -101,6 +101,21 @@ case "$1" in
     ;;
 esac

+# Since we use a dh_installinit --noscripts in rules, the following is
+# added here manually.
+# (The <hash>DEBHELPER<hash> comment below will get replaced by void.)
+if [ -x "/etc/init.d/asterisk" ]; then
+    update-rc.d asterisk defaults >/dev/null
+    # Regular DEBHELPER code would do this:
+    #invoke-rc.d asterisk start || exit $?
+    # We do this:
+    if ! invoke-rc.d asterisk status >/dev/null 2>&1; then
+        invoke-rc.d asterisk start || exit $?
+    else
+        invoke-rc.d asterisk restart-convenient
+    fi
+fi
+
 # dh_installdeb will replace this with shell code automatically
 # generated by other debhelper scripts.

--- a/debian/asterisk.postrm
+++ b/debian/asterisk.postrm
@@ -8,4 +8,10 @@ if [ "$1" = purge ]; then

 fi

+# The following bit is placed here manually instead of through the
+# <hash>DEBHELPER<hash> replacement.
+if [ "$1" = "purge" ] ; then
+    update-rc.d asterisk remove >/dev/null
+fi
+
 #DEBHELPER#
Speeding up the build
Who settles for single-process builds when we can have more cores at work?
--- a/debian/rules
+++ b/debian/rules
@@ -48,6 +48,13 @@ endif
 ifeq (,$(findstring nostrip,$(DEB_BUILD_OPTIONS)))
        INSTALL_PROGRAM += -s
 endif
+# You can now do this:
+# DEB_BUILD_OPTIONS=parallel=6 dpkg-buildpackage -us -uc
+# See: https://www.debian.org/doc/debian-policy/ch-source.html
+ifneq (,$(filter parallel=%,$(DEB_BUILD_OPTIONS)))
+       NUMJOBS = $(patsubst parallel=%,%,$(filter parallel=%,$(DEB_BUILD_OPTIONS)))
+       BUILDFLAGS += -j$(NUMJOBS)
+endif

 DEBVERSION:=$(shell dpkg-parsechangelog | sed -n -e 's/Version: //p')
 DEB_NOEPOCH_VERSION:=$(shell echo $(DEBVERSION) | cut -d':' -f 2)
Now you start the build like this:
$ DEB_BUILD_OPTIONS=parallel=6 dpkg-buildpackage -us -uc -sa
Fixing relocation errors
Perhaps you get this error:
/usr/bin/ld: app_voicemail_imapstorage.o: relocation R_X86_64_PC32
  against symbol `mm_log' can not be used when making a shared object;
  recompile with -fPIC
While I'm not entirely sure why, we can fix the problem by doing this:
--- a/debian/rules
+++ b/debian/rules
@@ -13,7 +13,7 @@
 %:
        dh "$@" --with autotools_dev,autoreconf,systemd

-export DEB_BUILD_MAINT_OPTIONS = hardening=+all
+export DEB_BUILD_MAINT_OPTIONS = hardening=+all,-pie
 DPKG_EXPORT_BUILDFLAGS = 1
 include /usr/share/dpkg/buildflags.mk
Updating the ABI hash
At this point, you should almost have a working build. Except for the updated ABI hash. Since we're not using external modules, we can simply update the hash whenever we like.
So, if you see this:
# Sanity check: don't break the ABI for modules:
Debian packaging problem: ABI checksum changed.
  Was: 32b00085fac294c16fcde5db8ce7e676
  Now: fa819827cbff2ea35341af5458859233
You change this:
--- a/debian/rules
+++ b/debian/rules
@@ -18,7 +18,7 @@ DPKG_EXPORT_BUILDFLAGS = 1
 include /usr/share/dpkg/buildflags.mk

 # Sanity check for a stable release:
-SAVED_ABI_HASH = 32b00085fac294c16fcde5db8ce7e676
+SAVED_ABI_HASH = fa819827cbff2ea35341af5458859233

 export DEB_HOST_GNU_TYPE  ?= $(shell dpkg-architecture -qDEB_HOST_GNU_TYPE)
 export DEB_BUILD_GNU_TYPE ?= $(shell dpkg-architecture -qDEB_BUILD_GNU_TYPE)
Update 2015-10-27
The hash calculation was changed in Asterisk 11.18 and 13.4 with the fixes from ASTERISK-25028.
The default hash is now simply:
$ echo LOADABLE_MODULES | md5sum
f450f61f60e761b3aa089ebed76ca8a5  -
Optionally disable systemd
Perhaps your system has no systemd. In that case you need to remove a few more items.
--- a/debian/control
+++ b/debian/control
@@ -4,7 +4,6 @@ Section: comm
 Maintainer: Debian VoIP Team <pkg-voip-maintainers@lists.alioth.debian.org>
 Uploaders: Mark Purcell <msp@debian.org>, Tzafrir Cohen <tzafrir@debian.org>, Jeremy Lainé <jeremy.laine@m4x.org>, Daniel Pocock <daniel@pocock.com.au>
 Build-Depends: debhelper (>= 9),
- dh-systemd,
  dpkg-dev (>= 1.16.1.1),
  lsb-base (>= 3.2-14),
  libreadline-dev | libreadline5-dev,
--- a/debian/rules
+++ b/debian/rules
@@ -11,7 +11,7 @@
 #  The "all" option enables "PIE" and "BINDNOW" and future hardening flags

 %:
- dh "$@" --with autotools_dev,autoreconf,systemd
+ dh "$@" --with autotools_dev,autoreconf

 export DEB_BUILD_MAINT_OPTIONS = hardening=+all,-pie
 DPKG_EXPORT_BUILDFLAGS = 1

--- a/debian/patches/series
+++ b/debian/patches/series
@@ -21,5 +21,5 @@ astdatadir
 reenable
 smsq_enable.patch
 aelparse_enable.patch
-systemd.patch
+#systemd.patch
 #test_framework.patch
--- a/debian/asterisk.examples
+++ b/debian/asterisk.examples
@@ -1,4 +1,4 @@
 sample.call
 contrib/scripts/vmail.cgi
 debian/asterisk.startup.conf
-contrib/scripts/asterisk_cleanup
+#contrib/scripts/asterisk_cleanup
--- a/debian/asterisk.install
+++ b/debian/asterisk.install
@@ -4,4 +4,4 @@ usr/share/asterisk/firmware
 usr/share/asterisk/keys
 usr/share/asterisk/conf
 usr/share/asterisk/documentation
-lib/systemd/system/asterisk.service
+#lib/systemd/system/asterisk.service
Done
If all went well, your parent directory now contains these:
asterisk-13.5.0/                       asterisk-doc_13.5.0-test1_all.deb
asterisk_13.5.0.orig.tar.gz            asterisk-mobile_13.5.0-test1_amd64.deb
asterisk_13.5.0-test1_amd64.changes    asterisk-modules_13.5.0-test1_amd64.deb
asterisk_13.5.0-test1_amd64.deb        asterisk-mp3_13.5.0-test1_amd64.deb
asterisk_13.5.0-test1.debian.tar.gz    asterisk-mysql_13.5.0-test1_amd64.deb
asterisk_13.5.0-test1.dsc              asterisk-ooh323_13.5.0-test1_amd64.deb
asterisk-config_13.5.0-test1_all.deb   asterisk-voicemail_13.5.0-test1_amd64.deb
asterisk-dahdi_13.5.0-test1_amd64.deb  asterisk-voicemail-imapstorage_13.5.0-test1_amd64.deb
asterisk-dbg_13.5.0-test1_amd64.deb    asterisk-voicemail-odbcstorage_13.5.0-test1_amd64.deb
asterisk-dev_13.5.0-test1_all.deb      asterisk-vpb_13.5.0-test1_amd64.deb
Enjoy!
2015-06-24 - on-the-fly encrypted backups
I was wondering how easy it was to encrypt files before rsyncing them away to the backup machine.
A quick search turned up the suggestion to use encfs by the user Thor on ServerFault.
That looks like a decent solution. Let's figure out if it meets our needs.
The idea is that we do this:
# mount read-only encrypted virtual copy of unencrypted local data:
encfs --reverse -o ro ~/data/ ~/.tmp_encrypted_data/

# at this point, you can rsync your data to the backup location.

# unmount like this:
fusermount -u ~/.tmp_encrypted_data/
So, what does that look like? I tested it on my Documents directory, and it looks like this:
$ mkdir ~/Documents-enc
$ encfs --reverse -o ro ~/Documents ~/Documents-enc
Creating new encrypted volume.
Please choose from one of the following options:
 enter "x" for expert configuration mode,
 enter "p" for pre-configured paranoia mode,
 anything else, or an empty line will select standard mode.
For now, I went with standard, which produced a Documents/.encfs6.xml
file with these parameters:
    <name>ssl/aes</name>
...
  <keySize>192</keySize>
  <blockSize>1024</blockSize>
At this point, you have two directories, one if which has read-only encrypted files:
$ du -sh Documents Documents-enc
319M  Documents
319M  Documents-enc

$ ls -ltr Documents | head -n4; ls -ltr Documents-enc | head -n4
total 192140
-rw-r--r-- 1 me me 1608 mrt 15  2010 customer_dev.oo.db.odb
-rw-r--r-- 1 me me 7810 mrt 15  2010 foo.ods
-rw-r--r-- 1 me me 8390 mrt 16  2010 salesliters.france.ods
total 192148
-rw-r--r-- 1 me me 1608 mrt 15  2010 R7YZkAKRlOLVJYK1YnzVm6rpZW6glWIJvDpBjb4uLVjFh,
-rw-r--r-- 1 me me 7810 mrt 15  2010 gCalD6peJm8GllS-PtaWvN14
-rw-r--r-- 1 me me 8390 mrt 16  2010 OIBZny,CQlxoHX7ZdhyZEvTB68c6cJ7tvPSkgUtHdDDyg1
File sizes (*), file ownership and time stamps are unaltered. File names and file contents are encrypted.
(*) The fact that the file sizes are identical, means there is no per-file initialization
vector, despite that the 1.7.4-2.4ubuntu2 manual says that they are enabled
by default. The uniqueIV option is not available for --reverse
mounted filesystems, because of the nature of the filesystem: it has no place
to store the randomly chosen IV; and you don't want it constantly changing.
The block based cipher keeps changes inside a block. I edited one of the first and one of the last bytes in a file, and got this:
$ cmp  Documents-enc/qbEp9gilGP8PbjxNYZh6YhjdfebfTuxqM3cBDg0Fw0,6I- Telecommwet1.txt  -bl
   465 141 a    170 x
   466  16 ^N   344 M-d
   467 320 M-P  135 ]
...
  1022 326 M-V  370 M-x
  1023 122 R    220 M-^P
  1024 366 M-v  370 M-x
430529 141 a    273 M-;
430530   0 ^@    60 0
430531 375 M-}  262 M-2
...
430606 260 M-0  270 M-8
430607  14 ^L   110 H
430608 271 M-9    6 ^F
That allows rsync and incremental backups to operate more efficiently
when files are only appended to or changed inline without inserting bytes.
(Depending on the common type of changes you make to files, you could add the
--whole-file parameter to rsync.)
Decrypting?
To decrypt the data again, you will need the configuration file. Make sure you have that backed up as well.
A quick command to decrypt a single file:
$ ENCFS6_CONFIG=/home/walter/Documents/.encfs6.xml encfsctl decode path/to/encrypted/file \
    qbEp9gilGP8PbjxNYZh6YhjdfebfTuxqM3cBDg0Fw0,6I-
EncFS Password:
original.rtf

$ ENCFS6_CONFIG=/home/walter/Documents/.encfs6.xml encfsctl cat path/to/encrypted/file \
    qbEp9gilGP8PbjxNYZh6YhjdfebfTuxqM3cBDg0Fw0,6I- > original.rtf
EncFS Password:

$ file original.rtf
original.rtf: Rich Text Format data, version 1, ANSI
But you will probably mount the entire filesystem instead — unless you chose to not encrypt the file names.
$ mkdir ~/Documents-enc-dec
$ echo my-password | ENCFS6_CONFIG=/home/walter/Documents/.encfs6.xml encfs \
    --stdinpass ~/Documents-enc ~/Documents-enc-dec

$ tthsum Documents{,-enc-dec}/salesliters.france.ods
ET73GNCTLCLTNURHZMK2AFY4BI7RN2SQQLWXR2Q  Documents/salesliters.france.ods
ET73GNCTLCLTNURHZMK2AFY4BI7RN2SQQLWXR2Q  Documents-enc-dec/salesliters.france.ods
What's next?
- Right now we backup customer files by initiating the rsync from the backup server.
We can still do that, but we need to:
- Pre-mount the directories we want to back up. The encfs mount tool
provides several useful options for this
(
--ondemand,--extpass). - Back up the ENCFS6_CONFIG config file itself. If you want it backed up on the backup host, encrypt it separately with PGP and place it next to the encrypted dirs. Securing the PGP keys and the filesystem password is your own responsibility.
- Limit access to the backup provider. You'll probably need to mount the
files as root since you want to back up sensitive files. The backup user
gets NOPASSWD sudo power to rsync:
backuppc ALL=NOPASSWD: /usr/bin/rsync --server --sender *
backuppc ALL=NOPASSWD: /usr/bin/ionice -c2 -n7 /usr/bin/rsync --server --sender *
Limiting access to the encrypted directories only should be done by a separate tool, such as AppArmor. Or you could push the backups to the backup host instead of having them polled. But that may not be an option. - I did not check whether encryption is always done, or just on-demand. If the latter is the case, we suffer no performance loss while we're not doing a backup run.
- Pre-mount the directories we want to back up. The encfs mount tool
provides several useful options for this
(
- If you prefer comfort over security, you can choose to use null-encryption on the file names. This may be a valid trade-off if your backup host is decently secure.
- The lack of a per-file IV means that it's not a secure as it could be. Again we have the security-usability trade-off.
Please do read the encfs manpage for more info. It's nice
and verbose.
Update 2015-11-10
If you need to generate new configurations with encrypted keys automatically, you can use the following script as a basis:
#!/bin/sh

echo -n "Password: "
read password

input=`mktemp -d`
output=`mktemp -d`

printf 'x\n1\n256\n4096\n2\n%s\n' "$password" |
    encfs --stdinpass --reverse "$input" "$output" >/dev/null
fusermount -u "$output"

key=`grep -A1 '<encodedKeyData>' "$input/.encfs6.xml" | tail -n1`
salt=`grep -A1 '<saltData>' "$input/.encfs6.xml" | tail -n1`
iters=`sed -ne 's/.*<kdfIterations>\([^<]*\)<.*/\1/p' "$input/.encfs6.xml"`

echo "key = $key"
echo "salt = $salt"
echo "iters = $iters"

rm -rf "$input" "$output"
2015-06-19 - downloading / organic sessions
Fetching the music from OrganicTheory.com, now with a single script:
#!/bin/sh
# vim: set ts=8 sw=4 sts=4 et ai:

produce() {
    grep -E '"setname"|/download/|"dj"' index.html | while read x; do
        dj=`echo "$x" | sed -e '/"dj"/!d;s/^.*dj">\([^<]*\)<.*/\1/;s/ /./g;s/\.\+/./g'`
        fn=`echo "$x" | sed -e '/"setname"/!d;s/^.*setname">\([^<]*\)<.*/\1/;s/ /./g;s/\.\+/./g'`
        if test -n "$dj"; then
            deejay=$dj
        elif test -n "$fn"; then
            filename=$fn
        else
            url=`echo "$x" | sed -e 's/^[^"]*"\([^"]*\)".*/\1/'`
            echo $url "$filename-$deejay.mp3"
        fi
    done
}

consume() {
    echo "$1: consuming" >&2
    while read x; do
        url=`echo "$x" | cut -d' ' -f1`
        filename=`echo "$x" | cut -d' ' -f2`
        wget -qO "$filename" "$url"
        echo "$1: downloaded $filename" >&2
    done
}

wget 'http://organictheory.com/' -O index.html

# Do 4 simultaneous downloads.
n=4
workers=""
for i in `seq 0 $((n-1))`; do
    produce | sed -e "$i~$n!d" | consume $i &
    workers="$workers $!"
done

wait $workers
Observe how we spawn 4 worker processes from (ba)sh, so we won't have to wait for the slowest download.
Output looks like this:
$ ./download.sh
0: consuming
1: consuming
2: consuming
3: consuming
3: downloaded Organic.Sessions.111-LuKess.mp3
0: downloaded Organic.Sessions.110-c0mrade.mp3
1: downloaded Organic.Sessions.113-Palindrome.mp3
...
Note that the odd behaviour of the wget -O flag causes
Organic Sessions 58 to be overwritten by os-058_jodywisternoff_2.
(Or the oher one, depending on which consumer runs first.)
$ md5sum os-058_jodywisternoff_* Organic.Sessions.58-Jody.Wisternoff.mp3
5215f9652950bb3bf3206e6b53817b4a  os-058_jodywisternoff_1
9d7648331dc0ece714b467f00a760c24  os-058_jodywisternoff_2
9d7648331dc0ece714b467f00a760c24  Organic.Sessions.58-Jody.Wisternoff.mp3
Some post-download action for cleanup:
$ rm Organic.Sessions.58-Jody.Wisternoff.mp3
$ wget 'http://organictheory.com/download/pure/os-058_jodywisternoff_1' \
    -O Organic.Sessions.58-1-Jody.Wisternoff.mp3
$ wget 'http://organictheory.com/download/pure/os-058_jodywisternoff_2' \
    -O Organic.Sessions.58-2-Jody.Wisternoff.mp3
$ for x in Organic.Sessions.[0-9][0-9]-*
    do mv "$x" `echo "$x" | sed -e 's/Organic.Sessions./Organic.Sessions.0/'`
  done
$ for x in Organic.Sessions.[0-9]-*
    do mv "$x" `echo "$x" | sed -e 's/Organic.Sessions./Organic.Sessions.00/'`
  done
$ for x in Organic.Grooves.[0-9]-*
    do mv "$x" `echo "$x" | sed -e 's/Organic.Grooves./Organic.Grooves.0/'`
  done
2015-04-23 - monitoring / process open files / limit
Here, an awesome shell one-liner to find which process uses the most files, relative to its max-open-files soft limit.
$ for x in /proc/[0-9]*
  do fds=0
     max=`awk '/^Max open files/ {print $4}' $x/limits 2>/dev/null` &&
       for t in $x/fd/*; do fds=$((fds+1)); done &&
       test "${max:-0}" -gt 0 && echo $((fds*100/max)) ${x##*/}
  done | sort -rn | while read l
  do pid=${l##* }; echo "$l `readlink /proc/$pid/exe`"; break; done
57 16674 /usr/lib/dovecot/imap-login
So, my imap-login (pid 16674) apparently uses 57% percent of its allowed max open files.
$ ls /proc/16674/fd | wc -l
19
$ cat /proc/16674/limits | grep ^Max\ open\ files
Max open files  33  33  files
On localhost, this isn't so useful. But it can be useful in a default server system monitoring (e.g. Zabbix) template: if any process nears the open files limit, you'll notice. This way you won't need to identify individual processes/daemons that may run out of file descriptors.
Explanation of peculiarities in the one-liner above:
awkstderr is discarded: short running processes may be gone before we can look at them; don't print an error;- the
for t in $x/fd/*is faster than firing upwc -w(this is better than usingbashand array counts, becausedashis faster on the whole); test "${max:-0}" -gt 0ensures the occasional 0 max-open-files result gets skipped;${x##*/}is faster than firing upbasename;while... breakat the bottom is faster than firing uphead -n1;- the
readlinkat the end is done only once, instead of in the loop.
Update 2016-01-05
Added the test "${max:-0}" -gt 0 check, because the max open files
values has been observed to be 0 in the wild, and even empty values for max...
(Zombie processes perhaps? Or intentional changes by the program itself?)
2015-03-11 - converting unprintable pdf / imagemagick
Okay, so we all know that printers are sent from hell, but we still need to use them from time to time.
Today, we were trying to print a PDF document with bar codes on it. Amazingly enough, the text on the PDF looked fine, but the bar codes (images) appeared as if they were wrapped at the wrong place.
Luckily, convert(1) from ImageMagick came to the rescue:
$ convert -density 300 -define pdf:fit-page=A4 input.pdf output.pdf

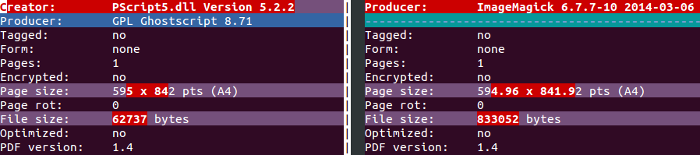
Although I still have no idea what the cause was, the result is something usable. Thanks, ImageMagick!
2015-03-04 - proxmox / resource usage
As I mentioned the other day, my VM was slow, so I needed a way to figure out which VM guests were causing the heavy load on our Proxmox platform.
I hacked up proxtop to enumerate the top resource users:
$ ./proxtop -t day proxmox.example.com monitor@pve
Password:<enter password>
SORTED BY: cpu, avg
...

SORTED BY: diskread, avg
------------------
#0:    3.1 MiB/s  pve10 (acme-bugs-bunny)
#1:    1.3 MiB/s  pve07 (customerX-private)
#2:  992.3 KiB/s  pve10 (acme-road-runner)
...

SORTED BY: diskwrite, avg
...
SORTED BY: netin, avg
...
SORTED BY: netout, avg
...
Like the example above shows, you get the top heaviest users for each of these resources: cpu, diskread, diskwrite, netin, netout.
Using the proxmoxer Python API worked intuitively; but see this:
- The proxmoxer
README shows this example to list all VMs.
for node in proxmox.nodes.get():
    for vm in proxmox.nodes(node['node']).openvz.get():
        print "{0}. {1} => {2}" .format(vm['vmid'], vm['name'], vm['status'])
That secondget()got me 0 VMs. I went with this:for vm in proxmox.cluster.resources.get(type='vm'): print "{0}. {1} => {2}" .format(vm['vmid'], vm['name'], vm['status']) - I had to filter out some records that were obviously invalid — large net reads/writes or large disk reads/writes — using a custom foreach that ignores insanely high values.
- VMs with only a single RRD data row tended to contain invalid values as well.
I hope it is useful to you too.
2015-03-02 - proxmox api / python module
So, my VM was slow, and I needed to know which VM guest was eating all the resources. These VM containers are all managed by Proxmox; which is great, but it doesn't show which VM guest is eating all the resources.
Luckily, Proxmox provides an API to get that info.
The docs pointed to two API modules for Python, my language of choice for these kinds of jobs: proxmoxer and pyproxmox. Others include Proxmoxia and pve2 (404 at the time of writing).
proxmoxer came out as the winner because:
- Pretty good PEP score
- Both HTTPS and SSH support (not needed in our case, but cleanly separated)
- Hosted on GitHub
- Travis build check (and friends)
The only thing that pyproxmox has going for it, is the convenience functions, but they limit functionality, making it kind of crippled instead.
# I don't see how I'm supposed to specify
# the timeframe with pyproxmox:
pyproxmox.getContainerRRDData(node, vmid)

# versus

proxmoxer.nodes(node).openvz(vmid).rrddata.get(timeframe='hour')

# See: http://pve.proxmox.com/pve2-api-doc/
# Path: /nodes/{node}/openvz/{vmid}/rrddata
Next time, an example script.
2015-02-27 - zabbix api / python module
Today, my choice of Python modules to Interface with Zabbix. They are all pretty similar, so that made it harder to choose.
Here the six modules, as mentioned on the Zabbix wiki are, in the order of my preference. Note that second and third came close, but I favor clean documented code and fewer dependencies. The last ones didn't get tested because of my Python3 requirement.
zabbix-client
# pip: zabbix-client
# pep: 99%
# last-update: Aug. 2014
# pros: header-docs
# cons: interface-for-login-is-different
from zabbix_client import ZabbixServerProxy
zapi = ZabbixServerProxy(url)
zapi.user.login(user=user, password=password)
rows = zapi.host.get(templateids=['10500'], output=['name', 'hostgroup'],
                     selectGroups=['name'])
pyzabbix
# pip: pyzabbix
# pep: 90%
# last-update: Oct. 2014
# pros: small, travis-build-check
# cons: depends-on-requests
from pyzabbix import ZabbixAPI
zapi = ZabbixAPI(url)
zapi.login(user=user, password=password)
rows = zapi.host.get(templateids=['10500'], output=['name', 'hostgroup'],
                     selectGroups=['name'])
zabbix-api-gescheit
# pip: zabbix-api
# pep: 75%
# last-update: Feb. 2015
# cons: interface-takes-dicts-instead-of-kwargs, bad-github-name
from zabbix_api import ZabbixAPI
zapi = ZabbixAPI(url)
zapi.login(user=user, password=password)
rows = zapi.host.get({'templateids': ['10500'], 'output': ['name', 'hostgroup'],
                      'selectGroups': ['name']})
zabbix-api-gnetsman
# pip: zabbix-api-gnetsman (except it wasn't found when I tried it)
# pros: unneeded-functionality
# cons: unneeded-functionality, depends-on-zabbix-api
py-zabbix
# pip: zabbix (previously: py-zabbix)
# pros: zabbix-sender-support
# cons: bad-indentation, no-py3
ZabbixPythonApi
# pip: ?
# cons: no-py3
2015-02-12 - asterisk / dialplan / variable expansion / security
Even after writing plenty of Asterisk PBX dialplan, I occasionally get bitten by the unintuitiveness of the parser.
A few rules to avoid mistakes, are:
- Always use double quotes on no side of the expression, or better yet, on both
if there is a chance that the value is empty:
$[${HANGUPCAUSE}=17]or
$["${value_which_may_be_empty}"="somevalue"] - Otherwise try to avoid double quotes (and semi-colons, and backslashes) whenever possible. If you need to escape them, it's too easy to get it wrong.
- Always strip double quotes from any user input. Always.
 ; imagine this variable comes from a valid SIP header
 same => n,Set(fromuser="!="InVaLiD"|")
 ; without this next line, you're screwed
 same => n,Set(fromuser=${FILTER(A-Za-z0-9_-,${fromuser})})
 ; if we did not filter, this comparison would look like this:
 ;   $[""!="InVaLiD"|""="secret"]
 same => n,Set(is_superuser=${IF($["${fromuser}"="secret"]?1:0)})
Today, I ran into this example, where — this time — the colon adds the magic. (Indented for clarity.)
 ;; drop optional <sip:...> -- changed between asterisk 10 and 11
 same => n,Set(
   tmp=${IF($["${SIPTRANSFER_REFERER:0:5}"="<sip:"]?
            ${SIPTRANSFER_REFERER:5:-1}:
            ${SIPTRANSFER_REFERER}
           )})
You'd be tempted to guess that it works as advertised, converting
<sip:123@domain:5060> to 123@domain:5060
and leaving the latter as-is, but you'd be wrong.
For the input without surrounding <sip:...>, it expands into this:
 ;; drop optional <sip:...> -- changed between asterisk 10 and 11
 same => n,Set(tmp=${IF($["123@d"="<sip:"]?omain:506:123@domain:5060)})
Notice the colons? If we indent that for clarity, it looks like this:
 ;; drop optional <sip:...> -- changed between asterisk 10 and 11
 same => n,Set(
   tmp=${IF($["123@d"="<sip:"]?
            omain:
            506:123@domain:5060
           )})
Drat, that came out wrong. tmp is now 506:123@domain:5060.
When changed to this, it works as intended:
 same => n,Set(tmp=${SIPTRANSFER_REFERER})
 ;; drop optional <sip:...> -- changed between asterisk 10 and 11
 same => n,ExecIf($["${tmp:0:5}"="<sip:"]?Set(tmp=${tmp:5:-1}))
2015-01-28 - gitlab / upgrade / ruby / bundle
While we do Python VirtualEnv stuff every day, we rarely do Ruby environments.
And after the Ubuntu dist-upgrade, the Ruby dependencies for our GitLab were broken — as was expected. This happens for Python pip installed packages as well. They're linked against older system libraries, which have been removed by the upgrade.
How to fix the Gitlab dependencies?
Browse through the upgrade docs
to find a bundle install command.
# cd /home/git/gitlab
# sudo -u git -H bundle install \
    --without development test postgres --deployment  # for MySQL
That did... absolutely nothing — again, as was expected.
We need some kind of force reinstall, like Python pip has;
-I, --ignore-installed.
Alas, bundle help install reveals no way to bypass
the “conservative updating”
Let's do it the crude way then:
# mv /home/git/gitlab/vendor/bundle{,.old}
# sudo -u git -H bundle install \
    --without development test postgres --deployment  # for MySQL
Good, lots of updates. Now things work again.
2015-01-10 - fail2ban / started / e-mail / disable
Tired of the Fail2ban start and stop e-mails?
Especially after a manual fail2ban restart, the [Fail2Ban] vsftpd: stopped on HOSTNAME and [Fail2Ban] vsftpd: started on HOSTNAME mail tuple is too spammy.
Quick fix to disable them:
Create a new file, named /etc/fail2ban/actions.d/sendmail-no-start-stop.local:
diff --git /etc/fail2ban/action.d/sendmail-no-start-stop.local /etc/fail2ban/action.d/sendmail-no-start-stop.local
new file mode 100644
index 0000000..cb7ecb9
--- /dev/null
+++ /etc/fail2ban/action.d/sendmail-no-start-stop.local
@@ -0,0 +1,3 @@
+[Definition]
+actionstart =
+actionstop =
And — you're using mta = sendmail right? —
add that include to all sendmail-*.conf:
diff --git /etc/fail2ban/action.d/sendmail-buffered.conf /etc/fail2ban/action.d/sendmail-buffered.conf
index 80eb20a..5782b3b 100644
--- /etc/fail2ban/action.d/sendmail-buffered.conf
+++ /etc/fail2ban/action.d/sendmail-buffered.conf
@@ -7,6 +7,7 @@
 [INCLUDES]

 before = sendmail-common.conf
+after = sendmail-no-start-stop.local

 [Definition]

diff --git /etc/fail2ban/action.d/sendmail-whois-lines.conf /etc/fail2ban/action.d/sendmail-whois-lines.conf
index 5a331e2..d8c7280 100644
--- /etc/fail2ban/action.d/sendmail-whois-lines.conf
+++ /etc/fail2ban/action.d/sendmail-whois-lines.conf
@@ -7,6 +7,7 @@
 [INCLUDES]

 before = sendmail-common.conf
+after = sendmail-no-start-stop.local

 [Definition]

diff --git /etc/fail2ban/action.d/sendmail-whois.conf /etc/fail2ban/action.d/sendmail-whois.conf
index a65f987..10c3392 100644
--- /etc/fail2ban/action.d/sendmail-whois.conf
+++ /etc/fail2ban/action.d/sendmail-whois.conf
@@ -7,6 +7,7 @@
 [INCLUDES]

 before = sendmail-common.conf
+after = sendmail-no-start-stop.local

 [Definition]

diff --git /etc/fail2ban/action.d/sendmail.conf /etc/fail2ban/action.d/sendmail.conf
index 70f3832..835ed99 100644
--- /etc/fail2ban/action.d/sendmail.conf
+++ /etc/fail2ban/action.d/sendmail.conf
@@ -7,6 +7,7 @@
 [INCLUDES]

 before = sendmail-common.conf
+after = sendmail-no-start-stop.local

 [Definition]
Unfortunately placing the empty actionstart and actionstop
in sendmail-common.local did not work as expected.
The after called from before = sendmail-common.conf
was still ran before the definitions we want to override.
So, we're stuck with the above minimal change to four files.
At least it's less intrusive than commenting out the
actionstart and actionstop in all of them.
Patch from /etc with -p2. Enjoy the silence in your inbox.
2015-01-09 - git / gnutls / handshake failed / nginx ciphers
When trying to keep up with all the TLS/SSL security changes,
you need to modify your nginx config every now and then.
The good TLS config may look like this:
# nginx.conf: http {
ssl_certificate     /etc/ssl/MY_DOMAIN.pem;
ssl_certificate_key /etc/ssl/MY_DOMAIN.key;

ssl_protocols       TLSv1 TLSv1.1 TLSv1.2;
ssl_ciphers         ECDHE-ECDSA-AES256-GCM-SHA384:ECDHE-RSA-AES256-GCM-SHA384:ECDHE-ECDSA-AES256-SHA384:ECDHE-RSA-AES256-SHA384:ECDHE-ECDSA-AES128-GCM-SHA256:ECDHE-RSA-AES128-GCM-SHA256:ECDHE-ECDSA-AES128-SHA256:ECDHE-RSA-AES128-SHA256:ECDHE-RSA-AES256-SHA;

ssl_session_cache   shared:SSL:5m;
ssl_session_timeout 5m;
ssl_prefer_server_ciphers on;

add_header Strict-Transport-Security "max-age=15768000; includeSubDomains";
And the above config is accompanied by a fairly good A grade from the Qualys SSL Labs Analyzer.
But, it turns out that a too strict config will cause failures with even recent versions of GnuTLS.
See this example:
$ git clone https://MY_GIT_SERVER/abc
Cloning into 'abc'...
fatal: unable to access 'https://MY_GIT_SERVER/abc/': gnutls_handshake() failed: Handshake failed
Okay, that was too strict apparently. Which versions?
$ lsb_release -a 2>/dev/null | grep ^Description
Description:  Ubuntu 14.04.1 LTS
$ dpkg -l git libgnutls26 | grep ^ii | awk '{print $2 " " $3}'
git 1:1.9.1-1
libgnutls26:amd64 2.12.23-12ubuntu2.1
At first, it looked like gnutls-cli-debug would provide the useful info.
$ gnutls-cli-debug MY_GIT_SERVER
Resolving 'MY_GIT_SERVER'...
Connecting to '1.2.3.4:443'...
Checking for SSL 3.0 support... no
Checking whether %COMPAT is required... yes
Checking for TLS 1.0 support... no
...

Server does not support any of SSL 3.0, TLS 1.0 and TLS 1.1
However, fixing that required the addition of RC4-SHA to the
ssl_ciphers list; a cipher that's not real strong.
$ gnutls-cli-debug MY_GIT_SERVER
Resolving 'MY_GIT_SERVER'...
Connecting to '1.2.3.4:443'...
Checking for SSL 3.0 support... no
Checking whether %COMPAT is required... yes
Checking for TLS 1.0 support... yes
Checking for TLS 1.1 support... yes
...
Good, GnuTLS is happy.
But, that got us a grade B.
And, worst of all, it didn't fix the git connection handshake error.
Luckily, git was satisfied when we added DHE-RSA-AES256-SHA instead.
And it did not mess up the rating too much.
Thus, the working config:
ssl_ciphers ECDHE-ECDSA-AES256-GCM-SHA384:ECDHE-RSA-AES256-GCM-SHA384:ECDHE-ECDSA-AES256-SHA384:ECDHE-RSA-AES256-SHA384:ECDHE-ECDSA-AES128-GCM-SHA256:ECDHE-RSA-AES128-GCM-SHA256:ECDHE-ECDSA-AES128-SHA256:ECDHE-RSA-AES128-SHA256:ECDHE-RSA-AES256-SHA:DHE-RSA-AES256-SHA;
2015-01-06 - uuid / storage / mysql
Storing an UUID in MySQL efficiently:
DROP FUNCTION IF EXISTS uuidbin;

CREATE FUNCTION uuidbin(uuid_val varchar(36)) RETURNS varbinary(16)
DETERMINISTIC SQL SECURITY INVOKER
RETURN CONCAT(UNHEX(LEFT(uuid_val,8)),UNHEX(MID(uuid_val,10,4)),
  UNHEX(MID(uuid_val,15,4)),UNHEX(MID(uuid_val,20,4)),
  UNHEX(RIGHT(uuid_val,12)));

DROP FUNCTION IF EXISTS uuidstr;

CREATE FUNCTION uuidstr(uuid_val varbinary(16)) RETURNS varchar(36)
DETERMINISTIC SQL SECURITY INVOKER
RETURN LOWER(CONCAT(HEX(LEFT(uuid_val,4)),'-',HEX(MID(uuid_val,5,2)),
  '-',HEX(MID(uuid_val,7,2)),'-',HEX(MID(uuid_val,9,2)),
  '-',HEX(RIGHT(uuid_val,6))));
Now you can create your uuid columns with type binary(16).
And conversion is easy:
mysql> select uuidstr(uuidbin(uuidstr(uuidbin(uuidstr(uuidbin(
            'a89e6d7b-f2ec-11e3-bcfb-5c514fe65f2f'))))))
            as uuid_back_and_forth;
+--------------------------------------+
| uuid_back_and_forth                  |
+--------------------------------------+
| a89e6d7b-f2ec-11e3-bcfb-5c514fe65f2f |
+--------------------------------------+