Notes to self, 2020
2020-12-28 - arduino / esp8266 / preprocessor macros
Which preprocessor macros are defined when compiling a sketch for an Arduino? And when compiling for an ESP8266?
Ask the compiler frontend.
So, assume I'm building for an Arduino Uno. Find it in
boards.txt:
$ grep Uno /snap/arduino/current/hardware/arduino/avr/boards.txt
uno.name=Arduino Uno
unowifi.name=Arduino Uno WiFi
$ grep ^uno.build.mcu /snap/arduino/current/hardware/arduino/avr/boards.txt
uno.build.mcu=atmega328p
Okay, -mmcu=atmega328p then.
Here's a subset of the macros you'll encounter:
$ /snap/arduino/current/hardware/tools/avr/bin/avr-gcc \
    -mmcu=atmega328p -dM -E - </dev/null |
  LC_ALL=C sort | grep -iE 'arduino|avr' | grep -viE '_have_|_builtin_'
#define AVR 1
#define __AVR 1
#define __AVR_2_BYTE_PC__ 1
#define __AVR_ARCH__ 5
#define __AVR_ATmega328P__ 1
#define __AVR_DEVICE_NAME__ atmega328p
#define __AVR_ENHANCED__ 1
#define __AVR_MEGA__ 1
#define __AVR_SFR_OFFSET__ 0x20
#define __AVR__ 1
#define __WITH_AVRLIBC__ 1
For an ESP8266, the Xtensa compiler is invoked, and
there is no -mmcu option.
Tick the Show verbose output during: compilation box in the Arduino IDE preferences, to see how the compiler is invoked. You might see something like this:
ESPDIR=$HOME/snap/arduino/50/.arduino15/packages/esp8266

$ESPDIR/tools/xtensa-lx106-elf-gcc/2.5.0-4-b40a506/bin/xtensa-lx106-elf-g++ \
  -D__ets__ -DICACHE_FLASH -U__STRICT_ANSI__ \
  -I$ESPDIR/hardware/esp8266/2.7.4/tools/sdk/include \
  -I$ESPDIR/hardware/esp8266/2.7.4/tools/sdk/lwip2/include \
  -I$ESPDIR/hardware/esp8266/2.7.4/tools/sdk/libc/xtensa-lx106-elf/include \
  -I/tmp/arduino_build_367486/core -c -w -Os -g -mlongcalls \
  -mtext-section-literals -fno-rtti -falign-functions=4 -std=gnu++11 \
  -ffunction-sections -fdata-sections -fno-exceptions -w -x c++ -E -CC \
  -DNONOSDK22x_190703=1 -DF_CPU=80000000L -DLWIP_OPEN_SRC -DTCP_MSS=536 \
  -DLWIP_FEATURES=1 -DLWIP_IPV6=0 -DARDUINO=10813 \
  -DARDUINO_ESP8266_GENERIC -DARDUINO_ARCH_ESP8266 \
  "-DARDUINO_BOARD=\"ESP8266_GENERIC\"" -DLED_BUILTIN=2 -DFLASHMODE_DOUT \
  -DESP8266 \
  -I$ESPDIR/hardware/esp8266/2.7.4/cores/esp8266 \
  -I$ESPDIR/hardware/esp8266/2.7.4/variants/generic \
  -I$HOME/Arduino/libraries/ArduinoMqttClient/src \
  -I$ESPDIR/hardware/esp8266/2.7.4/libraries/ESP8266WiFi/src \
  $SOURCE -o $TARGET -DARDUINO_LIB_DISCOVERY_PHASE
If we replace the $SOURCE -o $TARGET with -dM -E -
</dev/null there, we'll also get a pretty list. Here it is
filtered by arduino and esp (and xtensa):
...
#define ARDUINO 10813
#define ARDUINO_ARCH_ESP8266 1
#define ARDUINO_BOARD "ESP8266_GENERIC"
#define ARDUINO_ESP8266_GENERIC 1
#define ESP8266 1
...
#define __XTENSA__ 1
#define __xtensa__ 1
And for the Arduino Uno, we'd also get these:
...
#define ARDUINO 10813
#define ARDUINO_ARCH_AVR 1
#define ARDUINO_AVR_UNO 1
So, if we want to create portable code between the Arduino and the ESP8266 we could do this:
#if defined(ARDUINO_ARCH_ESP8266)
/* esp8266 specific stuff here */
#elif defined(ARDUINO_ARCH_AVR)
/* arduino specific stuff here */
#else
# error Unsupported platform
#endif
2020-12-11 - zfs destroy / dataset is busy
Just now, I tried to remove a ZFS dataset, and it reported
dataset is busy for no apparent reason.
# zfs list -r data
NAME                      USED  AVAIL  REFER  MOUNTPOINT
data                     3.12T   405G   251M  /data
data/kubernetes-logging  2.08T   405G  2.08T  /data/kubernetes/logging
data/rook-config         36.5M   405G  36.5M  /data/rook-config
data/rook-data           1.03T   708G   753G  -
# zfs destroy data/kubernetes-logging
cannot destroy 'data/kubernetes-logging': dataset is busy
The usual suspects were checked:
- The dataset was not mounted (
cat /proc/mounts | grep kubernetes). It could be mounted and unmounted just fine though. - There were no clones:
zdb data | grep '%'turned up nothing. lsof | grep data/kubernetesturned up nothing either.
After spending some wasted time with zdb, it turned out
the mount point / directory was held by a docker image:
# grep data/kubernetes /proc/*/mounts
grep: /proc/11941/mounts: Invalid argument
/proc/16986/mounts:data /data/kubernetes zfs rw,noatime,xattr,posixacl 0 0
/proc/16986/mounts:data/kubernetes-logging /data/kubernetes/logging zfs rw,noatime,xattr,posixacl 0 0
grep: /proc/18343/mounts: No such file or directory
grep: /proc/18365/mounts: No such file or directory
A-ha!
# ps faxu | grep 16986 -B1
16961  ?  Sl   jul08   9:04  \_ containerd-shim -namespace moby -workdir /var/lib/containerd/io.containerd.runtime.v1.linux/moby/2e5ff94b9e13a139eb125eeeddf31044a74f97c74adec2e781d5f33b6d3149e1 -address /run/containerd/containerd.sock -containerd-binary /usr/bin/containerd -runtime-root /var/run/docker/runtime-runc
16986  ?  Ssl  jul08  77:36  |   \_ /hostpath-provisioner
Interestingly, the container itself did not seem to be touching the actual mount point:
# docker inspect 2e5ff94b9e13a | grep data/kubernetes -B2
        "HostConfig": {
            "Binds": [
                "/data/kubernetes:/data/kubernetes",
(See, no /logging.)
But, destroying that hostpath-provisioner did the trick:
# kill 16986
# zfs destroy data/kubernetes-logging
(No error. Lots of free space again.)
2020-10-27 - cumulus / postfix in the right vrf
Cumulus Linux is a network operating system. It is a switch, but it also runs Linux OS, allowing us to run our automation tools on it. We use it to automate the configuration of our network. A network where we use VRF (virtual routing and forwarding) to separate customer traffic. This presence of VRFs in the OS means that we have to tell applications in which VRF to operate. And sometimes it needs some tweaks, like in the case of postfix.
How the specify the VRF
You can ssh right into the Cumulus switch. And there you can use your regular tools, like ping and curl. But, if you want to end up in the right network, you have to tell the tools where.
These examples are on a Cumulus Linux 3.7:
# net show vrf

VRF              Table
---------------- -----
CUSTOMERX         1001
CUSTOMERY         1002
mgmt              1020
...
If you want to ping to an IP in the CUSTOMERX network, you specify so:
# ping -I CUSTOMERX -c 1 -w 1 10.20.30.40
ping: Warning: source address might be selected on device other than mgmt.
PING 10.20.30.40 (10.20.30.40) from 10.5.83.22 CUSTOMERX: 56(84) bytes of data.
64 bytes from 10.20.30.40: icmp_seq=1 ttl=60 time=0.522 ms
If you specify no VRF or the wrong one, you'll get no reply. If you want to run applications or services in the management VRF, you have to specify mgmt. This is likely the only place where you have direct access to internet.
If you log in, you'll get the VRF from where you connected attached to your shell:
# ip vrf identify $$
mgmt
This makes sense, as the ssh daemon you're connected to, is also in that VRF:
# ip vrf identify $(pidof -s sshd)
mgmt
Applications without native VRF support
You may have noticed that for ping you can specify a
VRF using -I interface. Not all applications
support that. For those applications, you can run the command
prefixed by a call to ip
vrf exec:
# nc 10.20.30.40 22 -v
10.20.30.40: inverse host lookup failed: Unknown host
^C
# ip vrf exec CUSTOMERX nc 10.20.30.40 22
SSH-2.0-OpenSSH_8.2p1 Ubuntu-4ubuntu0.1
^C
Starting daemons in the right VRF
Cumulus Linux 3, based on Debian Jessie, uses systemd as init system. Pid 1 will be spawning the daemons, and that means that they won't start in the management VRF by default.
# ip vrf identify 1
(void)
They have made a nifty little systemd-generator that fixes so you can run services an appropriate VRF. For instance your ntp time daemon, which needs access to the internet:
cat /etc/vrf/systemd.conf
# Systemd-based services that are expected to be run in a VRF context.
#
# If changes are made to this file run systemctl daemon-reload
# to re-generate systemd files.
...
ntp
...
systemctl cat ntp@mgmt.service
# /etc/systemd/system/ntp@.service
# created by vrf generator
...

[Service]
Type=simple
ExecStart=/usr/sbin/ntpd -n -u ntp:ntp -g
Restart=on-failure
...

# /run/systemd/generator/ntp@.service.d/vrf.conf
# created by vrf generator
...

[Service]
ExecStart=
ExecStart=/bin/ip vrf exec %i /usr/sbin/ntpd -n -u ntp:ntp -g
As you can see, the ExecStart is prefixed with an ip vrf
exec mgmt. So, instead of starting/enabling
ntp.service, you start/enable ntp@mgmt.service
so it the time daemon runs in the expected VRF.
Trouble with the postfix service file
The postfix (mailer) init script in this particular distribution has an annoying quirk: it depends on itself.
cat /etc/init.d/postfix
#!/bin/sh -e

### BEGIN INIT INFO
# Provides:          postfix mail-transport-agent
# Required-Start:    $local_fs $remote_fs $syslog $named $network $time
# Required-Stop:     $local_fs $remote_fs $syslog $named $network
# Should-Start:      postgresql mysql clamav-daemon postgrey spamassassin saslauthd dovecot
# Should-Stop:       postgresql mysql clamav-daemon postgrey spamassassin saslauthd dovecot
# Default-Start:     2 3 4 5
# Default-Stop:      0 1 6
# Short-Description: Postfix Mail Transport Agent
# Description:       postfix is a Mail Transport agent
### END INIT INFO

...
The systemd-sysv-generator parses this, and generates this:
systemctl cat postfix.service
# /run/systemd/generator.late/postfix.service
# Automatically generated by systemd-sysv-generator

[Unit]
...
Before=mail-transport-agent.target shutdown.target
After=local-fs.target remote-fs.target ...
Wants=mail-transport-agent.target network-online.target
...

[Service]
...
ExecStart=/etc/init.d/postfix start
ExecStop=/etc/init.d/postfix stop
ExecReload=/etc/init.d/postfix reload

# /run/systemd/generator/postfix.service.d/50-postfix-$mail-transport-agent.conf
# Automatically generated by systemd-insserv-generator

[Unit]
Wants=mail-transport-agent.target
Before=mail-transport-agent.target
systemctl cat mail-transport-agent.target
# /lib/systemd/system/mail-transport-agent.target
...

# /run/systemd/generator/mail-transport-agent.target.d/50-hard-dependency-postfix-$mail-transport-agent.conf
# Automatically generated by systemd-insserv-generator

[Unit]
SourcePath=/etc/insserv.conf.d/postfix
Requires=postfix.service
That is, postfix.service provides
mail-transport-agent.target (the last snippet), but it
also depends on it; through Wants and Before options.
The Cumulus systemd VRF generator in turn generates this:
systemctl cat postfix@mgmt.service
# /etc/systemd/system/postfix@.service
# created by vrf generator
# Automatically generated by systemd-sysv-generator

[Unit]
...
Before=mail-transport-agent.target shutdown.target
After=local-fs.target remote-fs.target ...
Wants=mail-transport-agent.target network-online.target
...

[Service]
Environment=_SYSTEMCTL_SKIP_REDIRECT=true
...
ExecStart=/bin/ip vrf exec %i /etc/init.d/postfix start
ExecStop=/bin/ip vrf exec %i /etc/init.d/postfix stop
ExecReload=/bin/ip vrf exec %i /etc/init.d/postfix reload
...
Unfortunately, this means that postfix@mgmt.service now
depends on postfix.service (the version with an
unspecified VRF). And that it is likely that starting
postfix.service will cause
postfix@mgmt.service to fail — because
the competing postfix is already running:
# LC_ALL=C systemctl list-dependencies postfix@mgmt.service |
    grep -E 'postfix|mail-transport'
postfix@mgmt.service
* |-system-postfix.slice
* |-mail-transport-agent.target
* | `-postfix.service
Depending on luck or your configuration, you might get the right process started, but also see the other process as failed:
# LC_ALL=C systemctl list-units --failed
  UNIT                                 LOAD   ACTIVE SUB    DESCRIPTION
* postfix.service                      loaded failed failed LSB: Postfix Mail Transport Agent
Fixing the postfix service file
But we don't want to fix this with luck. Fix it by ensuring that the non-VRF postfix startup never causes conflicts:
cat /etc/systemd/system/postfix.service.d/ignore.conf
[Service]
# Ensure dependencies on this do not conflict with the proper
# postfix@mgmt.service:
ExecStart=
ExecStop=
ExecReload=

ExecStart=/bin/true
With that in place, postfix now starts smoothly in the right VRF. And a test-mail should arrive smoothly:
# FROM=test@example.com && TO=yourself@example.com &&
  printf 'Subject: test\r\nDate: %s\r\nFrom: %s\r\nTo: %s\r\n\r\ntest\r\n' \
    "$(date -R)" "$FROM" "$TO" | /usr/sbin/sendmail -f "$FROM" "$TO"
The VRF context
And if you're wondering where that VRF context lives, it's in the cgroup:
# ip vrf exec mgmt sh -c 'grep :l3mdev: /proc/$$/cgroup'
11:l3mdev:/mgmt
# ip vrf exec CUSTOMERX sh -c 'grep :l3mdev: /proc/$$/cgroup'
11:l3mdev:/CUSTOMERX
Update 2025-11-25
On Cumulus Linux 4.3.x you may need a more convoluted fix for postfix:
Replace %i with - in /lib/systemd/system/postfix@.service:
# copied /lib/systemd/system/postfix@.service; replaced %i with -
# avoids vrf generator conflicts
[Unit]
Description=Postfix Mail Transport Agent (instance %i)
Documentation=man:postfix(1)
PartOf=postfix.service
Before=postfix.service
ReloadPropagatedFrom=postfix.service
After=network-online.target nss-lookup.target
Wants=network-online.target

[Service]
Type=forking
GuessMainPID=no
ExecStartPre=/usr/lib/postfix/configure-instance.sh -
ExecStart=/usr/sbin/postmulti -i - -p start
ExecStop=/usr/sbin/postmulti -i - -p stop
ExecReload=/usr/sbin/postmulti -i - -p reload

[Install]
WantedBy=multi-user.target
And rerun the /usr/lib/systemd/system-generators/systemd-vrf-generator:
# bash -x /usr/lib/systemd/system-generators/systemd-vrf-generator \
    /run/systemd/generator /tmp /run/systemd/generator.late
This gives you a working postfix@mgmt.service that
does not expect mgmt to be a postfix instance name.
2020-10-24 - minecraft / open lan game / change port
Apparently it is not possible to select a port when opening a LAN game in (Java) Minecraft. When you're not using the standalone server, you'll get a random listening port. There are mods to change this, but that's not convenient. Instead, a simple iptables rule may come in handy.
Assuming you're running Minecraft on a Linux machine, and you have already forwarded the (default) TCP port of 25565 to a LAN machine on your NAT router, then forwarding incoming traffic to the newly assigned random (for example 31749) port can be done like this:
# iptables -t nat -I PREROUTING -p tcp --dport 25565 \
    -j REDIRECT --to-ports 31749
Do you also have a firewall locally? Then you'll need to allow the rewritten port too (as, the filter table comes after the nat table):
# iptables -t filter -I INPUT -p tcp --dport 31749 -j ACCEPT
There is no need to enable net.ipv4.ip_forward for this.
And — not necessary to understand the above, but insightful anyways —
here's an iptables chain refresher image (blatantly stolen
from the internet). As you can see, PREROUTING comes before the
INPUT, which explains why you have to open the random port in the INPUT
chain.

2020-10-23 - offsite / on-the-fly encrypted backups / gocryptfs
Earlier, I wrote about using encfs to do on-the-fly encrypted backups (using encfs). The idea was that you grant ssh+rsync access to a backup system, but that that system does not know what it is backing up. This provides a layer of security between your backup provider and your private data.
That scheme works like this:
- there is a remote system doing periodic incremental rsync backups, like a PlanB Backup server;
- you grant ssh+rsync access to that system;
- but only to a specific path;
- on that path, you mount an encrypted view of your filesystem — a.k.a. reverse encryption;
- the backup server only sees encrypted files, but it will still benefit from the incremental nature of rsync when creating backups.
The issue came up again, so here's a little update of the current state of things:
- encfs has been brought to life a little after it appeared inactive for a while. Current version in Ubuntu/Focal is 1.9.5, released April 2018.
- gocryptfs has joined the competition in 2016. It also has an Ubuntu/Focal package, now at 1.7.1, released October 2019.
- It appears those are the only two well-known methods to create reverse encrypted mounts.
Here we'll explore gocryptfs.
gocryptfs
gocryptfs sports the reverse option we're looking for. It's written in golang. It has been audited in 2017, although the audit did not cover the reverse mode specifically (the AES-SIV mode).
Version 1.7 lets you choose from the following encryption ciphers:
$ gocryptfs -speed
AES-GCM-256-OpenSSL    772.22 MB/s
AES-GCM-256-Go        1452.66 MB/s  (selected in auto mode)
AES-SIV-512-Go         199.04 MB/s
For reverse encryption, we're forced to use the AES-SIV-512-Go
cipher (see -aessiv below), described in RFC 5297. Since the
reverse encryption doesn't keep any state, it cannot store IVs
(or nonces). The Synthetic Initialization Vector (SIV) block
cipher mode produces a deterministic IV. (With a random IV, the encrypted
file would keep changing.) This comes with a speed penalty.
Initializing the gocrypt reverse config
Create a configuration directory, password and config file:
# umask 0077
# mkdir /.nobackup
# dd if=/dev/random bs=32 count=1 |
    base64 >/.nobackup/gocryptfs.reverse.rootfs.pass
1+0 records in
1+0 records out
32 bytes copied, 5.0439e-05 s, 634 kB/s
Here we choose to enable -plaintextnames. This means
that filenames will be readable. That is less secure, but a
lot more convenient when asked to restore a single file.
# gocryptfs -reverse -aessiv -plaintextnames \
    -config /.nobackup/gocryptfs.reverse.rootfs.conf \
    -passfile /.nobackup/gocryptfs.reverse.rootfs.pass \
    -init /.nobackup/  # path is irrelevant

Using config file at custom location /.nobackup/gocryptfs.reverse.rootfs.conf
Choose a password for protecting your files.
passfile: reading from file "/.nobackup/gocryptfs.reverse.rootfs.pass"

Your master key is:

    d9504720-c98856e9-860d56bc-2f40eebd-
    fefb9b2a-aac5cb1d-46f81fa3-abe2aee2

If the gocryptfs.conf file becomes corrupted or you ever forget your password,
there is only one hope for recovery: The master key. Print it to a piece of
paper and store it in a drawer. This message is only printed once.
The gocryptfs-reverse filesystem has been created successfully.
You can now mount it using: gocryptfs -reverse /.nobackup MOUNTPOINT
The gocryptfs -init call outputs a master key
and writes a configuration file. You can save the key, but if you keep
the /.nobackup/gocryptfs.reverse.rootfs.pass password and
the /.nobackup/gocryptfs.reverse.rootfs.conf configuration
backed up somewhere, you should be safe too.
The configuration file it has written should look somewhat like this:
# cat /.nobackup/gocryptfs.reverse.rootfs.conf
{
  "Creator": "gocryptfs 1.7.1",
  "EncryptedKey": "GhBnT...",
  "ScryptObject": {
    "Salt": "Oyq5J...",
    "N": 65536,
    "R": 8,
    "P": 1,
    "KeyLen": 32
  },
  "Version": 2,
  "FeatureFlags": [
    "GCMIV128",
    "HKDF",
    "PlaintextNames",
    "AESSIV"
  ]
}
Testing the mount point
Let's do the initial mount:
# mkdir -p /home/remotebackup/rootfs
Don't forget the specify -reverse when doing the mount.
(It will imply readonly, -ro.)
Here we can exclude some things that should not be backed up, like
the /.nobackup/ directory, or the mount point itself (we
don't want recursion
from the encrypted filesystem into itself, which caused trouble
for us with encfs). Setting the owner using
-force_owner is useful when a non-root user will be doing
the rsync backups.
# gocryptfs -reverse \
  -config /.nobackup/gocryptfs.reverse.rootfs.conf \
  -passfile /.nobackup/gocryptfs.reverse.rootfs.pass \
  -exclude .nobackup/ \
  -exclude .home/remotebackup/rootfs \
  -force_owner 1000:1000 \
  -fsname gcryptfs-reverse-/
  / /home/remotebackup/rootfs

Using config file at custom location /.nobackup/gocryptfs.reverse.rootfs.conf
passfile: reading from file "/.nobackup/gocryptfs.reverse.rootfs.pass"
Decrypting master key
Filesystem mounted and ready.
Setting up fstab
Of course you want the filesystem to be mounted automatically.
Setting up /etc/fstab is a breeze because the gcrypt
fuse-mount binary takes its options in a mount-compatible fashion
(using -o):
# This should be a single line in fstab. Be sure to join the line after
# the commas without any whitespace.
/ /home/remotebackup/rootfs fuse.gocryptfs
    reverse,config=/.nobackup/gocryptfs.reverse.rootfs.conf,
    passfile=/.nobackup/gocryptfs.reverse.rootfs.pass,
    exclude=.nobackup,exclude=home/remotebackup/rootfs,
    force_owner=1000:1000,fsname=gcryptfs-reverse-/ 0 0
With that line in fstab, it's a matter of mounting the destination:
# mount /home/remotebackup/rootfs
# mount | grep /remotebackup/
/ on /home/remotebackup/rootfs type fuse.gocryptfs-reverse (ro,nosuid,nodev,relatime,user_id=0,group_id=0,max_read=131072)
# df -h | grep -E '/$|/rootfs$'
/dev/mapper/ubuntu--vg-root  106G   98G  3.2G  97% /
gcryptfs-reverse-/           106G   98G  3.2G  97% /home/remotebackup/rootfs
Nice and easy.
Test that we can decrypt single files
Since we're using this for backups, chances are we'll want to decrypt
single files at one point. (There was a reason we were using
-plaintextnames.)
Is it possible to do so without syncing the entire filesystem?
Yes it is. See this example:
# mkdir /home/remotebackup/test-{encrypted,decrypted}
/home/walter/example.c is a human readable file.
# hd /home/walter/example.c
00000000  69 6e 74 20 66 75 6e 63  28 29 20 7b 0a 20 20 20  |int func() {.   |
...
The version in /home/remotebackup is not, obviously:
# hd /home/remotebackup/rootfs/home/walter/example.c
00000000  00 02 b1 df 38 5c 1b 2e  34 3c 71 e7 e7 02 df 45  |....8\..4<q....E|
...
Copy to the temporary directory, as if we're restoring a single file:
# cp /home/remotebackup/rootfs/home/walter/example.c \
    /home/remotebackup/test-encrypted/example.c
Forward-encrypt this temporary directory:
# gocryptfs \
  -config /.nobackup/gocryptfs.reverse.rootfs.conf \
  -passfile /.nobackup/gocryptfs.reverse.rootfs.pass \
  /home/remotebackup/test-encrypted/ \
  /home/remotebackup/test-decrypted/
Or, alternately, by using only the stored master-key we saved at
the initialization step and the appropriate configuration (in this case
-aessiv and -plaintextnames).
# gocryptfs -aessiv -plaintextnames \
    -masterkey=d9504720-c98856e9-860d56bc-2f40eebd-fefb9b2a-aac5cb1d-46f81fa3-abe2aee2 \
    /home/remotebackup/test-encrypted/ \
    /home/remotebackup/test-decrypted/

Using explicit master key.
THE MASTER KEY IS VISIBLE VIA "ps ax" AND MAY BE STORED IN YOUR SHELL HISTORY!
ONLY USE THIS MODE FOR EMERGENCIES
Filesystem mounted and ready.
If the hashes of /home/walter/example.c and
/home/remotebackup/test-decrypted/example.c are equal, then it
really is that easy:
# md5sum /home/walter/example.c \
    /home/remotebackup/rootfs/home/walter/example.c \
    /home/remotebackup/test-encrypted/example.c \
    /home/remotebackup/test-decrypted/example.c
8b2399d85114f8e5f6ad10239afad345  /home/walter/example.c
d3962161b8fbc819b75325ce3c4c7805  /home/remotebackup/rootfs/home/walter/example.c
d3962161b8fbc819b75325ce3c4c7805  /home/remotebackup/test-encrypted/example.c
8b2399d85114f8e5f6ad10239afad345  /home/remotebackup/test-decrypted/example.c
The hashes match. All is good!
Conclusion
It looks like gocryptfs is a good candidate to support encrypted backups through a reverse encrypted mount. Possibly the recent encfs works equally well, but gocryptfs appears to be more actively maintained at the time of writing. And it works out of the box.
Securing ssh+rsync access for the remotebackup user is beyond the scope of this article. But it shouldn't be too hard to chroot it to its own home directory, denying it access to any unencrypted files.
Of course, an alternate solution is using a snapshotting filesystem like ZFS with local encryption, and backing up raw (encrypted) snapshots. But that's definitely something for another day. In the mean time, you can check out planb-zfssync, if you want to go that route.
Disclaimer
As I am no encryption expert, I did not audit the encryption methods in gocryptfs. As always, use common sense, and be sure to read the relevant security bulletins.
2020-10-13 - pgp on yubikey / refresh expiry
Generally, I try to follow security best practices. This means that I have my PGP signing, authentication and encryption keys on my YubiKey, and I have configured the keys to expire after a year. Unfortunately, refreshing the expiry every year is not quite enough to store how to do that into muscle memory. Here are the steps relevant to my use case.
Putting the keys on the YubiKey in the first place is worth a post of its own. But others have done that well enough, like Andrea Grandi with configuring onfiguring an offline GnuPG master key and subkeys on YubiKey.
First step is noticing that it's that time of the year again
(Yes, XIII is the alias/comment for my key.)
$ gpg --armor --sign -u xiii
gpg: skipped "xiii": Unusable secret key
gpg: signing failed: Unusable secret key
$ gpg --armor --encrypt -r xiii
gpg: xiii: skipped: No public key
gpg: [stdin]: encryption failed: No public key
$ gpg -K xiii
sec#  rsa4096 2017-10-10 [SC] [expired: 2020-10-11]
      ...C170E20E
uid           [ expired] Walter Doekes (XIII) <walter@example.com>
ssb>  rsa4096 2017-10-10 [S] [expired: 2020-10-11]
ssb>  rsa4096 2017-10-10 [E] [expired: 2020-10-11]
ssb>  rsa4096 2017-10-10 [A] [expired: 2020-10-11]
Okay. Time to dig up the old master key so we can update the subkeys.
Note the hash mark (#) in the above listing: the private key
for the master key is not available here.
Note the angle bracket (>)
next to ssb (Secret SuBkey): that means those private
subkeys are on a smart card.
Update the expiry in a temporary location
We don't want to load the master key into our GPG config. But we do need it to update the (subkey) expiry values. So, we use a temporary GNUPGHOME.
I'll leave the task of fetching the master key
(with subkeys) from a secure storage to you. Assume you've got it in
MASTER_KEY_AND_SUBKEYS.
$ TEMPHOME=$(mktemp -d '/dev/shm/gnupghome.XXXX' | tee /dev/stderr)
/dev/shm/gnupghome.rYCR
Using /dev/shm here instead of /tmp to
make it less likely that decrypted GPG files ever touch the disk.
$ GNUPGHOME=$TEMPHOME gpg --import < MASTER_KEY_AND_SUBKEYS
gpg: keybox '/dev/shm/gnupghome.rYCR/pubring.kbx' created
gpg: /dev/shm/gnupghome.rYCR/trustdb.gpg: trustdb created
gpg: key ...C170E20E: public key "Walter Doekes (XIII) <walter@example.com>" imported
gpg: To migrate 'secring.gpg', with each smartcard, run: gpg --card-status
gpg: key ...C170E20E: secret key imported
gpg: Total number processed: 1
gpg:               imported: 1
gpg:       secret keys read: 1
gpg:   secret keys imported: 1
WARNING: Do not merge any new public data/signatures from your
regular GPG at this point — gpg --export xiii | GNUPGHOME=$TEMPHOME gpg --import
— as it would turn all secret subkeys into stubs,
and your backup of these keys would then contain the master key only.
Enter the gpg console, so we can set a new expire date:
$ GNUPGHOME=$TEMPHOME gpg --edit-key xiii
...
sec  rsa4096/...C170E20E
     created: 2017-10-10  expired: 2020-10-11  usage: SC
     trust: unknown       validity: expired
sub  rsa4096/...
     created: 2017-10-10  expired: 2020-10-11  usage: S
sub  rsa4096/...
     created: 2017-10-10  expired: 2020-10-11  usage: E
sub  rsa4096/...
     created: 2017-10-10  expired: 2020-10-11  usage: A
First, set key 1 through 3, to edit the subkeys:
gpg> key 1
gpg> key 2
gpg> key 3
...
sub* rsa4096/...
     created: 2017-10-10  expired: 2020-10-11  usage: S
sub* rsa4096/...
     created: 2017-10-10  expired: 2020-10-11  usage: E
sub* rsa4096/...
     created: 2017-10-10  expired: 2020-10-11  usage: A
Note how an asterisk (*) appears next to the word
sub.
Set them to expire after a year from now:
gpg> expire
Are you sure you want to change the expiration time for multiple subkeys? (y/N) y
Please specify how long the key should be valid.
         0 = key does not expire
      <n>  = key expires in n days
      <n>w = key expires in n weeks
      <n>m = key expires in n months
      <n>y = key expires in n years
Key is valid for? (0) 1y
Key expires at wo 13 okt 2021 10:34:59 CEST
And do the same for the master key:
gpg> key
(all subkey asterisken are gone again)

gpg> expire
Changing expiration time for the primary key.
gpg: WARNING: no user ID has been marked as primary.  This command may
              cause a different user ID to become the assumed primary.
...
Key is valid for? (0) 1y
Key expires at wo 13 okt 2021 10:36:51 CEST
At this point, you may want to call clean sigs here too,
which will remove expired signatures:
- clean sigs
- Remove any signatures that are not usable by the trust calculations. For example, this removes any signature that does not validate. It also removes any signature that is superseded by a later signature, or signatures that were revoked.
(Check gpg --list-sigs xiii before/afterwards.)
gpg> save
Check and back up this update master and subkeys
Expiry has been fixed.
BEWARE: If you see hash marks (#) next to
the ssb, your private subkeys are not available,
and you may have erased them in an earlier step. You may want to go
back and fix that, before you overwrite the private keys in your safe
storage.
$ GNUPGHOME=$TEMPHOME gpg -K
/dev/shm/gnupghome.rYCR/pubring.kbx
-------------------------------
sec   rsa4096 2017-10-10 [SC] [expires: 2021-10-13]
      ...C170E20E
uid           [ unknown] Walter Doekes (XIII) <walter@example.com>
ssb   rsa4096 2017-10-10 [S] [expires: 2021-10-13]
ssb   rsa4096 2017-10-10 [E] [expires: 2021-10-13]
ssb   rsa4096 2017-10-10 [A] [expires: 2021-10-13]
Export this to your safe place (beyond the scope of this post):
$ GNUPGHOME=$TEMPHOME gpg --armor --export-secret-keys > MASTER_KEY_AND_SUBKEYS_NEW
Import the new public keys
We only need to update the public keys in our regular environment. Do this by exporting directly from the temporary home:
$ GNUPGHOME=$TEMPHOME gpg --armor --export | gpg --import
gpg: key ...C170E20E: "Walter Doekes (XIII) <walter@example.com>" 6 new signatures
gpg: Total number processed: 1
gpg:         new signatures: 6
$ gpg --card-status | grep expires
sec#  rsa4096/...C170E20E  created: 2017-10-10  expires: 2021-10-13
ssb>  rsa4096/...          created: 2017-10-10  expires: 2021-10-13
ssb>  rsa4096/...          created: 2017-10-10  expires: 2021-10-13
ssb>  rsa4096/...          created: 2017-10-10  expires: 2021-10-13
$ gpg --armor --sign -u xiii
test
^D
-----BEGIN PGP MESSAGE-----
...
Yay!
Destroy the temporary files
$ find $TEMPHOME -type f
/dev/shm/gnupghome.rYCR/pubring.kbx~
/dev/shm/gnupghome.rYCR/pubring.kbx
...

$ find $TEMPHOME -type f -print0 | xargs -0 shred -u
$ rmdir $TEMPHOME/* $TEMPHOME
$ pkill gpg-agent
That should free the master key.
Publish the new public key
Publish the new public key/subkeys, so others can use them.
$ for x in keyserver.ubuntu.com keys.gnupg.net pgp.mit.edu; do
    gpg --keyserver $x --send-keys C170E20E; done
gpg: sending key ...C170E20E to hkp://keyserver.ubuntu.com
gpg: sending key ...C170E20E to hkp://hkps.pool.sks-keyservers.net
gpg: sending key ...C170E20E to hkp://pgp.mit.edu
Note that it may take a while for the keyservers to propagate this...
elsewhere# gpg --keyserver keyserver.ubuntu.com --recv-keys OTHER_ID C170E20E
gpg: key ...OTHER_ID: "XYZ" <xyz@example.com>" not changed
gpg: key ...C170E20E: "Walter Doekes (XIII) <walter@example.com>" 6 new signatures
gpg: Total number processed: 2
gpg:              unchanged: 1
gpg:         new signatures: 6
You may also need to import your public key anywhere else where you're signing/encrypting. Also everywhere where you're using GnuPG-Agent forwarding.
Update 2023-10-16
Updated the /tmp usage example to
/dev/shm, where the chance is higher that it will not
persist to disk.
2020-09-10 - tls / testing certificate chains / easycert
The openssl client is a very versatile tool, but also a bit cryptic. The easycert utility from the ossobv/vcutil scripts makes validating/managing certificates easier.
easycert from ossobv/vcutil has a few modes of operation: CLI, CGI, generating certificates and testing certificates. Nowadays we mostly use the testing mode: -T
The utility is a convenient wrapper around openssl s_client and
x509 calls. Get it from github.com/ossobv/vcutil
easycert.
Usage
Run it like this:
$ easycert -T HOSTNAME PORT
or like this:
$ easycert -T LOCAL_CERT_CHAIN
For example, checking the https://google.com certificate chain might look like this:
$ easycert -T google.com 443
The list below should be logically ordered,
and end with a self-signed root certificate.
(Although the last one is optional and only
overhead.)

Certificate chain
 0 s: {96:65:7B:C2:08:15:03:E1:C3:F8:50:DD:8F:B6:73:65:43:DF:8C:80} [d5b02a29] C = US, ST = California, L = Mountain View, O = Google LLC, CN = *.google.com
   i: {98:D1:F8:6E:10:EB:CF:9B:EC:60:9F:18:90:1B:A0:EB:7D:09:FD:2B} [99bdd351] C = US, O = Google Trust Services, CN = GTS CA 1O1
 1 s: {98:D1:F8:6E:10:EB:CF:9B:EC:60:9F:18:90:1B:A0:EB:7D:09:FD:2B} [99bdd351] C = US, O = Google Trust Services, CN = GTS CA 1O1
   i: {9B:E2:07:57:67:1C:1E:C0:6A:06:DE:59:B4:9A:2D:DF:DC:19:86:2E} [4a6481c9] OU = GlobalSign Root CA - R2, O = GlobalSign, CN = GlobalSign
---
Expires in 67 days
There are a couple of things to note in the above output:
- As the comment already mentions: the issuer i (signer) of the first certificate must be the subject s of the next certificate. Certificate 0 is signed by certificate 1, an intermediate. (The chain may be longer.)
- When your web browser (or other application) validates the
SSL/TLS certificate, it has (at least) the self signed root key. In
this case:
4a6481c9.
On a *nix system, this file will generally be located in the/etc/ssl/certsdirectory, as a symlink to the actual certificate:$ ls -l /etc/ssl/certs/4a6481c9.0 lrwxrwxrwx 1 root root 27 mrt 12 2018 /etc/ssl/certs/4a6481c9.0 -> GlobalSign_Root_CA_-_R2.pem $ easycert -T /etc/ssl/certs/4a6481c9.0 ... Certificate chain 0 s: {9B:E2:07:57:67:1C:1E:C0:6A:06:DE:59:B4:9A:2D:DF:DC:19:86:2E} [4a6481c9] OU = GlobalSign Root CA - R2, O = GlobalSign, CN = GlobalSign i: {9B:E2:07:57:67:1C:1E:C0:6A:06:DE:59:B4:9A:2D:DF:DC:19:86:2E} [4a6481c9] OU = GlobalSign Root CA - R2, O = GlobalSign, CN = GlobalSign --- Expires in 459 days - The
{96:65:7B:C2:08:15:03:E1:C3:F8:50:DD:8F:B6:73:65:43:DF:8C:80}is the X509v3 Subject Key Identifier (or Authority Key ~).
Where the certificate-subject_hashand-issuer_hashsimply are based on the subject (and can have duplicates), the Subject Key identifier and its Authority counterpart uniquely identify a specific certificate. (More about this below.)
As you can see, easycert makes inspecting certificate chains easy.
Examples
You can also see easycert in action on various badssl.com tests:
$ easycert -T expired.badssl.com 443
...

Certificate chain
 0 s: {9D:EE:C1:7B:81:0B:3A:47:69:71:18:7D:11:37:93:BC:A5:1B:3F:FB} [c98795d1] OU = Domain Control Validated, OU = PositiveSSL Wildcard, CN = *.badssl.com
   i: {90:AF:6A:3A:94:5A:0B:D8:90:EA:12:56:73:DF:43:B4:3A:28:DA:E7} [8d28ae65] C = GB, ST = Greater Manchester, L = Salford, O = COMODO CA Limited, CN = COMODO RSA Domain Validation Secure Server CA
 1 s: {90:AF:6A:3A:94:5A:0B:D8:90:EA:12:56:73:DF:43:B4:3A:28:DA:E7} [8d28ae65] C = GB, ST = Greater Manchester, L = Salford, O = COMODO CA Limited, CN = COMODO RSA Domain Validation Secure Server CA
   i: {BB:AF:7E:02:3D:FA:A6:F1:3C:84:8E:AD:EE:38:98:EC:D9:32:32:D4} [d6325660] C = GB, ST = Greater Manchester, L = Salford, O = COMODO CA Limited, CN = COMODO RSA Certification Authority
 2 s: {BB:AF:7E:02:3D:FA:A6:F1:3C:84:8E:AD:EE:38:98:EC:D9:32:32:D4} [d6325660] C = GB, ST = Greater Manchester, L = Salford, O = COMODO CA Limited, CN = COMODO RSA Certification Authority
   i: {AD:BD:98:7A:34:B4:26:F7:FA:C4:26:54:EF:03:BD:E0:24:CB:54:1A} [157753a5] C = SE, O = AddTrust AB, OU = AddTrust External TTP Network, CN = AddTrust External CA Root
---
Expires in -1978 days
$ easycert -T incomplete-chain.badssl.com 443
...

Certificate chain
 0 s: {9D:EE:C1:7B:81:0B:3A:47:69:71:18:7D:11:37:93:BC:A5:1B:3F:FB} [34383cd7] C = US, ST = California, L = Walnut Creek, O = Lucas Garron Torres, CN = *.badssl.com
   i: {0F:80:61:1C:82:31:61:D5:2F:28:E7:8D:46:38:B4:2C:E1:C6:D9:E2} [85cf5865] C = US, O = DigiCert Inc, CN = DigiCert SHA2 Secure Server CA
---
Expires in 612 days
X509v3 Subject Key Identifier
About the X509v3 Subject Key Identifiers and X509v3
Authority Key Identifiers: here's what would happen if you created
a different certificate with the same subject (and
consequently the same 4a6481c9 hash), but did not supply
said identifiers.
(We use the -config option to skip the openssl
default extensions.)
$ openssl genrsa -out GlobalSign-bogus.key 2048 >&2
Generating RSA private key, 2048 bit long modulus (2 primes)
.....+++++
..........+++++
e is 65537 (0x010001)
$ openssl req -batch -new -x509 \
    -key GlobalSign-bogus.key -out GlobalSign-bogus.crt \
    -subj '/OU=GlobalSign Root CA - R2/O=GlobalSign/CN=GlobalSign' \
    -config <(printf '[req]\ndistinguished_name = req_distinguished_name\n[req_distinguished_name]\n')
$ easycert -T ./GlobalSign-bogus.crt
...

Certificate chain
 0 s: {x509v3-subject-key-not-provided} [4a6481c9] OU = GlobalSign Root CA - R2, O = GlobalSign, CN = GlobalSign
   i: {x509v3-issuer-key--not-provided} [4a6481c9] OU = GlobalSign Root CA - R2, O = GlobalSign, CN = GlobalSign
---
Expires in 29 days
Observe how it has the same 4a6481c9 hash (and it's
missing the identifiers). Watch what happens when we try to
use it for validation:
$ curl https://google.com/ --capath /dev/null \
    --cacert ./GlobalSign-bogus.crt
curl: (35) error:0407008A:rsa
  routines:RSA_padding_check_PKCS1_type_1:invalid padding
curl is not happy. And shows an obscure error. Obviously it's good that it fails. It should, as the RSA key doesn't match. But if you accidentally have multiple CA root certificates with the same hash, this can be very confusing, and a mess to sort out.
Let's create a new one, this time adding
subjectKeyIdentifier and
authorityKeyIdentifier:
$ rm GlobalSign-bogus.crt

$ openssl req -batch -new -x509 \
    -key GlobalSign-bogus.key -out GlobalSign-bogus.crt \
    -subj '/OU=GlobalSign Root CA - R2/O=GlobalSign/CN=GlobalSign' \
    -config <(printf '[req]\ndistinguished_name = req_distinguished_name\n[req_distinguished_name]\n') \
    -addext keyUsage=critical,cRLSign,keyCertSign \
    -addext basicConstraints=critical,CA:true \
    -addext subjectKeyIdentifier=hash \
    -addext authorityKeyIdentifier=keyid:always,issuer

$ easycert -T ./GlobalSign-bogus.crt
...

Certificate chain
 0 s: {02:40:B3:7E:46:F4:E1:32:18:8B:DF:60:F1:90:74:A7:0A:CB:1A:E8} [4a6481c9] OU = GlobalSign Root CA - R2, O = GlobalSign, CN = GlobalSign
   i: {02:40:B3:7E:46:F4:E1:32:18:8B:DF:60:F1:90:74:A7:0A:CB:1A:E8} [4a6481c9] OU = GlobalSign Root CA - R2, O = GlobalSign, CN = GlobalSign
---
Expires in 29 days
This time curl (in fact libssl) will reject it before complaining about invalid RSA padding.
$ curl https://google.com/ --capath /dev/null \
    --cacert ./GlobalSign-bogus.crt
curl: (60) SSL certificate problem: unable to get local issuer certificate
Whereas when we manually supply the right certificate, everything works as intended:
$ curl https://google.com/ --capath /dev/null \
    --cacert /etc/ssl/certs/4a6481c9.0
<HTML><HEAD><meta http-equiv="content-type" content="text/html;charset=utf-8">
...
As a quick aside: curl will not accept an intermediate
certificate to validate against, when that does not have
CA:true flag set (which an intermediate doesn't
have):
$ curl https://google.com/ \
    --capath /dev/null --cacert ./99bdd351.crt
curl: (60) SSL certificate problem: unable to get issuer certificate
As an aside to this aside: this requirement was also
observed with the 3CX
phone system that needed the root certificate. (You can check the
details of a certificate by doing openssl x509 -in CERT
-noout -text. You'll see the CA:TRUE
on the root cert.)
In any case: you can coerce openssl into accepting an
intermediate certificate, if you're explicit with the
-partial_chain flag:
$ openssl s_client -connect google.com:443 \
    -CAfile ./99bdd351.crt -partial_chain
...
Verify return code: 0 (ok)
How to deal with services that don't send intermediates
And if you're dealing with SSL/TLS services that only supply their own certificate, you now know what to do. Put both the intermediate(s) and the root certificate in your local chain:
$ curl https://incomplete-chain.badssl.com:443/ \
    --capath /dev/null --cacert ./85cf5865.crt
curl: (60) SSL certificate problem: unable to get issuer certificate
$ easycert -T ./85cf5865.crt
...

Certificate chain
 0 s: {0F:80:61:1C:82:31:61:D5:2F:28:E7:8D:46:38:B4:2C:E1:C6:D9:E2} [85cf5865] C = US, O = DigiCert Inc, CN = DigiCert SHA2 Secure Server CA
   i: {03:DE:50:35:56:D1:4C:BB:66:F0:A3:E2:1B:1B:C3:97:B2:3D:D1:55} [3513523f] C = US, O = DigiCert Inc, OU = www.digicert.com, CN = DigiCert Global Root CA
---
Expires in 907 days
And after finding and adding 3513523f:
$ curl https://incomplete-chain.badssl.com:443/ \
    --capath /dev/null --cacert ./85cf5865+3513523f.crt
<!DOCTYPE html>
...
Validation succesful!
2020-09-09 - excel / generate sheet password collision
Yesterday, I demonstrated how to brute force the Excel protected sheet/cells password. (Write protection! Not read protection a.k.a. encryption!) Today, I figured there must be a faster way, as the hash is not at all complicated.
After fiddling around a little, I hacked together this bit of Python:
def reverse_f(wanted):
    "Calculate Excel protected sheet password"
    # https://wjd.nu/notes/2020#excel-generate-sheet-password-collision
    # https://wjd.nu/notes/2020#libreoffice-asking-for-cell-password-brute-force
    def reverse_rotate(v):
        "Right shift by one, rotating the right most bit to bit 15"
        if v & 0x1:
            return (v >> 1) | 0x4000
        return v >> 1
    chars = []
    valid_tokens = tuple([ord(i) for i in (
        'ABCDEFGHIJKLMNOPQRSTUVWXYZ'
        'abcdefghijklmnopqrstuvwxyz'
        '0123456789')])
    # Length 9 should be enough to go down from 16 to 7 bits:
    # we skip some shorter solutions, but there are only a few hashes
    # that benefit from that.
    length = 9
    h = wanted ^ 0xce4b ^ length        # step 7 (xor CE4BH xor len)
    for i in range(length - 2):         # (step 1 and 2 and 6)
        r = reverse_rotate(h)           # step 5
        # Find a char that blanks out as much from the right hand side.
        # Ensuring that no bit is left over on the right side either,
        # which would propagate to the left. This way, we trim the
        # number down as fast as posible.
        ch = r & 0x7f
        while ch not in valid_tokens and ch < 0x70:
            ch += 0x10
        while ch not in valid_tokens and ch > 0x30:
            ch -= 0x10
        assert ch in valid_tokens, ch
        h = r ^ ch                      # step 4 and 3
        chars.append(ch)
    r = reverse_rotate(h)
    # There is 1 rotation left, and we have to get below 0x7f.
    assert r < 0x100, (hex(wanted), hex(h), hex(r))
    # Lastly, brute force our way to the last two characters.
    for ch1 in valid_tokens:
        for ch2 in valid_tokens:
            if not (reverse_rotate(r ^ ch1) ^ ch2):  # step 5, 4, 3, and 1
                chars.extend([ch1, ch2])
                pwd = ''.join(chr(ch) for ch in chars)
                print('found password for 0x{:x}: {} [{!r}]'.format(
                    wanted, pwd, pwd))
                return pwd
    assert False, 'no solution found for 0x{:x}'.format(wanted)
If you recall the f function from yesterday's post:
def f(s):  # takes a string
    h = 0                                   # step 1
    for idx in range(len(s) - 1, -1, -1):   # step 1 and 2 and 6
        h ^= ord(s[idx])                    # step 3 and 4
        h <<= 1                             # step 5 (left shift)
        if h & 0x8000:                      # step 5 (check high bit)
            h = (h & 0x7fff) | 1            # step 5 (truncate + rotate)
    return (h ^ len(s)) ^ 0xce4b            # step 7
You can run it like this:
>>> hex(f('abcdefghij'))
'0xfef1'
>>> reverse_f(0xfef1)
found password for 0xfef1: Y0800PPBe ['Y0800PPBe']
'Y0800PPBe'
>>> hex(f('Y0800PPBe'))
'0xfef1'
Or you can enumerate all at once:
>>> for x in range(0x0000, 0x10000):
...     reverse_f(x)
...
So, next time you encounter a
<sheetProtection sheet="true"

   password="ca5b" formatColumns="false"

   formatRows="false" insertRows="false"/>
you can do this:
>>> reverse_f(0xca5b)
found password for 0xca5b: L08X080Bi ['L08X080Bi']
'L08X080Bi'
2020-09-08 - libreoffice / asking for cell password / brute force
While we were editing a provider-supplied Excel document using LibreOffice, at seemingly random times, it would show a popup asking us for a password to a cell. This popup would only go away if we set a new (non-blank) password on it. Annoying!
Apparently, it has to do with Sheet and Cell protection whereby an editing user is disallowed to edit certain cells/rows/sheets in a document.
Having certain cells marked read-only, sure. But protected using a password? That doesn't make sense. We're editing the document, it's ours now.
So, you can disable sheet protection using the Tools menu, where there is a Protect sheet checkbox. Disabling it should give us full access. Unfortunately, in this case the correct non-blank password is needed.
As you may already know, an xlsx file, is just a PK
zipped archive with XML and other content in it. Let's see if we can
find a password in there:
$ cd $(mktemp -d)
$ unzip ~/Documents/annoying_document.xlsx
Archive:  /home/walter/Documents/annoying_document.xlsx
  inflating: xl/workbook.xml
  inflating: xl/styles.xml
...
$ grep password . -r
./xl/worksheets/sheet1.xml:...
...</sheetData><sheetProtection sheet="true" password="ca5b"
  formatColumns="false" formatRows="false"
  insertRows="false"/><mergeCells count="7">...
Okay, there's the password: ca5b. Except it's not a password. It's a (very short) hash.
We can simply remove the entire <sheetProtection/>
tag and zip it up again. (Easy fix.)
Or, we could go for the hard fix, and try to brute force a password. This also helps if you have multiple documents with the same "protection".
OpenOffice.org's documentation has this to say about the password hash:
The PASSWORD record contains the hash value of the password used to protect the sheet.
[...]
The length of the password is restricted to 15 characters.
ALGORITHM Get_Password_Hash( password )
1) hash <-0 ; char_index <-char_count <-character count of password
2) char_index <-char_index - 1
3) char <-character from password with index char_index
   {0 is leftmost character}
4) hash <-hash XOR char
5) rotate the lower 15 bits of hash left by 1 bit
6) IF char_index > 0 THEN JUMP 2)
7) RETURN hash XOR char_count XOR CE4BH
In Python, that might look like this:
def f(s):  # takes a string
    h = 0                                   # step 1
    for idx in range(len(s) - 1, -1, -1):   # step 1 and 2 and 6
        h ^= ord(s[idx])                    # step 3 and 4
        h <<= 1                             # step 5 (left shift)
        if h & 0x8000:                      # step 5 (check high bit)
            h = (h & 0x7fff) | 1            # step 5 (truncate + rotate)
    return (h ^ len(s)) ^ 0xce4b            # step 7
And running it on the string abcdefghij yields FEF1 (in hex):
>>> hex(f('abcdefghij'))
'0xfef1'

>>> assert f('zzyw') == f('BBAb')
>>> assert f('zzyw') == f('pqpp')
>>> assert f('zzyw') != f('pqpr')
If we want to brute force it, we'll optimize away the
0xce4b and the ord() calls first:
def f_tuple(t):  # takes a tuple of ints
    h = 0                                   # step 1
    for idx in range(len(t) - 1, -1, -1):   # step 1 and 2 and 6
        h ^= t[idx]                         # step 3 and 4
        h <<= 1                             # step 5 (left shift)
        if h & 0x8000:                      # step 5 (check high bit)
            h = (h & 0x7fff) | 1            # Step 5 (truncate + rotate)
    return h ^ len(t)                       # step 7
>>> hex(f_tuple([ord(i) for i in 'abcdefghij']) ^ 0xce4b)
'0xfef1'
>>> import timeit
>>> abcdefghij_tuple = tuple(ord(i) for i in 'abcdefghij')
>>> result_tuple = 0xfef1 ^ 0xce4b
>>> timeit.timeit(lambda: f('abcdefghij') == 0xfef1)
1.3861091136932373
>>> timeit.timeit(lambda: f_tuple(abcdefghij_tuple) == result_tuple)
1.2009429931640625
And we can use the nice generator pattern provided by Python:
def generator():
    "Yields 'A', 'B', 'C', .., 'Z', 'AA', 'AB', etc. as tuples of ints"
    valid_tokens = tuple([ord(i) for i in (
        'ABCDEFGHIJKLMNOPQRSTUVWXYZ'
        'abcdefghijklmnopqrstuvwxyz'
        '0123456789'
        # You're free to add more tokens, but it may have an adverse effect
        # on the search. YMMV.
        # '!@#$%^&*()' ',./<>?;:[]{}-_=+|'
        )])
    max_token = len(valid_tokens)
    # "The length of the password is restricted to 15 characters."
    for length in range(1, 16):  # length 1 through length 15
        state = length * [0]  # index to valid_tokens
        while True:
            pass_ = tuple(valid_tokens[i] for i in state)
            yield pass_  # as tuple of ints, because f_tuple is faster than f
            # Increase last element of state by one:
            for tailidx in range(length - 1, -1, -1):  # edit last index first
                state[tailidx] += 1
                if state[tailidx] != max_token:
                    break
                state[tailidx] = 0
            else:
                # We did not break out of the loop, so all of state was
                # max_key. Try the next length.
                break
So.. that keeps repeating forever, until all combinations have been tried:
>>> g = iter(generator())
>>> [''.join(chr(ch) for ch in next(g)) for i in range(10)]
['A', 'B', 'C', 'D', 'E', 'F', 'G', 'H', 'I', 'J']
.. and after 10,000 iterations, it's at:
>>> [''.join(chr(ch) for ch in next(g)) for i in range(10000)][-10:]
['BkS', 'BkT', 'BkU', 'BkV', 'BkW', 'BkX', 'BkY', 'BkZ', 'Bka', 'Bkb']
Wrapping it all up, a function to find a valid password for a specified hash:
def find_password_for(wanted):
    expected = wanted ^ 0xce4b
    for t in generator():
        if f_tuple(t) == expected:
            pwd = ''.join(chr(ch) for ch in t)
            print('found password for 0x{:x}: {} [{!r}]'.format(
                wanted, pwd, pwd))
            return
>>> find_password_for(0xca5b)
found password for 0xca5b: BBAy ['BBAy']
.. or, if we want to know what it's doing, we can add a bit of
SIGALRM magic:
def find_password_for(wanted):
    # vvvvv-- print status
    import signal
    def print_status(*args):
        print('(generator is at {!r})'.format(''.join(chr(ch) for ch in t)))
        signal.alarm(1)
    signal.signal(signal.SIGALRM, print_status)
    signal.alarm(1)
    try:
        # ^^^^^-- print status
        expected = wanted ^ 0xce4b
        for t in generator():
            if f_tuple(t) == expected:
                pwd = ''.join(chr(ch) for ch in t)
                print('found password for 0x{:x}: {} [{!r}]'.format(
                    wanted, pwd, pwd))
                return
    # vvvvv-- print status
    finally:
        signal.alarm(0)  # stop alarm
Now you can see what's going on (and how slow it is):
>>> find_password_for(f('ABBBO'))
(generator is at 'BuvU')
(generator is at 'EaWh')
(generator is at 'HGAG')
... 18 lines elided ...
(generator is at '5fau')
(generator is at '8Exw')
(generator is at 'AAmr9')
found password for 0xc014: ABBBO ['ABBBO']
So, that was a sort-of interesting side track. It's noteworthy
that it's still quite slow. I stopped the iterations before
finding a collision for 0xfef1.
Removing the <sheetProtection/> is generally your best bet.
Maybe this could be an interesting toy project to try out Rust-lang on...
2020-07-03 - docker unprivileged user / becoming root
My colleague was rightly annoyed that our USER
www-data docker images greatly hindered effective debugging. Can
we become root again, while still keeping the additional
secure-by-default non-root images?
If we have enough permissions on the filesystem, then: yes, we can.
Take the following example, where we'll be looking at a
myproject pod.
(You can skip the Kubernetes steps if you already know where
the Docker instance resides.)
$ kubectl get pods -o wide myproject-66dd6b4dd-jskgf
NAME                        READY   STATUS    RESTARTS   AGE   IP           NODE
myproject-66dd6b4dd-jskgf   1/1     Running   0          64d   10.244.1.3   192.168.1.2

$ kubectl exec -it myproject-66dd6b4dd-jskgf -- bash

myproject-66dd6b4dd-jskgf:/app$ id
uid=33(www-data) gid=33(www-data) groups=33(www-data)
Yes, so indeed, we are not root. If we want to install
ping or curl or some other useful library, our
apt-get powers are limited.
Go the the node, find the docker instance, inspect it to find the "current" filesystem:
$ ssh 192.168.1.2

NODE# docker ps | grep myproject
550480e3a8a7   myhub/myproject-img   "uwsgi uwsgi.ini"   k8s_web_myproject-66dd6b4dd-jskgf_ns

NODE# docker inspect k8s_web_myproject-66dd6b4dd-jskgf_ns | grep Graph -A10
        "GraphDriver": {
            "Data": {
                "Dataset": "rpool/ROOT/ubuntu/b6846e..",
                "Mountpoint": "/var/lib/docker/zfs/graph/b6846e.."
            },
            "Name": "zfs"
        },
...
The above example shows a ZFS filesystem. For Overlay2 it may look like this:
NODE# docker inspect k8s_web_myproject-66dd6b4dd-jskgf_ns | grep Graph -A10
        "GraphDriver": {
            "Data": {
                "LowerDir": "/var/lib/docker/overlay2/ff5b1c..-init/diff:/var/lib/...etc...etc..etc..",
                "MergedDir": "/var/lib/docker/overlay2/ff5b1c../merged",
                "UpperDir": "/var/lib/docker/overlay2/ff5b1c../diff",
                "WorkDir": "/var/lib/docker/overlay2/ff5b1c../work"
            },
            "Name": "overlay2"
        },
...
We should be able to find the instance filesystem in the Mountpoint:
NODE# ls -log /var/lib/docker/zfs/graph/b6846e../bin/bash
-rwxr-xr-x 1 1037528 Jul 12  2019 /var/lib/docker/zfs/graph/b6846e../bin/bash
Or, for Overlay2, in the MergedDir:
NODE# ls -log /var/lib/docker/overlay2/ff5b1c../merged/bin/bash
-rwxr-xr-x 1 1113504 Jun  7  2019 /var/lib/docker/overlay2/ff5b1c../merged/bin/bash
On to the actual changes...
Create a temporary setuid binary. You could choose any binary, but
you'll need something that allows you to go from effective uid to real
uid. /bin/sh or /bin/bash is a safe bet, you
can program your way upwards from there:
NODE# install -oroot -m4775 /var/lib/docker/zfs/graph/b6846e../bin/{bash,superbash}
Now we should have a copy of /bin/bash as
/bin/superbash with mode 4755 (setuid bit).
Go back to the docker instance and start superbash
— bash needs -p to refrain from dropping the effective uid:
$ kubectl exec -it myproject-66dd6b4dd-jskgf -- bash

myproject-66dd6b4dd-jskgf:/app$ id
uid=33(www-data) gid=33(www-data) groups=33(www-data)

myproject-66dd6b4dd-jskgf:/app$ superbash -p

superbash-4.3# id
uid=33(www-data) gid=33(www-data) euid=0(root) groups=33(www-data)
Almost there, we now have effective root but not real root. Use your favorite scripting language to finish it off:
superbash-4.3# python -c \
  'from os import *;setuid(0);setgid(0);b="/bin/bash";execve(b,[b],environ)'

myproject-66dd6b4dd-jskgf:/app# id
uid=0(root) gid=0(root) groups=0(root)
Remove the superbash backdoor when you're done.
myproject-66dd6b4dd-jskgf:/app# rm /bin/superbash
Or better yet, restart the docker image to flush your changes.
2020-05-25 - nss-dns4only / libc / disable AAAA lookups
Have you ever noticed how some applications can do AAAA DNS record lookups even though the host has no IPv6 connectivity? That means double DNS lookups for zero profit. Why is that? And how can you disable it?
Problem
To make a long story short, a common combination of circumstances can cause useless gratuitous AAAA lookups:
- Applications that are IPv6 ready (or applications that don't care);
- on hosts using libc;
- where IPv6 is enabled (
net.ipv6.conf.all.disable_ipv6=0) — even though there is no IPv6 router in the network.
Where is that?
Well, with all the microservices around nowadays, it's likely that's the case for your nearest Kubernetes node. And it's also likely there are one or more jobs doing DNS queries every second or more.
Now, I'm all for the adoption of IPv6. But to be realistic, there are simply many hosts that are not directly connected to IPv6 yet. And even if they are, it's still a shame that every lookup is done in twofold.
Details
The problem is in the getaddrinfo
libc call. Most applications that connect somewhere, e.g.
curl, call getaddrinfo() with the "unspecified"
(AF_UNSPEC) address family; i.e. both an IPv4 and an IPv6
response is okay.
In the background, getaddrinfo() will do two DNS record
lookups over UDP: one for an (IPv4) A record, and one for an (IPv6)
AAAA record. It collects the responses and returns both to the
calling application. The application will then try to connect over
IPv6 and IPv4 sequentially, depending on which records were returned.
If you're lucky, your host has no IPv6 address at all (not
even a link-local one) and your application passes the
AI_ADDRCONFIG parameter (or gets it by default from
GNU libc). Then you might only get a single lookup. But in all
other cases, you get two lookups. And you always have to wait for the
slowest of the two responses.
Solutions
So, can you disable IPv6 lookups for these cases?
Some applications will have an option, like curl has the
-4 option. But adding that everywhere is tedious.
It would be nice to disable A
or AAAA lookups on a host entirely (see also a RedHat libc bug report).
However, as you can see in the
RFE above, no work
appears to have been done in GNU libc since that report was
filed in 2016.
Are there any other workarounds then?
I'm glad you asked! Because this issue has other
side effects
than just increased load and latency, I made a
workaround in the form of a nsswitch.conf callback:
nss-dns4only
It works by intercepting the getaddrinfo() calls, and turning
them into AF_INET lookups:
ret = _nss_dns_gethostbyname3_r(
    lookupname, AF_INET, &result, buffer2, buflen, errnop, herrnop,
    ttlp, NULL);
Try it out. You can download the source or fetch a pre-built Debian package from the nss-dns4only releases page. Installation is described in the README.
(Note that it does not work with libc versions that have no NSS system, like musl libc.)
Disclaimer: Again, I do not wish to hinder the adoption of IPv6 in any way. If there is demand, I'll gladly help create the inverse: an IPv6-only version that only does AAAA lookups.
2020-05-24 - gitlab / securing public repositories
In the past, GitLab repositories were created with Public Visibility by default. Now they have a more sensible security setting. Still, it can be nice to assert that public repositories are not Public-by-Accident.
How? Well, one fix is to check that Public repositories are
in a whitelisted public namespace (e.g.
/public/). That way it's immediately obvious that the
repositories herein are visible to everyone.
Use a Private browser and go to: https://YOUR_GITLAB_INSTANCE/explore/projects
Does it contain more projects than you expect? Then you may want to
periodically run this gitlab-find-pub-shared.sh script:
#!/bin/sh
# Complain if "public" projects are found outside the "pub" namespace.
# Complain if "internal" projects are found outside the "shared" namespace.

projects=$(su -l -s /bin/sh -c \
    "psql gitlabhq_production -tAF, -c \"select p.visibility_level as lvl, (coalesce(n2.path || '/', '') || n.path || '/' || p.path) as pth
    from projects p inner join namespaces n on n.id = p.namespace_id left join namespaces n2 on n2.id = n.parent_id order by pth, lvl;\"" postgres)

if test "$1" = "-v"; then  # verbose
    echo "$projects"
fi

echo "$projects" | while read -r line; do
    level=${line%%,*}
    path=${line#*,}
    namespace=${path%%/*}
    if test "$namespace" = "pub" && test $level -eq 20; then
        :
    elif test "$namespace" = "shared" && test $level -eq 10; then
        :
    elif test $level -eq 0; then
        :
    else
        echo "Unexpected level $level for $path" >&2
    fi
done
Additionally, any pipelines (CI/CD build logs) on your Public projects may also be visible to anyone. See Visibility of pipelines in GitLab projects. This may not be the best default.
To automatically
ensure privacy there — Public pipelines set to FALSE
— you can periodically run this
gitlab-no-public-pipelines-build-logs.sh script:
#!/bin/sh
# Automatically set the "Public pipelines" (public_builds) to false for
# all projects. In GitLab 12 success/failure checkmarks are visible to
# anyone, but the contents of the logs/artifacts will not be.
su -l -s /bin/sh -c '\
    psql gitlabhq_production -tAF, -c \
    "update projects set public_builds = false where public_builds = true;"' \
    postgres >/dev/null
2020-05-23 - more or less useless tips and tricks 3
More or less useless/useful tips and tricks, bundled together.
They weren't worthy of a box div on their own.
I gave them only a li each.
- gsettings set org.gnome.desktop.calendar show-weekdate true —
to enable week numbers in the gnome-shell datetime calendar popup.
(You may need to set
LC_TIMEtoen_GBso the week starts on a Monday instead of, American style, on a Sunday. You'll probably have setLC_PAPERtoo already, to get A4 paper size printing defaults.) - prlimit --nofile=2048:2048 -p $PID
— to change resource limits of a running process. If you ever run into the problem
that a long-running application has too
few open files or has a 0-byte core-file limit, prlimit
will use the
prlimit(2)system call to change limits on the fly:$ ulimit -c 0 $ prlimit --core=unlimited -p $$ $ ulimit -c unlimited
- wcheckrestart -sd | xargs systemctl restart
— taking advantage of the fact that systemctl will find
service files by running pid (
systemctl status $PID), this sequence will restart processes that reference updated shared libraries. See: wcheckrestart -sd - Escaping
$1in zabbix_agent2UserParameter=— if you're using zabbix_agent2 you may notice it's fairly compatible with the v1 version. However, to escape theUserParameterdollar signs, you cannot use the double-dollar. Luckily, you can generally use shell quoting instead. The following works for both zabbix_agent and zabbix_agent2:# 'dpkg -l foobar' lists: "ii foobar 1.2-1 Foobar is a bar baz package" # So dpkg.version[foobar] yields "1.2-1" -UserParameter=dpkg.version[*], dpkg -l '$1' | awk '/^ii/{print $$3}' +UserParameter=dpkg.version[*], dpkg -l '$1' | awk '/^ii/{print $''3}' - Converting an image to a full size A4 PDF:
convert INPUT.jpg -resize 1240x1750 -background white -gravity north \
    -extent 1240x1750 -units PixelsPerInch -density 150 OUTPUT.pdf
(If you run intoconvert-im6.q16: not authorized, you may need to edit /etc/ImageMagick-6/policy.xml.)
2020-05-13 - encryption decryption speed / gnupg / openssl
We were looking at encryption ingredients the other day. Because, if we want to compare encryption methods, we shouldn't compare apples and oranges. With that newfound knowledge, we can run a few speed tests.
The aggregated data (raw data sources can be found below):
| Encryption | Decryption | |||||||
| user (ms) | sys (ms) | total (ms) | mem (10K) | user (ms) | sys (ms) | total (ms) | mem (10K) | |
|---|---|---|---|---|---|---|---|---|
| gpg 1.4 | 7645 | 354 | 7999 | 354 | 15738 | 322 | 16060 | 359 |
| gpg 2.2 | 2863 | 340 | 3203 | 507 | 6212 | 340 | 6552 | 515 |
| gpg 2.3* | 2752 | 281 | 3033 | 527 | 4494 | 318 | 4812 | 536 |
| gpg 2.3* nohw | 4508 | 281 | 4789 | 525 | 7547 | 318 | 7865 | 537 |
| openssl | 1754 | 339 | 2093 | 506 | 421 | 391 | 812 | 506 |
| openssl nohw | 3564 | 344 | 3908 | 504 | 2765 | 396 | 3161 | 507 |
| customcrypt | 3338 | 421 | 3759 | 2458 | 3565 | 435 | 4000 | 2461 |
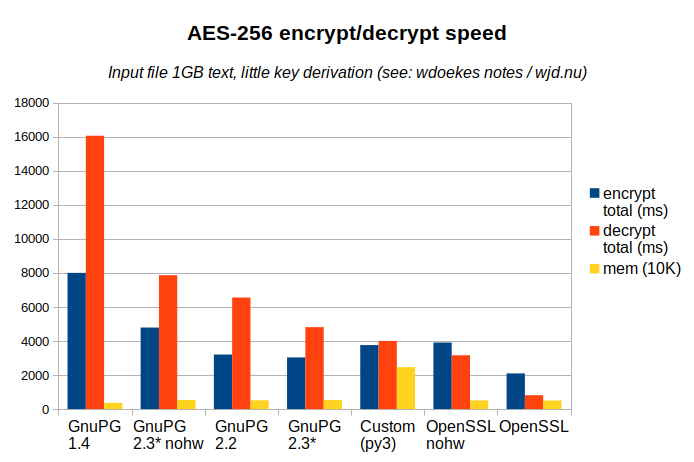
First a few notes about the graph:
- Lower is better: both for time and memory usage. It's sorted by decryption speed.
- Compression is off, key derivation is minimal: most time will be spent in the symmetric cipher.
- The nohw variants of GnuPG and OpenSSL run with Intel AES-NI disabled: no hardware acceleration.
- Total time is simply user time + system time as there was no parallelism. System time deviates only a little between the methods.
- The memory bar shows the max. resident set size (in 10KB units).
We can make the following observations from the above graph:
- OpenSSL is fastest. It's also the dumbest, without any integrity checks. But even without AES-NI, it outperforms GnuPG decryption.
- While you expect little or no difference, OpenSSL decrypts faster than it encrypts, and the inverse is true for GnuPG: for stable versions even by factor of two!
- AES-NI hardware acceleration matters. But so does application performance.
- GnuPG has been improving its performance, but they're not there yet.
Conclusion time!
We were looking for the right tool for long term storage of data and a couple of options were reviewed. GnuPG AES-256 decryption time is 6 times as slow as OpenSSL. However, it still wins by usability and compatibility.
I know, that conclusion is not what the graph is telling us. But decryption speed is not everything. (In fact, most of our long term data will probably never be decrypted at all.) And I'm also confident that future versions of GnuPG will close the gap some more.
No hardware acceleration (nohw): no aes-ni CPU support
To disable CPU AES support in the results marked with nohw, two methods were employed.
For OpenSSL AES-NI can be can be disabled using: OPENSSL_ia32cap="~0x200000200000000".
For libgcrypt — used by GnuPG — a tiny library preloader was used:
/* gcc gcrypt-no-aesni.c -fPIC -shared -Wl,-init,init -lgcrypt \
     -o gcrypt-no-aesni.so  # LD_PRELOAD to disable 'aes-ni' for GnuPG */
#include <gcrypt.h>
void init() { gcry_control(GCRYCTL_DISABLE_HWF, "intel-aesni", NULL); }
Versions used
- gpg 1.4.22 (Ubuntu/Bionic, 1.4.22-3ubuntu2)
- gpg 2.2.4 (Ubuntu/Bionic, 2.2.4-1ubuntu1.2)
- gpg 2.3.0-beta516 (
gnupg-2.3-base-257-g643ec7c64patched to make it build on Bionic. - libgrypt 1.8.1 (Ubuntu/Bionic, 1.8.1-4ubuntu1.2)
- openssl/libssl 1.1 (Ubuntu/Bionic, 1.1.1-1ubuntu2.1~18.04.5)
- A custom python3 script which uses ChaCha20 instead of AES-256-CBC. It's included because it was also in my previous post.
Detailed graph sources
collect-enc-dec-samples.sh - Run tests N times
samples.log.bz2 - Raw results
aggregate-enc-dec-samples.sh - Drop outliers and produce average CSV
results.csv - Aggregated results
results.ods - Results in a spreadsheet
The data was gathered by setting ITERATIONS to
120 and running all methods sequentially. Then the 5%
fastest and slowest results were dropped.
$ ./collect-enc-dec-samples.sh >samples.log

$ ./aggregate-enc-dec-samples.sh samples.log >results.csv
(taking average 7..114 results from 'samples.log')

$ cat results.csv
;Encryption;;;;Decryption;;;;
;user (ms);sys (ms);total (ms);mem (10K);user (ms);sys (ms);total (ms);mem (10K);
g1.4;7645;354;7999;354;15738;322;16060;359;
g2.2;2863;340;3203;507;6212;340;6552;515;
g2.3;2752;281;3033;527;4494;318;4812;536;
n2.3;4508;281;4789;525;7547;318;7865;537;
ossl;1754;339;2093;506;421;391;812;506;
osno;3564;344;3908;504;2765;396;3161;507;
cust;3338;421;3759;2458;3565;435;4000;2461;
2020-05-01 - encryption / vocabulary / long term storage
While investigating the most appropriate encryption cipher and format, I realised I didn't have enough vocabulary on the subject. This post aims to close that knowledge gap somewhat.
I'm looking at symmetric ciphers here, as they are used when storing lots of data. (In fact, when encrypting larger amounts of data, public/private key encryption (an asymmetric cipher) is only used to encrypt a separate key for the symmetric cipher, which is then used for bulk of the data.)
Initially, our objective was to find a suitable encryption file standard that satisfies the following properties:
| Property | Reasoning |
|---|---|
| safety | The encryption standards should be modern enough and be hard to crack. We're going for long term storage here. We still want to be relatively safe in 10 years. |
| integrity | If a file has been tampered with, we need to know. This may seem obvious, but without any digest/hash or message authentication code (generally HMAC), a flipped bit will silently propagate through the symmetric decryption process and produce garbage, instead of signaling an error. (And, when using a keyed-hash (HMAC) we can check authenticity as well.) |
| standards | When we have to look at the files in 10 years, we must be able to decrypt. The secret key derivation, digest calculation and the symmetric cipher must still be around. And, importantly, all chosen parameters must be documented in or near the encrypted file container. (Salt, initialization vector, key derivation method and rounds, the chosen cipher...) |
| speed | When the above requirements have been satisified, we want some speed as well. When access to the data is needed, we don't want to have to wait for slow bzip2 decompression. Also relevant here is that some encryption methods support parallel decryption, while others don't. (Although that can be mitigated by splitting up files in 1-4GB chunks, which incidentally improves cloud/object storage usability.) |
For symmetric file encryption, we'll need the following ingredients:
| Ingredients | |
|---|---|
| password | The password will be used to derive a secret key. The more entropy the password has, the fewer rounds of derivation we need to do. |
| key derivation function | The
derivation function takes the password,
an optional salt and derivation parameters and yields the
key.
More derivation iterations make a password more secure. Both S2K and PBKDF2-HMAC accept various digest functions. Right now the common one is SHA-256. A quick note about iterations and counts:
|
| initialization vector (iv) | To
avoid repetition in block cipher cryptographic output — which may
leak information — parts of the previous block get intermixed in
the next block. This removes repetitive patterns. To shield
the first block as well, the data starts with random
initialization data. (See the the ECB penguin for
a visual example why a block cipher needs additional data.) Generally, the IV should be random data, sent as cleartext. OpenSSL enc however derives the IV
from the password; only the salt is sent in the clear. |
| compression | Compression creates a more uniform distribution of characters: increasing the entropy, again reducing patterns. However, the compression may increase encryption times by a lot. (Note that compression should not be used in interactive contexts. See a human readable TLS CRIME Vulnerability explanation.) |
| message authentication | As
mentioned above, block/stream cipher encrypted data means: feed it garbage
in, you get garbage out. Without an integrity check, you won't know that
you're dealing with garbage. The ubiquitous scheme for validation here is
Encrypt-then-MAC, whereby a keyed digest is appended to the
output. During decryption, this can be checked for data errors while
not giving away any clues about the cleartext. GnuPG ships
with something simpler called modification detection code (MDC,
using SHA-1 as the digest). OpenSSL
enc doesn't support any and would require a separate hashing
(or, better yet, HMAC) pass. |
| ciphers and block modes | Encryption
ciphers come in various flavors. There are certainly newer ones,
but AES-128 and AES-256
are common and fast when hardware acceleration (AES-NI) is used.
As for block cipher modes: GnuPG uses
Ciphertext feedback (CFB) mode. It is similar to the Cipher Block
Chaining (CBC) which OpenSSL enc has for AES.
CBC and CFB cannot be decrypted in parallel, as they require
input from previous blocks.Note that not all ciphers are block ciphers. Some, like RC4 and ChaCha20 are stream ciphers, and they don't require any additional block mode — be it CBC or CFB or CTR. (About the Counter (CTR) mode: this mode uses a sequential integer as repetition-busting data. This one can be encrypted/decrypted in parallel.) |
With all of those ingredients on the table, a sample encryption pass with GnuPG might look like this:
$ time gpg --batch \
    --symmetric --passphrase-file ./password.txt \
    --s2k-mode 3 --s2k-digest-algo SHA512 \
    --cipher-algo AES256 \
    --output ./encrypted.gpg \
    ./original.txt

real  0m10.923s
user  0m10.743s
sys   0m0.180s
Pretty slow. Let's disable (the default ZLIB) compression:
$ time gpg --batch \
    --symmetric --passphrase-file ./password.txt \
    --s2k-mode 3 --s2k-digest-algo SHA512 \
    --compress-algo none \
    --cipher-algo AES256 \
    --output ./encrypted-no-compression.gpg \
    ./original.txt

real  0m3.725s
user  0m3.136s
sys   0m0.588s
Much better, but now our sample file is larger. Let's add very
lightweight qlzip1 (qpress) in the mix.
(See QuickLZ and qpress-deb.)
$ time gpg --batch \
    --symmetric --passphrase-file ./password.txt \
    --s2k-mode 3 --s2k-digest-algo SHA512 \
    --compress-algo none \
    --cipher-algo AES256 \
    --output ./encrypted.qz1.gpg \
    <(qlzip1 < ./original.txt)

real  0m1.402s
user  0m1.486s
sys   0m0.203s
Now we're getting somewhere. Aside from the highly compressible
(json) original.txt, we've produced the
following files in the mean time:
$ du -sh original.txt encrypted*
   959M original.txt
    90M encrypted.gpg
   959M encrypted-no-compression.gpg
    86M encrypted.qz1.gpg
Checking the key derivation s2k-count and s2k-digest-algo, to get a feeling for the key derivation speed:
$ for c in 65011712 8388608 65536; do
    for a in SHA1 SHA256 SHA512; do
      rm -f ./encrypted-1-one-byte.qz1.gpg
      out=$(a=$a c=$c bash -c '\
        time gpg --batch \
          --symmetric --passphrase-file ./password.txt \
          --s2k-mode 3 --s2k-digest-algo $a --s2k-count $c \
          --compress-algo none \
          --cipher-algo AES256 \
          --output ./encrypted-1-one-byte.qz1.gpg \
          <(qlzip1 < ./1-byte-file.txt)' \
        2>&1)
      printf 't %s count %8d algo %6s\n' \
        $(echo $out | awk '{print $2}') $c $a
    done
  done
t 0m0.490s count 65011712 algo   SHA1
t 0m0.373s count 65011712 algo SHA256
t 0m0.275s count 65011712 algo SHA512
t 0m0.068s count  8388608 algo   SHA1
t 0m0.052s count  8388608 algo SHA256
t 0m0.039s count  8388608 algo SHA512
t 0m0.003s count    65536 algo   SHA1
t 0m0.004s count    65536 algo SHA256
t 0m0.005s count    65536 algo SHA512
So, as promised, taking a longer hash results in fewer S2K iterations: the 2 x SHA-512 hash equivalents of 250.000, 32.000 and 250 rounds, respectively. Notice how the elapsed time quickly drops from half a second to milliseconds.
This is where strong (high entropy) passwords come into play. If the password is as random as the derived key would be we don't need to do any sizable derivation pass. That is, unless we want to slow people (both legitimate users and attackers) down on purpose. (If someone is trying to crack our file, they might as well skip the derivation step and guess the key instead. Only if they also want our (master) password, should they do the derivation. Rotating the password every so often mitigates this.)
Okay. So what about OpenSSL? How does OpenSSL enc compare?
$ time gpg --batch \
    --symmetric --passphrase-file ./password.txt \
    --s2k-mode 3 --s2k-digest-algo SHA512 --s2k-count 65536 \
    --compress-algo none \
    --cipher-algo AES256 \
    --output encrypted.qz1.gpg <(qlzip1 < ./original.txt)

real  0m1.097s
user  0m1.186s
sys   0m0.171s

$ time openssl enc -e -pass file:./password.txt \
    -pbkdf2 -md sha512 -iter 250 -salt \
    -aes-256-cbc \
    -out encrypted.qz1.ossl-pbkdf2-250-sha512-aes256cbc \
    -in <(qlzip1 < original.txt)

real  0m1.072s
user  0m1.047s
sys   0m0.197s
Pretty comparable! But, note how we have to store
ossl-pbkdf2-250-sha512-aes256cbc somewhere, because
only the key derivation salt is stored in the clear.
And, the OpenSSL version does not even include error detection!
So, we've looked at GnuPG and OpenSSL. What about zip? 7zip? Any others?
Both zip and 7-zip don't only do compression and encryption, they also do file archiving. Archiving is not something we're looking for here. Nor is their compression. Even if we made sure that the contents were encrypted when decrypting (needed for integrity purposes), we'd still be using the wrong tool for the job. Did I mention that streaming (on-the-fly) encryption/decryption is a pre? Which they can't do. Being able to chain tools together keeps memory low and usability high.
What about something homegrown?
Well yes, for the full comparison experience, I happen to have a
private customer-built custom encryption tool — with a custom file format —
laying around: let's call it customcrypt.py.
It uses PBKDF2HMAC(algorithm=SHA512, iterations=250) for key derivation,
and HMAC(derived_key2, algorithm=SHA256) for
Encrypt-then-MAC verification and a ChaCha20
stream cipher (hence no block mode required).
$ time python3 customcrypt.py \
    -e <(qlzip1 < original.txt) \
    encrypted.qz1.custom

real  0m1.212s
user  0m1.321s
sys   0m0.180s
Not too shabby either. (Although I question the usefulness of deriving an integrity key from the same password.) The drawback of this particular file format is that it hardcodes some parameters, i.e.: it's not self-documenting. (A problem we can fix.) But also, in 10 years, this script may get lost or have broken dependencies. (A problem that's harder to fix.)
For the tests above, GnuPG 2.2.4 (on Ubuntu/Bionic) was used. Algorithm availability on the CLI:
$ gpg --version
gpg (GnuPG) 2.2.4
libgcrypt 1.8.1
...
Cipher: IDEA, 3DES, CAST5, BLOWFISH, AES, AES192, AES256, TWOFISH,
        CAMELLIA128, CAMELLIA192, CAMELLIA256
Hash: SHA1, RIPEMD160, SHA256, SHA384, SHA512, SHA224
Compression: Uncompressed, ZIP, ZLIB, BZIP2
For OpenSSL the version was 1.1.1 (also Ubuntu). Algorithms can be found thusly:
$ openssl help
...
Message Digest commands (see the `dgst' command for more details)
blake2b512        blake2s256        gost              md4
md5               rmd160            sha1              sha224
... (elided a few) ...
Cipher commands (see the `enc' command for more details)
aes-128-cbc       aes-128-ecb       aes-192-cbc       aes-192-ecb
aes-256-cbc       aes-256-ecb       aria-128-cbc      aria-128-cfb
... (elided a few) ...
Next time, we'll look at symmetric cipher speed, which is the last factor in the mix. Then we can make a final verdict.
2020-04-29 - saltstack / printf IO-error / debianutils / which
After some upgrades, I suddenly noticed unexpected sh: printf: I/O error
output. Some debugging later, it turns out that it's the Dash way of informing
us of a PIPE error. Apparently salt's cmd.run can cause
so little output buffering, that the debianutils which command can be
aborted mid-output.
Not-broken example:
$ which python3 python false | head -n1
/usr/bin/python3
Broken example, through a salt cmd.run call:
$ salt 'example.com' cmd.run 'which python3 python false | head -n1'
example.com:
    /usr/bin/python3
    sh: printf: I/O error
It finds and prints /usr/bin/python3. Then head -n1
is so fast in closing stdin, that dash
notices and reports an I/O error when the dash builtin
printf tries to write the line
/usr/bin/python to stdout — which is the
stdin that head closed already.
$ salt 'example.com' cmd.run 'sh -x /bin/which python3 python false | head -n1' 2>&1 | tail -n5
    + [ -f /usr/bin/python ]
    + [ -x /usr/bin/python ]
    + puts /usr/bin/python
    + printf %s\n /usr/bin/python
    sh: printf: I/O error
bash reports something similar, but is more pronounced:
$ salt 'example.com' cmd.run 'bash -x /bin/which python3 python false | head -n1' 2>&1 | tail -n5
    + '[' -x /usr/bin/python ']'
    /usr/bin/python3
    + puts /usr/bin/python
    + printf '%s\n' /usr/bin/python
    /bin/which: line 10: printf: write error: Broken pipe
While I haven't delved into the reason why this happens in these salt calls only,
I think the problem lies with debianutils which.
Something like this would fix things:
--- /bin/which  2020-04-29 14:40:26.032397533 +0200
+++ /bin/which-fixed  2020-04-29 14:56:11.518941600 +0200
@@ -7,7 +7,7 @@ if test -n "$KSH_VERSION"; then
  }
 else
  puts() {
-   printf '%s\n' "$*"
+   printf '%s\n' "$*" 2>/dev/null
  }
 fi
Trapping the PIPE signal would not work, as the signal
is handled already — by a handler that prints "write error:
Broken pipe".
$ sh -c 'trap exit PIPE; echo foo; sleep 1; echo bar' | true
sh: echo: I/O error

$ bash -c 'trap exit PIPE; echo foo; sleep 1; echo bar' | true
bash: line 0: echo: write error: Broken pipe
Oh well. At least this explains the odd messages.
2020-02-12 - supermicro / java / console redirection / kvm
Connecting to the new SuperMicro iKVM management interfaces requires a working Java in your browser (IcedTea browser plugin). It will launch a Java Web Start (javaws) application. And java plugins (and needless web forms) are a pain in the behind. Is there a better way?
Obviously, running from the web interface just means downloading a Java application, and running it locally. So why can't we do that directly, and skip the IcedTea Java browser plugins?
Previously, we could connect to most hosts using the IPMIView utility, downloadable from the SuperMicro FTP server. Nowadays, that doesn't work for two reasons:
- A TLS layer is added to all connections (KVM port 5900, and virtual storage port 623). That's a good thing.
- The KVM username and password are rotated instead of being the same as the one used to connect to the HTTPS interface. A less obvious decision.
Wrapping the connection in TLS
IPMIView already had the capability of wrapping some connections in TLS. As can be seen in ipmikvm (2019):
# spawn socat
crtpath="$ipmipath/BMCSecurity" # "/opt/ipmiview/BMCSecurity/client.crt"
crtopt="commonname=IPMI,cafile=$crtpath/server.crt"
crtopt="$crtopt,cert=$crtpath/client.crt,key=$crtpath/client.key"
socat "TCP4-LISTEN:$port" "OPENSSL:$remotehost:$remoteport,$crtopt" &
That works for most current SuperMicro iKVM interfaces. However, that script did not provide for Virtual Storage (port 623) TLS wrapping.
Fetching the rotated username and password
With the newer SuperMicro management interfaces, you can log in on
https://MANAGEMENT_IP/ using the configured
username+password, but connecting to the KVM interface yields a
Authentication Failed.
If you go to Remote Control, Console Redirection
and click Launch Console, you're presented with a
launch.jnlp download — which may or may not get
picked up by your Java plugins, if you have them.
You can fetch this file programmatically, using a bit of curl and bash:
get_launch_jnlp() {
    management_ip="$1"
    user="$2"
    pass="$3"

    fail=1
    url="https://$management_ip"
    temp=$(mktemp)
    b64_user=$(echo -n "$user" | base64 -w0 | sed -e 's/=/%3D/g;s/+/%2B/g')
    b64_pass=$(echo -n "$pass" | base64 -w0 | sed -e 's/=/%3D/g;s/+/%2B/g')
    if curl --fail -sk --cookie-jar "$temp" -XPOST "$url/cgi/login.cgi" \
          --data "name=$b64_user&pwd=$b64_pass&check=00" -o/dev/null; then
        launch_jnlp=$(curl --fail -sk --cookie "$temp" \
            "$url/cgi/url_redirect.cgi?url_name=man_ikvm&url_type=jwsk")
        test $? -eq 0 && fail=
    fi
    rm "$temp"
    test -z "$fail" && echo "$launch_jnlp"
}
# SYNOPSIS: get_launch_jnlp 10.x.x.x USERNAME PASSWORD
And that launch.jnlp file will look somewhat like this:
<jnlp spec="1.0+" codebase="http://10.x.x.x:80/">
  <information>
    <title>ATEN Java iKVM Viewer</title>
    <vendor>ATEN</vendor>
    <description>Java Web Start Application</description>
  </information>

  <security>
   <all-permissions/>
  </security>

  <resources>
    <property name="jnlp.packEnabled" value="true"/>
    <j2se version="1.6.0+" initial-heap-size="128M"
      max-heap-size="128M" java-vm-args="-XX:PermSize=32M -XX:MaxPermSize=32M"/>
    <jar href="iKVM__V1.69.39.0x0.jar" download="eager" main="true"/>
  </resources>

<!-- ... -->

  <resources os="Linux" arch="amd64">
    <nativelib href="liblinux_x86_64__V1.0.12.jar" download="eager"/>
  </resources>

<!-- ... -->

  <application-desc main-class="tw.com.aten.ikvm.KVMMain">
    <!-- arguments 0..9 -->
    <argument>http://10.x.x.x:80/</argument>
    <argument>iKVM__V1.69.39.0x0.jar</argument>
    <argument>libwin_x86__V1.0.12.jar</argument>
    <argument>libwin_x86_64__V1.0.12.jar</argument>
    <argument>libwin_x86_64__V1.0.12.jar</argument>
    <argument>liblinux_x86__V1.0.12.jar</argument>
    <argument>liblinux_x86__V1.0.12.jar</argument>
    <argument>liblinux_x86_64__V1.0.12.jar</argument>
    <argument>liblinux_x86_64__V1.0.12.jar</argument>
    <argument>libmac_x86_64__V1.0.12.jar</argument>

    <!-- arguments 10..21 -->
    <argument>10.x.x.x</argument><!-- 10 management_ip -->
    <argument>otherUserName</argument><!-- 11 username -->
    <argument>otherPassWord</argument><!-- 12 password -->
    <argument>null</argument><!-- 13 hostname (unused) -->
    <argument>63630</argument><!-- 14 non-tunnel KVM port -->
    <argument>63631</argument><!-- 15 non-tunnel VM port -->
    <argument>0</argument><!-- 16 companyId? -->
    <argument>0</argument><!-- 17 boardId? -->
    <argument>1</argument><!-- 18 use TLS tunnel -->
    <argument>5900</argument><!-- 19 remote KVM port -->
    <argument>623</argument><!-- 20 remote VM port -->
    <argument>1</argument><!-- 21 VM/USB service -->
  </application-desc>
</jnlp>
Using the socat trick as mentioned above works when
supplying these emphemeral otherUserName and
otherPassWord to the old iKVM.jar as seen in
the ipmikvm (2019) script.
However, getting the Virtual Storage to work was less trivial than
simply setting up a second socat (with forking mode,
needed because the Java iKVM will connect to it multiple times):
socat "TCP4-LISTEN:$sport,bind=127.0.0.1,fork" "OPENSSL:$dhost:$dport,$crtopt"
That did not do the trick. Instead, it rained Close Socket
Beause Socket Pipe is broken errors.
Luckily there is a better way: fetch the new Java application from the SuperMicro management interface directly, and use that.
Fetching the Java Web Start application
If we take the URLs from the launch.jnlp above, we get:
http://10.x.x.x:80/iKVM__V1.69.39.0x0.jar
However, it is jnlp.packEnabled packed, so it becomes:
http://10.x.x.x:80/iKVM__V1.69.39.0x0.jar.pack.gz
Fetching those:
$ for x in iKVM__V1.69.39.0x0.jar liblinux_x86_64__V1.0.12.jar; do
     curl -o $x.pack.gz http://10.x.x.x:80/$x.pack.gz
  done

$ for x in *.pack.gz; do unpack200 $x ${x%.pack.gz}; done

$ ls -l
total 7968
-rw-r--r-- 1 walter walter 3985027 feb 12 16:21 iKVM__V1.69.39.0x0.jar
-rw-r--r-- 1 walter walter 3811134 feb 12 16:20 iKVM__V1.69.39.0x0.jar.pack.gz
-rw-r--r-- 1 walter walter  178685 feb 12 16:21 liblinux_x86_64__V1.0.12.jar
-rw-r--r-- 1 walter walter  178699 feb 12 16:20 liblinux_x86_64__V1.0.12.jar.pack.gz
(Seriously? Why bother packing it?)
$ unzip liblinux_x86_64__V1.0.12.jar
Archive:  liblinux_x86_64__V1.0.12.jar
PACK200
  inflating: META-INF/MANIFEST.MF
  inflating: META-INF/SMCCERT2.SF
  inflating: META-INF/SMCCERT2.RSA
  inflating: libSharedLibrary64.so
  inflating: libiKVM64.so

$ rm -rf META-INF
Alright! Now we have everything we need. (It needs the
libiKVM64.so in the current path.)
$ java -cp iKVM__V1.69.39.0x0.jar tw.com.aten.ikvm.KVMMain
no iKVM64 in java.library.path

$ java -Djava.library.path=. -cp iKVM__V1.69.39.0x0.jar tw.com.aten.ikvm.KVMMain
Usage: IP USER_NAME PASSWORD PORT

$ java -Djava.library.path=. -cp iKVM__V1.69.39.0x0.jar tw.com.aten.ikvm.KVMMain \
  1 2 3 4
Usage: IP USER_NAME PASSWORD PORT
Interesting. Somehow that help text did not keep up with development.
$ java -Djava.library.path=. -cp iKVM__V1.69.39.0x0.jar tw.com.aten.ikvm.KVMMain \
  $(seq 10) 10 11 12 13
Exception in thread "main" java.lang.ArrayIndexOutOfBoundsException: 14

$ java -Djava.library.path=. -cp iKVM__V1.69.39.0x0.jar tw.com.aten.ikvm.KVMMain \
  $(seq 10) 10 11 12 13 14
Exception in thread "main" java.lang.ArrayIndexOutOfBoundsException: 15

$ java -Djava.library.path=. -cp iKVM__V1.69.39.0x0.jar tw.com.aten.ikvm.KVMMain \
  $(seq 10) 10 11 12 13 14 15
Exception in thread "main" java.lang.ArrayIndexOutOfBoundsException: 21
Ok, ok, I get it! All arguments it is...
(Full disclosure: decompiling KVMMain.class from
iKVM__V1.69.39.0x0.jar helped in determining the
arguments seen in the annotated xml above.)
So, connecting to the KVM then becomes something like this:
exec_ikvm_tls2020() {
    jar="$1"
    management_ip="$2"
    user="$3"
    pass="$4"
    # If you look at the (decompiled) source, you'll notice that the
    # two local ports (65534 65535) get replaced, and the two remote ports
    # are set to default (5900 623). We'll set them here in case an updated
    # jar file fixes it.
    # Additionally, if you set use_tls (argument 18) to 0, the code
    # path simply ends. So we cannot use this one to connect to older
    # plain iKVM interfaces.
    exec java -Djava.library.path="$(dirname "$jar")" \
      -cp "$jar" tw.com.aten.ikvm.KVMMain \
      0 1 2 3 4 5 6 7 8 9 \
      "$management_ip" "$user" "$pass" null 65534 65535 0 0 1 5900 \
      623 1
}
# SYNOPSIS: exec_ikvm_tls2020 10.x.x.x KVM_USERNAME KVM_PASSWORD
Combined with the code that fetched the JNLP, and the java
application, we'll end up with something like this:
ipmikvm-tls2020
(see also: ossobv/vcutil on GitHub).
2020-01-31 - openssl / sign / subject alternative names
Recently, an automated job of mine failed because the latest and greatest Python refused to validate an SSL certificate with 127.0.0.1 in the common name (CN).
Apparently CN=127.0.0.1 will not be accepted anymore, as
using the common name for hostname validation has been deprecated for
ages now.
The fix? Use subject alternative names (SANs).
Generally, you'll already have these when you have your certificates signed by somebody else. But if you're signing certificates yourself, you'll need to know how to pass them to openssl:
The old way of creating a self-signed certificate:
$ openssl genrsa -out lo_server.key 4096 &&
  openssl req -new -key lo_server.key -out lo_server.csr -batch \
    -subj '/CN=127.0.0.1/emailAddress=example@localhost' &&
  openssl x509 -in lo_server.csr -out lo_server.crt -req \
    -signkey lo_server.key -days 3650
The new way, with SANs. Note how that third call fetches the SAN extension values from the 'csr' (using bash process substitution) so we don't have to configure them twice:
$ openssl genrsa -out lo_server.key 4096 &&
  openssl req -new -key lo_server.key -out lo_server.csr -batch \
    -subj '/CN=localhost/emailAddress=example@localhost' \
    -addext "subjectAltName=DNS:localhost,IP:127.0.0.1,IP:::1" &&
  openssl x509 -in lo_server.csr -out lo_server.crt -req \
    -signkey lo_server.key -days 3650 -extfile <(
      printf 'subjectAltName=%s' \
      $(openssl req -in lo_server.csr -noout -text |
        sed -e '/DNS:/!d;s/^[[:blank:]]*//;s/, /,/g;s/IP Address:/IP:/g') )
And, these subjectAltName= extensions also come in handy when
you want to play with proper SIP URIs matching, as defined in RFC5922-7.1 SIP
Identities.
2020-01-30 - 3cx voip / letsencrypt tls
Can you get your 3CX Phone System to connect to your SIP provider Trunk over TLS, when the server uses a Let's Encrypt certificate?
3CX documentation on this topic is scarce. There are posts like 3CX Forum: SIP TLS:
It's fairly straightforward: Your provider must give you a TLS Root Certificate (.pem) so you can encrypt the traffic. If they have SRV records the system will automatically know where to connect for TLS mode (Auto Discovery option on General trunk tab), or the provider might just tell you to change your port to the one they are listening to for TLS connections.
It can actually be that straightforward, if you do have the root certificate. But if you try to give the 3CX the certificate itself, or an intermediate — which is a perfectly fine thing to do in the TLS world — it will refuse without any useful info.
Step one: select TLS in the interface.
Step two: upload a root certificate.
![[3CX, transport protocol TLS, PEM file upload]](/files/2020/01/3cx-select-tls-for-trunk.jpg)
Okay, this is peculiar. Why doesn't it just use the certificates from the OS? The SIP server uses a perfectly valid Let's Encrypt certificate. Do I really need to upload anything here?
The server certificate we're presented with is:
- a valid and recent Let's Encrypt certificate;
- with the common name (CN) matching the FQDN;
- with a
DNS:FQDNsubjectAltName (SAN); - available over TLSv1.2.
(It doesn't use fancy new URI:sip:FQDN subject
alternative names, but I haven't come across any of those yet. And I
doubt I can get those inserted into my Let's Encrypt certificates.)
But, as the 3CX needs something uploaded to continue, let's just upload the certificate itself. Surely that is even more secure than any root certificate...
$ openssl s_client -connect TRUNK:5061 -showcerts </dev/null
...
-----BEGIN CERTIFICATE-----
MIINllCT1NLTkpCRU5IM1NKTFBBRjVSRU9MVTRBTU1VVEVPUjQzSkpBICAtCgcCA
...
-----END CERTIFICATE-----
Put it in a cert.pem, and upload it. Right?
Wrong! The 3CX will refuse to connect with the following error, which has no bearing on the actual problem:
SIP Server / Call Manager ID: 12293
Registration at TRUNK has failed.
Destination (sip: sip.TRUNK.tld: 5061; transport = TLS; lr;
maddr = 1.2.3.4) is not reachable, DNS error resolving FQDN,
or service is not available.
Some tcpdump/wireshark sniffing helps us more:
3CX -> TRUNK.5061: TLSv1.2: Handshake Protocol: Client Hello (len 260)

TRUNK.5061: 3CX -> TLSv1.2: Handshake Protocol: Server Hello (len 58)
TRUNK.5061: 3CX -> TLSv1.2: Handshake Protocol: Certificate (len 2589)
TRUNK.5061: 3CX -> TLSv1.2: Handshake Protocol: Server Hello Done (len 4)

3CX -> TRUNK.5061: TLSv1.2: Alert (Level: Fatal, Description: Unknown CA) (len 2)
Okay, so:
- there is traffic (no DNS error, and there is a service);
- they both speak TLS, and the same version at that;
- the 3CX speaks of an
Unknown CA.
Okay. Let's upload the intermediate certificate then. If we
scroll up to the openssl s_client command above, we can
find it in the second certificate block. Save it as
intermediate.pem and upload it.
Also wrong! Same error, same TLS handshake failure.
Instead, the 3CX really really wants us to get the root certificate. It could be found like this:
$ openssl x509 -in intermediate.pem -noout -subject -hash -issuer -issuer_hash
subject=C = US, O = Let's Encrypt, CN = Let's Encrypt Authority X3
4f06f81d
issuer=O = Digital Signature Trust Co., CN = DST Root CA X3
2e5ac55d

$ ls -l /etc/ssl/certs/2e5ac55d*
lrwxrwxrwx 1 root root 18 mrt 12  2018 /etc/ssl/certs/2e5ac55d.0 -> DST_Root_CA_X3.pem

$ openssl x509 -in /etc/ssl/certs/DST_Root_CA_X3.pem -noout -subject -hash -issuer -issuer_hash
subject=O = Digital Signature Trust Co., CN = DST Root CA X3
2e5ac55d
issuer=O = Digital Signature Trust Co., CN = DST Root CA X3
2e5ac55d
Very well. After uploading DST_Root_CA_X3.pem, things
started to work. Now, if only 3CX could work on their error reporting.
2020-01-20 - python3 / opengl / 2d example
What are the ingredients you need to create a basic OpenGL application? For starters, you'll need a window, you'll need to be able to display some text and you'll want to capture keyboard some responses. And, see that window drawing and redrawing works.
Here's an annotated Python3 example. Starting with the imports:
#!/usr/bin/env python3
# wjd-opengl-example-2d-text // Public Domain // OpenGL test (wdoekes, 2020)
# requires: PyOpenGL (python3-opengl) [tested with 3.1.0]
import functools
import sys
import traceback

from ctypes import POINTER, c_char, c_ubyte
from OpenGL.GL import (
    GL_COLOR_BUFFER_BIT, GL_DEPTH_BUFFER_BIT,
    glClear, glLoadIdentity,
    glColor3f, glOrtho, glRasterPos2f)
from OpenGL.GLUT import (
    GLUT_RGBA, GLUT_DOUBLE, GLUT_BITMAP_8_BY_13,
    glutInit, glutInitDisplayMode, glutInitWindowSize,
    glutCreateWindow, glutMainLoop,
    glutPostRedisplay, glutSwapBuffers,
    glutDisplayFunc, glutKeyboardFunc,
    glutBitmapString)
Constants and a text buffer, which will be the "text editor buffer".
# Window width and height
window_width, window_height = 500, 500

# Colors are always supplied as 3-tuples of floats in [0..1]
COLOR_GREEN = (0.0, 1.0, 0.0)

# Global text buffer
text_buffer = '\n'.join([
    'Please type something here, or press ESC to quit.',
    '',
    'Hello World!',
    'Hall\u00e5 V\u00e4rld!',   # Swedish, to test ISO-8859-1
])
Helper functions, not directly related to OpenGL:
def exit_1_on_exception(func):
    """
    Wrapper for callbacks, so we die immediately in case something is
    wrong.
    """
    def _wrapper(*args, **kwargs):
        try:
            return func(*args, **kwargs)
        except SystemExit:
            raise
        except BaseException:
            traceback.print_exc()
            sys.exit(1)
    return functools.wraps(func)(_wrapper)

def string_to_cbuf(string):
    """
    Conversion magic, converting unicode strings to C-strings.
    """
    # You could speed this up, by keeping a static buffer. But then you
    # need to pad the input to the buffer size (because from_buffer_copy
    # requires at least the buffer size).
    # (iso-8859-1 for GLUT_BITMAP_8_BY_13 and friends)
    bstring = (string + '\0').encode('iso-8859-1', 'replace')
    buf = c_ubyte * len(bstring)
    # The result is compatible with an LP_c_ubyte, but you may need to
    # cast it to a c_char_p.
    return buf.from_buffer_copy(bstring)

LP_c_ubyte = POINTER(c_ubyte)  # noqa
c_char_p = POINTER(c_char)
The actual OpenGL calls, called by the GLUT (OpenGL Utility Toolkit).
@exit_1_on_exception
def setup_2d_drawing():
    # Set 2D projection. Swapping 0.0 and window_height causes the
    # window coordinates to grow downwards, as you're used to when
    # doing 2D drawing.
    glLoadIdentity()
    glOrtho(0.0, window_width, window_height, 0.0, 0.0, 1.0)

@exit_1_on_exception
def on_draw():
    print('on_draw')

    # Clearing is needed, or removed characters won't get erased.
    glClear(GL_COLOR_BUFFER_BIT | GL_DEPTH_BUFFER_BIT)

    # Text coordinates are also from the top (because of glOrtho
    # top-bottom swap). The glRasterPos2f sets to bottom-left pos of the
    # first character.
    glColor3f(*COLOR_GREEN)  # a 3-tuple of floats in [0.0, 1.0]
    glRasterPos2f(2, 13)     # ypos at bottom of 8_BY_13 char
    text_cbuf = string_to_cbuf(text_buffer + '_')
    # text_width = glutBitmapLength(GLUT_BITMAP_8_BY_13, text_cbuf)
    glutBitmapString(GLUT_BITMAP_8_BY_13, c_char_p(text_cbuf))

    # We have been drawing on the back buffer, so it isn't visible. Move
    # it to front.
    glutSwapBuffers()

@exit_1_on_exception
def on_keyboard(key_bchar, mouse_x, mouse_y):
    """
    Keyboard callback: processes keystroke (changes text buffer)

    Args:
        key_bchar (bytes): A single character bytestring
        mouse_x (int): X position of mouse, relative to the left of window
        mouse_y (int): Y position of mouse, relative to the top of window
    """
    global text_buffer

    key_int = ord(key_bchar)
    print('on_keyboard: key=0x{:02x}, mouse=({},{})'.format(
        key_int, mouse_x, mouse_y))

    if key_int in (0x03, 0x04, 0x1b):  # ^C, ^D or ESC
        sys.exit(0)
    elif key_int == 0x08:  # Backspace
        text_buffer = text_buffer[0:len(text_buffer) - 1]
    elif key_int == 0x0d:  # Return (Enter)
        text_buffer += '\n'
    elif key_int >= 0x20 and key_int not in (0x7f,):  # (any printable char)
        text_buffer += chr(key_int)

    # Notify that we want the screen redrawn.
    glutPostRedisplay()
The actual OpenGL calls, called by the GLUT (OpenGL Utility Toolkit).
def main():
    # Main window setup.
    glutInit()
    glutInitDisplayMode(GLUT_RGBA | GLUT_DOUBLE)
    glutInitWindowSize(window_width, window_height)
    # Optional: suggest to window manager where our main window should
    # be placed. Without it, it will choose a sane location.
    # #glutInitWindowPosition(0, 0)

    glutCreateWindow('\u00a1Example!'.encode('iso-8859-1'))  # with reverse '!'
    glutDisplayFunc(on_draw)
    glutKeyboardFunc(on_keyboard)
    setup_2d_drawing()

    glutMainLoop()

if __name__ == '__main__':
    main()
Run the above, and you should get a super lame text editor window.
Obviously it's not that useful, but it demonstrates the minimum amount of calls you need to make, to get some basic keyboard input and text output in an OpenGL application.
2020-01-19 - python3 / opengl / glutbitmapstring argumenterror
When trying to display a simple bit of text in a Python-coded
OpenGL window, using the simplest possible means
(glutBitmapString), I got an ArgumentError that was
uncalled for.
>>> glutBitmapString(GLUT_BITMAP_8_BY_13, text)
Traceback (most recent call last):
  File "<stdin>", line 1, in <module>
ctypes.ArgumentError: argument 2: <class 'TypeError'>: wrong type
The problem is that text argument.
If we try to call its friend glutBitmapLength with the
same C signature, it does work. Let's see this example with
glutInit() to set things up:
>>> from OpenGL.GLUT import *
>>> from ctypes import *
>>> glutInit()
[b'foo']
>>> glutBitmapLength(GLUT_BITMAP_8_BY_13, b'Hello World')
Traceback (most recent call last):
  File "<stdin>", line 1, in <module>
ctypes.ArgumentError: argument 2: <class 'TypeError'>: expected LP_c_ubyte instance instead of bytes
Okay, so we need an LP_c_ubyte.
>>> text = (c_ubyte * 12).from_buffer_copy(b'Hello World\0')
>>> glutBitmapLength(GLUT_BITMAP_8_BY_13, text)
88
Good! And since glutBitmapLength and
glutBitmapString have the same argument signatures, we
can call glutBitmapString, right?
FGAPI int  FGAPIENTRY glutBitmapLength( void* font, const unsigned char* string );
FGAPI void FGAPIENTRY glutBitmapString( void* font, const unsigned char *string );
Wrong.
Apparently something is changed during the marshalling boilerplate, seeing that these two Python signatures are different:
In OpenGL/raw/GLUT/__init__.py (from
python3-opengl 3.1.0+dfsg-1):
# /usr/include/GL/freeglut_std.h 503
glutBitmapLength = platform.createBaseFunction(
    'glutBitmapLength', dll=platform.PLATFORM.GLUT, resultType=c_int,
    argTypes=[c_void_p,POINTER(c_ubyte)],
    doc='glutBitmapLength( c_void_p(font), POINTER(c_ubyte)(string) ) -> c_int',
    argNames=('font', 'string'),
)
But in OpenGL/GLUT/freeglut.py (same package), we have:
# /usr/include/GL/freeglut_ext.h 90
glutBitmapString = platform.createBaseFunction(
    'glutBitmapString', dll=platform.PLATFORM.GLUT, resultType=None,
    argTypes=[c_void_p, c_char_p],
    doc='glutBitmapString( c_void_p(font), POINTER(c_ubyte)(string) ) -> None',
    argNames=('font', 'string'),
)
Notice that c_char_p there. A simple cast does the trick:
>>> glutBitmapString(GLUT_BITMAP_8_BY_13, POINTER(c_char)(text))
Or, alternatively, a different source buffer:
>>> text = (c_char * 12).from_buffer_copy(b'Hello World\0')
But one does wonder where that conversion got borked. It appears to
be wrong, as the docstring mentions c_ubyte.